The Monmouth cap was known by name in the mid 16th century, but probably dates back to the 15th century. The cap, first knit in Monmouth, Wales, became a staple clothing item for middle class English, workers, sailors and soldiers alike. One existing cap is made of rough, two plied yarn, with only 59 stitches for a 22 inch circumference.
I wasn't going to use rough yarn because I'm still in the midst of spinning for the hood project and my spinning wheels are in use. I don't spin yarn that thick on a regular basis. I have loads of yarn around but nothing in that grist. I dug out the walnut dyed yarn from earlier this fall. The pictures I looked at, show the hats features fairly clearly and written descriptions are quite detailed as well. Some have a button on top, some don't. They seem to be fulled and have a hanging loop at the bottom. They have a doubled brim and fit quite closely. So, I knitted up a swatch and figured out what gauge I'd need and went from there. It seems to be a fairly straight forward project.
Materials - Paton's Classic Wool - 1 skein
Needles - 1 set double points, 1 circular needle.. I think it's in 4.5 mm but the needles are ancient or scrounged and I've no idea for certain. I'll edit the size when I actually get a needle gauge and know for sure.
Gauge- 5 stitches per inch ( more important info than needles anyway!)
skills needed - cast on, stockinette stitch, purl stitch, pick up stitch, knit 2 together
Cast on 100 stitches.
Place marker before first stitch and carefully join without twisting.
Knit for 2.25 inches.
Purl one row.
Knit for 2.25 inches.
This is the brim. The row of purl stitches makes a convenient fold. Fold brim up to the inside of hat.
Matching row for row, pick up one stitch from the bottom edge (now folded) and knit together with the working stitch of the same row. Work the entire hat brim this way, catching each row to the hat body. This creates a finished edge and no need to sew the brim to the hat later. Keep track of the marker for the start.
Knit until hat measures 5.5 inches from purled edge.
Start decreases...
Knit 8, knit 2 together - repeat for entire row
knit
knit
knit 7, knit 2 together - repeat for entire row
knit
knit
knit 6, knit 2 together - repeat for entire row
knit
knit
knit 5, knit 2 together - repeat for entire row
knit
knit 4, knit 2 together - repeat for entire row
knit
knit 3, knit 2 together - repeat for entire row
knit
knit 2, knit 2 together - repeat for entire row
knit
knit 1, knit 2 together - repeat for entire row
knit
knit 2 together - should be 10 stitches on needles
knit
cut yarn, leaving a 15 inch tail. Thread yarn through 10 stitches and tie off, weaving in the tail
weave in the tail at the inside brim.
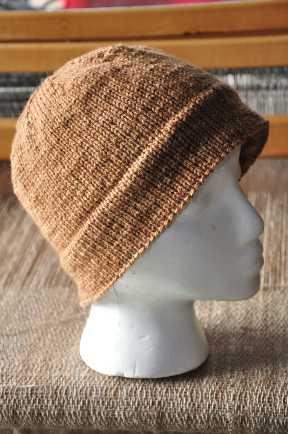
ta da... done..
I love it! Thanks for sharing.
ReplyDeleteThis is adorable!!! I'm going to finish mine a little different. My daughter wears her hair back in a pony tail just about 90% of the time and I can see this with an opening in the back with a draw string to close it. I will be sure to send you a pic when it's finished. Thanks for such a great pattern. I love the way you did the brim. Barbara
ReplyDeleteIt looks wonderful. I like your idea of double at the ears - much warmer.
ReplyDeleteThis is a really great hat! Thanks for providing a pattern!
ReplyDeletei love the simplicity of it. thanks for sharing!
ReplyDeleteIt's a wonderful cap. Thanks so much for sharing the pattern. I'm going to have to make one, one of these days.
ReplyDeleteI knit this in cascade 220 with size 8 needles. Used up the remnants of 2 balls of complementary colors.
ReplyDeleteEasy knit -- I finished off the top by just K2tog all around and then a row of stockinette and then K2tog again until I was down to 9 stitches. Worked really well and fits my 22" head quite nicely.
Not so very different from modern day hats...why fix what ain't broken as they say! I like the sizing tip...I have a huge melon and have trouble making/finding knit hats that fit me!
ReplyDeletePS Try to fix your link on the Challenge facebook page. It isn't including the last bit so I had to work a bit to see this! And it is worth coming to see!
I have a question:
ReplyDeleteI am new to knitting and I'm wondering if the "knit" between the decrease rows means I should knit a full row before I move on to the next decrease row? Thanks so much!
Lovely hat. REALLY lovely hat! Thank you for the pattern!
ReplyDeleteLooks like a good chemo hat.
ReplyDeleteI too wonder if the knit between decrease rows means a whole row.
Delighted with this hat. Managed to knit it across three evenings with two strands of cheapo DK. A lovely snug and warm hat
ReplyDelete