Pages

April 26, 2017

Signs of spring

 There are signs that spring is really here!  There are leaves on many of the trees.  In town, where it seems to leaf up a little earlier than out in the country, there is already a canopy of green.  The magnolia trees were flowering and so beautiful.  Magnolias are a bit of an iffy proposition as we can get late frosts which stop the flowering abruptly some years.

The leaves are bursting forth out in the country too.  This photo was taken a few days ago.  Yesterday there was the slightest green haze on the trees, but today, they are that bright spring green.  So pretty!
The currant bushes are getting ready to flower.  The one on the left is a native currant bush while the one on the right is a European currant variety.   Both are supposed to be hardy in this area.


The tulips are in full bloom today, but yesterday they were just starting to open.  The sunny daffodils have been happily blooming for a few days now.


These are some of the Japanese Indigo seeds that I started early this year, in hopes of getting them to seed.  I transplanted the seedlings into several larger pots.  This one is doing the best.  You can see that the leaves already have a bluish cast to them, so they are developing pigment.  I need to transplant them again, into a larger pot which will go outside, but there is still too much of a frost risk to do so yet.  They are doing much better than I'd expected, so this is making me very happy. 

The Hyacinths are out in full force.  They are beautiful and I love the scent.  However it's been grey, dull and too cool for the scent to throw far, or it's been warm and too windy.  Either way, I get to see them, but having a cup of tea on the deck, surrounded by the scent of the Hyacinths has not happened yet this year.

April 21, 2017

This week's wrap up


This was another week where it felt like I didn't accomplish very much, but I know that I did.  The grey skies and torrential downpours certainly didn't help, not did the intermittent wifi connections which seem to mess everything up, especially watching the hockey play offs.   On Easter Sunday I was at Westfield, where I demonstrated Pysanky making.   I love talking with the visitors as there are some really interesting people.  I did keep one egg from slithering off in the hands of a very sneaky child, but lost one to a lollipop laden child who drooled on one egg, causing the dyes to run.    I moved the tablecloth back before I started working with the wax and lit candle, so that I didn't drip on it.

The second skein of S twist singles from the Falkland top is off the wheel and wet finished.   It is ready to go but I'm trying  to decide whether to dye it with natural dyes or if I should just use acid dyes.   It shouldn't be such a big deal I guess, but right now the husband is making the new counters, making thorough planning a necessity.  There is no way I want to be caught finishing up a dyeing project when he wants to be fussing with the new countertops.   The small one done for an learning experience is gorgeous, so counters get the go ahead and dyeing takes the back seat for the moment. I'm waiting to put the spin patterned project on the loom until the yarn is dyed.  It really is easier to dye the yarn than the yardage.  There are probably close to 1200 yards in total of the singles, spun 38-40 wpi.  I'll definitely be putting on a dummy warp for this project.

I thought I was out of the naturally coloured cotton, with only a small sample packet of the varieties of "easy spin" cotton sliver.   However I found 100 g of naturally green cotton hiding on a shelf.  I started spinning it up just to keep the cotton technique going.  Cotton sliver is often easier to spin from one end than the other.  This seems to have an oddness about it and I find myself switching from end to end sometimes, just because it seems to want to clump in places.  Other areas seem to spin normally.  I'm finding those awkward areas are prone to a bit of uneven spinning, which makes me a bit unhappy.  That being said, it's still pretty nice yarn.  It will be plied together and get tossed in my bag of plied cotton waiting for a bigger project.

This is the main reason  for feeling like I've been a bit unproductive.  I've wanted to play the banjo for about 20 years but they aren't cheap instruments and there was always something more important.   However, one of these fell into my hands last week.   It is awesome and I've been practicing and practicing.   It's a bit slow going because I have little experience with stringed instruments.  However it is indeed going forward and I'm making some progress.   Without any instructors locally, I'm currently relying on a series of online lessons available through the library, several other online lessons, a couple of books and a husband who doesn't play the banjo, but plays other stringed instruments and is helping me out.   There are two main styles, of which I am currently playing neither, but I'm playing, so I figure all is good.   
Now if only the sun would shine, because I'm tired of all this grey weather.


April 17, 2017

Waffle Weave update, spring cards and woad seed planting

I hemmed all the waffle weave cloths by machine, which meant that they actually got hemmed in record time.    I had tried several different treadlings for the hems, but after trying them all, I preferred to just weave the hems in waffle weave.   They seem to look and act the nicest in the finished towels and are pretty easy to hem.
The two cloths I did with purple cottolin weft, were folded into bunny shapes.  I used them to hold hand poured vanilla scented candles. They are votives and now I'm thinking that I should have put them in votive holders, to make sure the kids burn them safely.  This one isn't waffle weave, but an inadvertent birdseye twill, because I set the treadles in correctly for the pattern I was using.   I even tested and checked it, so I really wasn't paying attention that day as I was halfway through the towel when I noticed it.
I carved this block of spring flowers.  I was thinking about a friend who loves snails, so I added a little snail to the picture.   My son's girlfriend thought they were pretty neat and suggest I sell these on Etsy.   I thought that was a rather nice compliment.
I planted some more Japanese Indigo seed, these ones are destined for the garden, whereas the first batch was grown early, in order to try to produce my own seed.   I also planted some woad seed.   I used old seed and only a few germinated.  I took some of that seed and soaked it overnight, and a few more germinated.  I soaked some seed overnight, layered it in paper towels and set it in a plastic bag, like that grade school science experiment with beans.   A few more seeds germinated.    Then I found the last remaining seeds that a friend gave me more recently.   I soaked those over night and planted them.  So far, none of these last batch have germinated.   But... (happy smile here ) so far enough of the old seed has germinated, using all those extreme methods, that I should have enough to play around with woad pigment later this summer, if I can keep them alive.  I think I have 20 seedlings so far.  If the fresher woad germinates, then I'll have a safety net as well.

I have fresh Madder seed if anyone needs any.  It's from last fall.


April 12, 2017

Pysanky Process

Apparently, like icons, pysanky are written, not drawn.   There is lots of symbolism in the designs.  The first found wax resist dyed egg dates from about the 15th century.  There are decorated eggs found from the neolithic era, although they are made of ceramic.   There is an ancient history for decorated eggs, that is for sure.
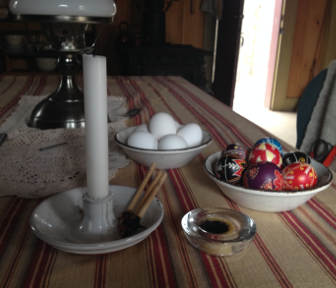
 2 kistka and a beeswax disk used to draw the wax lines on the eggs.   The small, pointed tip of the kistka is heated in a candle flame, then dipped in the wax, which melts and fills the reservoir, allowing lines to be drawn on the egg shell, like a pen.   Lightly drawn pencil lines can be used as guidelines, especially useful for long, straight lines.  The beeswax turns black when the candle soot mixes in.   This makes the wax easier to see on the egg, but doesn't affect the outcome.
 All the areas which you want to be white are covered with wax first.  The the egg is dipped into the first colour.   Once the egg is dyed to the desired depth of colour, it is removed from the dye and allowed to dry.  Then the areas which you want to be the next colour are covered with wax.   Here the orange egg has been dyed twice, with the white, yellow and orange areas covered with wax.  The dyes need to be applied in a particular order.  Green can contaminate other colours so is often painted in areas specifically and then covered, rather than dipping the whole egg in the dye.  Blue and green are usually dyed before red, but the blue will make the red turn a bit purple, so it is useful to plan out the colours ahead of time.  Brown eggs may not show all the colours clearly and the colours won't be as bright s on white eggs.

.
 The orange egg has been dyed red, but of course I took the photo before the red areas were covered.  The yellow egg took quite a while to cover all those triangles.   It took several hours in 2 different sessions.   You would think that the black sooty wax would show the areas missed when trying to completely cover an area, but it doesn't really.  
To remove the wax after all the dyeing is complete, the egg is held near the flame and the wax is wiped off as it melts.  You can only do a small area at a time as the wax cools down fairly quickly.  I'm a little disappointed in the yellow dye.  It has weakened fairly quickly and it doesn't dye the eggs evenly.  I don't know if that is an issue with the eggs or the dye.  Because of the weakness of the yellow dye, the contrast on the yellow and white triangles isn't quite enough to be really effective.  On the other hand, the purple egg, which is a replacement for the one I found cracked, is much nicer than the one that I originally made. 
I've 6 finished, although I really made 8, but 2 had cracks in them.   I might have time to make 1 or 2 more before I need them to fill the Easter Basket.


April 11, 2017

The week before Easter

I cut the purple waffle weave off the loom on Sunday and wet finished it.   I started sewing between each piece, to secure the threads when I ran out of thread of an appropriate colour.  I had no white thread left and only purple of an odd shade which looked horrid with the towels.  I had to go to town anyway yesterday, to get to the guild room, run some errands and get my cute little car in for an oil change, so I just added one more stop to pick up some thread.  Hopefully I'll get started on hemming the face cloths tonight.  This run of face clothes was done at a sett of 24, which makes for a very nice looking fabric.  I'm going to do a comparison of the waffle weave I did at sett 20 and these at sett 24.   The slightly looser ones have a lovely drape are are soft and absorbent when in use.  It will be interesting to see if these work the same way.

I started on the candy for the Easter Basket.  Milk chocolate rooster lollipops and peanut butter filled, dark chocolate frogs.  This is pretty easy stuff, melt the chocolate, pour in a mould, chill till hardened, pop the candy out and bag.  The gold twist ties make them look special though.  I wonder if I should get some jelly beans to add a bit of candy colour?

Every Easter basket needs Easter eggs.   It is hard to believe that it takes about 3 hours per egg to make these, and these are simple pysanky, done mainly freehand.  There are fancy electric kistka, the stylus used to spread the wax, lathes to make lines perfectly straight and even etc.  I just use a candle, a little tub of beeswax and very basic kistka, although I have 3 different sizes for thick, medium and thin lines. The one on the bottom right egg was cracked, so I need to make a replacement.   The blue egg, has turquoise details, but the colours are too similar to show well.  I'll redo that egg as well. I was supposed to demonstrate these on Friday, and then could give them to my kids on Sunday.  I was going to use these as samples for the demo.  However, because of a work schedule, we're gathering on Friday, so the original plan won't work, if I'm able to switch the demo to Sunday.   Not sure how I'm dealing with that yet.

I just realized that this stuff should all have been done last week, to keep this shorter week less rushed.   I guess that didn't work out in my planning.


April 06, 2017

Spin Patterning project update

Spin patterning project update...

I've spun about 1000 yards of Z twist singles from the Falkland top. They are wet finished and dried on the niddy noddy to keep the active twist tamed for the moment.   I am pretty sure that I'll size them using double strength gelatin because that is the process I've used successfully with wool singles before, but I'm still thinking about it.  They are very evenly spun, the twist is consistent and they seem to be quite strong, so I might not bother with the sizing.

I've started on the S twist singles, which look pretty much the same from a distance.  Except for the way the bobbin spins, and the way you need to twist the thread when you want to thin out a slub, it all spins the same.  Because of this sameness, I am spinning some Blue Faced Leicester sliver on the Sonata, just to switch things up.   The funny thing is that it's off white, so still white but it's destined for a dye pot, so it feels different, even though it isn't.  

I almost wound off the partial bobbin to free it up and start spinning some cotton for a demo day at the Marr shop at Westfield Heritage Village.  I'd started the process and put it back on, deciding it wouldn't matter.  Wouldn't you know that over half the visitors asked about cotton and it would have been the perfect teaching opportunity.  I spent the day spinning with Cat, who grows and processes flax.  She's really interesting and great fun to chat with. 
I put a narrow waffle weave project on the loom.  There are 2 threading errors.   I noticed them almost right away, while I was testing in the first inch of weaving.   However, I realized that I'd have to re-thread 3/4 of the heddles.   I looked at my timeline and decided that I really didn't want to spend 2 more days redoing the heddles and then rethreading the reed, thereby having to rush the weaving and finishing of the project.   These need to be woven off, wet finished, hemmed and turned into decorative bunnies before next Friday.  That timeline means my kids will get bunny shaped face cloths with threading errors.  The waffle weave should hide them pretty well though.

I'm reading some textile books at the moment, Ann Richards' Weaving Textiles That Shape Themselves, which is really interesting and Susan Faulkner Weaver's Handwoven Tape: Understanding and Weaving Early American and Contemporary Tape, which is just a little dryer but still really interesting, and finally an old copy of American Woven Coverlets by Carol Strickler which is my "easy" read for sticking in my bag when I have to sit around waiting for any reason.


April 01, 2017

Colours of April

Today I wandered out to the front garden to see if I could pick a bit of cat nip.  It grows there as a weed and Kevin especially, likes it when it is very fresh and very young.  Well, I only found a few little tiny catnip leaves, but I did find all sorts of other cool stuff.
The maple trees are flowering!   It is such a glorious sign of spring.  The flowers are tiny and a deep red colour, but they give the illusion that leaves are coming.   I noticed that the weeping willows are starting to turn that lovely early springtime yellowy green.  While we haven't had an awful winter, it does feel like we are really ready for spring.   I had to scrape off an inch of snow off my windshield on Thursday, and I am so over that fun!

The grackles and starlings have been flying overhead, in large, noisy flocks.   When I kept the bird feeder full through the springtime, we used to get an awful lot of birds nesting nearby, eating at the feeder and screeching their calls and birdsong in ways which were no longer charming.   Now, the feeder is empty and most of the grackles and starlings move on.   It's not nearly as loud here in the mornings anymore and it costs a whole lot less in bird feed as well.

The Siberian Irises are blooming.  What a tiny but vibrant flower!  There are these lighter violet colours with the yellow markings and a dark purple with white markings.   They are only a few inches tall but such a fancy little package they are!

The crocuses are looking a little ragged though.  First, I think I need to do some serious weeding and toss them a bit of fertilizer or compost.  Second, the chooks dig around the flower beds looking for bugs and worm.  They tend to tromp over the poor flowers.  Still, they are a pretty burst of colour this time of year.

I've naturalized some winter onions.  They are a perennial which are sometimes called Egyptian Walking onions.  They grow little onions at the top of a flower stalk, which falls over and the onions will self seed.   I tend to just pick them and plant them where I want them to grow.  They are ready to start harvesting.   These are quite sweet and really, they can be eaten out of hand if you are so daring.  In a quick lunchtime soup, they are a lovely addition.