Pages

October 31, 2013

Pumkin Sunday

Pumpkin Sunday was a lovely day.  I knew it was going to be cool and I would be outside, so I dressed appropriately, with lots of layers.   When I left home the weather was sunny and the sky was blue.  However, the closer I got to the museum, the skies became darker and drearier.   So much so, that I popped into the costume department and grabbed a cloak to ward against the chill which invaded when the sun was hiding behind the clouds.   Part way through the morning, it rained a miserable, cold rain.  All said the icky weather was less than half an hour and then we went between sun and cloud for the rest of the day.  Eventually I just tossed the cloak aside because I didn't need it when it was sunny and it was becoming too much work to put it on and take it off.

I was pretty lucky as well because people look after each other here.   I was loaned an umbrella, brought a cup of very interesting herbal tea which tasted very much of chocolate and was fed steaming hot potato soup for lunch.   I worked with a young lady who despite being only in grade 7, was interesting, personable and quickly picked up what we needed to do for the demos.  She jumped right in and helped out in a most welcome and useful fashion.   It made for an enjoyable afternoon.

We did a lot of baking, almost all of it pumpkin related.  Not only did I bring pumpkin foods to bake, but a friend did as well.   There were two different pumpkin pie recipes.  Mine was from Miss Beechers Domestic Receipt Book from 1850, which was my cook book choice of the day.   I'm not sure of the providence of the other pie recipe as someone else brought it for me to cook, along with a bread pudding stuffed in a pumpkin.   I made a pumpkin corn bread (Miss Beecher 1850) which disappeared pretty quickly as samples.  I also made a pumpkin yeast bread, based on the corn bread recipe which wasn't period at all, but wanted a contrast to the corn bread.    I tried my hand at a raised paste pie, using Hannah Glasse's The Art of Cookery Plain and Simple, 1740, Cheshire Pie recipe.  It's a pork and apple pie which is amazingly delicious. 

The recipes were pretty delicious.  The pumpkin corn bread was fairly plain, having no sweetener in it and it probably could have used a tad more salt.  If one were to add a couple of tablespoons of sugar or honey to it, the recipe would have been more appealing, although it was well liked. 

Miss. Beecher's Pumpkin Bread ( 1850)

Stew and strain some pumpkin, stiffen it with Indian meal, add salt and yeast and it makes a most excellent kind of bread.

1.5 tsp yeast
1/2 tsp salt
1.5 - 2 cups pumpkin
Corn meal
2 tsp sugar
1 cup warm water

Mix sugar into warm water and stir until dissolved.  Proof yeast in water mixture for about 10 minutes or until it starts to bubble up nicely.
Stir yeast into pumpkin, adding salt.  Mix well.   Add corn meal until batter is stiffer than a cake batter but not as firm as a bread dough.  I think I used about 3 cups of corn meal.   The actual amounts will depend on how moist your pumpkin is.   Pour batter into greased pan.  Let rise for about 40 minutes.  Bake in a pre-heated oven, about 375° F, for about 35 minutes or until centre comes clean when tested with a toothpick and bounces back. (190° on a baking thermometer)

I'm guessing at the oven temp and time because the bake oven was actually 450° but cooling fairly quickly due to a breeze which had popped up unexpectedly.  I'd check after 20 minutes though.  I didn't bother to use a toothpick as just pressing lightly on the top of the cake and having it bounce back is pretty reliable.  I doubled the amount of salt I originally used.  If I were eating this with a stew or other savory dish, I'd not bother with a sweetener, but otherwise, I'd add 1/4 cup of sugar or honey.   If I were eating it with chili, I'd add a whole whack of diced jalapeno to it, whether it was period or not!

October 24, 2013

The Icelandic Fleece

Yep, woke up to snow this morning
All I can say is Wow!!!!!    So far this fleece is amazing.  I'll admit, I haven't tipped it out of the bag yet and examined the whole thing.  I
purchased it on examining a few pulled locks and the colour.  It's cold and wet outside so not really conducive to spreading out a fleece.  The two cats would go nuts if I unrolled the fleece inside.  Except for the scary part of the cellar, there really isn't a good place to unroll it in the house, since the laundry room is still under renovations.  (Nope, I'm not going into the scary part of the cellar, because did I mention... it's scary!)

I dug out my good old window screen for washing separate locks.  I put a small handful of locks in a lingerie bag and laid out a single layer of locks in 2 separate packets.  I washed them at the same time.  When dried, I realized that the handful washed in the lingerie bag had not only lost most of the lock structure but also looked like it was starting to felt up.  It pulled apart easily, but not something I wanted to risk with the rest of the fleece.   However, the single layers of separate locks were perfect. 

The fleece isn't overly full of lanolin, something I've found that can happen with pet sheep kept in perfect conditions.    Medium grade fleeces like Shetlands with more lanolin than a Merino fleece, are just a pain to wash, but that can easily happen with happy sheep.  So far this Icelandic fleece is also beautifully free of VM, with only a few pieces of easy to pick out large bits of straw.   I'm so looking forward to processing this pretty fleece.

Two types of locks on this Icelandic fleece
Right now though, I'm washing.   Every morning, I align a layer of locks each of my 4 bits of window screen, pin them together and wash them.  It takes 2 soapy soaks in hot water and 2 rinses to get them clean.  Then I lay them out and dry them.   I might pick up more window screening because at this rate, I'll still be cleaning Icelandic fleece next July.

So far I've found 2 types of locks.  The tight curls of the shorter locks and the longer curls with practically no curl.
Tog (long, dark fibres) and Thel (short, soft fibres) are separated


I pulled the Tog and Thel from some sample locks.  With a very quick and easy tug, the two separate, with no fuss or muss.   Oh they are nice.  The longer, darker Tog is definitely coarser, but not awful. The soft, pale Thel is gorgeous.  It is so soft and yummy.    If I had several fleeces to play with, I would seriously consider playing around with spinning the Tog and Thel separately for a strong Tog warp and a soft Thel weft, as suggested by some of the Greenland finds.  However, with only one fleece, I'm not sure how much fibre I'll have to play with,  once it's washed.

October 21, 2013

Fleece Festival and Finished Projects.

The Woodstock Fleece Festival has come and gone.  My guild puts together a booth, demos and offers a class every year.  This year, the class had a limit of 6, which was quickly filled and expanded to 18 spaces.  Phew, I was glad that I wasn't teaching that one, but rather was one of the demo crew for the day.  I sat at my wheel and spun for the entire morning, which is always fun. I enjoy answering questions about the technical aspects of how a wheel spins, how to actually spin and about spinning wheels in general.  This year I had lots of questions about the type of wheel I was spinning by a number of people who were interested in the Kromski brand.   Of course there is the inevitable shopping.  This year I pre-ordered most of what I wanted and allowed myself 1 or 2 impulse purchases, so kept the budget well in control.  The next day I realized I'd forgotten one of the impulse purchases that I'd wanted, so while I'm disappointed as missing this fall's issue of Jane Austen Knits, I don't mind having spent less money.

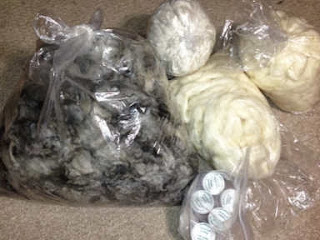
What I did get was a glorious Icelandic fleece from Willow Garden.  They had lovely fleeces and this
one seems to be fairly low in veg. matter and other contaminants and the varigated grey colour is spectacular.   The Tog or long coarser hair is very dark, almost black while the Thel or inner coat is so very soft and ranges from a light to medium grey.   It will be fun to work with, I'm certain of that.  There is also  Blue Faced Leicester sliver , some Merino/Cashmere blend rovings and some acid dyes.   Both cats decided that the Icelandic fleece was something to paw over and I had to hide it, at least until I get it washed up, nice and clean, not smelling quite so much of fresh sheep.

I finished up the chemise.  It was a quick project, only take a couple of hours to sew it up, including hand work.  It was really meant to be a wearable muslin so it wasn't made with expensive materials.  Good thing too as I don't really like it.   It misjudged the size so it's too large.  It's also too long, which if I liked wearing it and it fit, would be an easy fix.  Mainly, it has this weird, mandated by the pattern construction instructions, unfinished internal seam, which drove me buggy when sewing it up.  It's something that I've decided that I can't live with, so the chemise will become a nightgown and I'll find a better pattern.  No lace or tucks on the next chemise either.  It's just too much and unnecessary frou frou, for a garment meant to be used while working at the Bake oven.  


October 16, 2013

Victorian Undies and the coolest sewing tool

I've recently found myself in a position of needing new costume clothing as most of mine is now way too big.  As I'm working the Bake oven for 2 Sundays in a row upcoming and the weather is noticeably cooler, I decided to start with 1865ish stuff.   Since you need to build these costumes in layers, starting with the inside and working out, I am replacing all the Victorian undies first.

I drafted a new pattern for the drawers and while I was testing the pattern hoping to make a useable muslin, I kept the decoration fairly low key, I didn't want them completely plain.  Even if nobody else will see them, I wanting something I knew fit in with period style ornamentation.  I started these a week before a family member was schedule for surgery and I was pretty stressed.  However, the pattern came together flawlessly or so I thought, with the most even, spectacularly perfect tucks I'd ever made, which I then noticed were on the inside of the drawers.  I think it might have been faster to bin them and re-cut the pattern, but I didn't have enough fabric left.  So after tossing them in a corner for a couple of weeks, I went to pick out the stitches and found that my seam ripper didn't make it home from Fruits of Our Labours back in May.  Back in the corner they went until I could get a new seam ripper and dump the lethargy of a rapidly failing project to go at those tucks again.

The threads came out easily while the nicely pressed fold lines didn't disappear, making it a little more difficult to fold them the opposite way and resew them.   They aren't as perfect second time around, but they aren't too horrible and I can live with them as functional clothing.   The eyelet edging I had considered for the hems of the legs was all wrong.  All the extant samples I've seen use cotton laces.  While I have a significant amount of cotton lace in my stash, most of it is narrower, being bought for doll clothes and for what was really supposed to be a sample, and might not fit, I wasn't going to use the good stuff.   I did find a bit of flat cotton lace in a rumpled ball, which after a bit of a pressing, turned out to be not really expensive lace, but quite suitable.  I did have to pull a gimp thread - the thicker heading at the top to gather it. I used a machine heirloom sewing technique to sew it on.  I've used them a lot for doll clothes and other projects which don't take any stress or wear and tear.  I hope it has the strength to stand up to actual wearing.

The two tucks are functional tucks, meaning they are put in after the legs are sewn together and they can be let down if more length is needed in case for some reason I suddenly grow 2 inches taller or damage the bottom edge and need to length them to keep using them.
They are constructed with flat-felled seams and facings to reduce chafing possibilities.  I dragged them out to a guild meeting last night where I finished the hand stitching although they still need a button and button hole on the front waist band.

Today I drafted out a pattern for a new Victorian chemise and had the fun of using my pattern notcher.  I have a couple of cool tools but this one never fails to amuse me and make me happy.  It makes the sweetest, most perfect little notches in patterns which work so much better than any I've put in with just nipping with scissors.  It's a solid feeling little tool which works perfectly every time and is just fun to use.  I'll have to admit it was a gift and something I'd probably have never purchased for myself but definitely adds enjoyment and makes patterns look much more professional!


October 11, 2013

Fall socks

My friend Maureen went to PEI to visit family, build a deck and do some touring around.  One of the places she stopped was Belfast Mini-Mills.  Not only do they make small industrial wool processing equipment, but they also process fibre there.    Maureen decided I'd need a keep busy project for a couple of weeks in September, so she surprised me with a care package of fabulous sock yarn.  I mean fabulous as in roll around in squishy, soft and yummy superwash sock yarn that feels as nice as the high end yarn, not the affordable stuff, or at least the yarn I can afford.   Honestly, if the colours weren't so perfect, I might have just sat around squishing the yarn rather than knitting it up.

She mentioned that they only had one skein of the pink.  When she matched it with the blue, that gal in the shop said it would make lovely stripes.  Apparently Maureen knows me quite well as she told her that more likely I'd make one sock in one colour and the second sock in the other.   She was right.  This yarn is much too nice to waste on fussy stripes.   I started one pattern and realized that the yarn was just a little splitty for the all over cable pattern I'd chosen, so I switched it to a simpler pattern which just runs down the outside of each sock.  It's a little fussy to knit, but the large area of plain stockinette stitch makes it a little faster and definitely has relaxing aspects to it. 

I love, love, love the colours.  I love the yarn.  The pattern is Deflect from Knitty, which is a lovely on line Knitting magazine.  They have great articles and tons upon tons of patterns in each issue.


October 09, 2013

Frustrations and Fun

I just spent the past week and a half spinning.  I carded, combed and spun with a mission.  I took my time so that everything was as perfect as it could be and then too my time spinning so that I had lovely, consistent yarns that I was happy with.

I started with some indigo dyed mohair locks.  There weren't enough, or so I thought, so I blended them with an equal amount of white mohair to make a yarn which would be a core yarn.  The instructions said it had to be tightly spun, so I did just that, spinning a smooth, higher twist yarn.

 Then I carded up some commercially dyed wool roving, again with an equal percentage.  I roughly blended the two colours and got this interesting green/blue blend which spun up beautifully.   I tried for something with less twist and fatter than the lovely  mohair singles.  The finished singles weren't quite as vibrant as I'd hoped but they were pretty enough for the job I'd planned for them.

I spent days spinning a lovely lemon yellow fine silk single to go with the above two.  I then tried my hand at 3 ply spiral plying and I can tell you that my results suck most spectacularly!  Not even worthy of a photo.    After 3 days of practice plying, just the spiral wrapping, not even the final ply, I know that sometime in the future I will be doing this whole darned thing over again, putting way less twist in the core yarn that the instructions say is necessary, because the Z twist core, wrapping with a Z twist wrap just wasn't gelling for me this week.  I was frustrated to the max and had used unpleasant words more than a few times, I'm sorry to say, while I drank way too much herbal tea and listened to way too many miserably sad country songs trying to find one which talked about loosing it while spinning.  Turns out they're all about losing women, dogs and trucks, not a single thing about a spinning wheel!

Last night, I headed off to the guild's Spinning Night.  It was a miserable drive in because this time of year, traveling west, puts the setting sun, exactly at my eye level and I'm too short for the sun visor on the truck to work for me in any useful way, unless that sun is just before or past high noon
.  However, when I picked up the room key, a cheerful Pat, our guild president, informed me it was her birthday and we had a nice, albeit short chat which put me in a much better frame of mind.  By the time spinning night was done, I was relaxed and having again.

Linda had brought a bunch of Mohair for us to play with. Mohair is the hair from Angora goats.  We had a lovely, green mohair 20% /Shetland 80% blend which spun like butter, mohair batts and mohair locks.  It was informal, informative and really good company.

This is the Mohair/Shetland blend.  I spun it as thin as I could, though it's really not a useful sort of yarn weight.  It would work for a strengthening thread for sock yarn perhaps, or a very fine lace weight.  However, it was fun to spin and fun to see if I could keep it that fine without breaking (yep, I did!) and fun to see just how much yarn I could get with the bit of roving we had to play with.  Linda was pretty generous though, so it wasn't difficult!   I'm now ready to start to battle the Level 4 Master Spinner homework again.  Phew..


October 01, 2013

It's a big, big hole in the foundation...

12 in deep x 30 in wide footing poured into hole in foundation
Ready to start laying the bricks and stones
 Sometime ago, many years in the past, the previous owners of this house decided to put in an oil furnace and tank and to add some electrical wiring requiring some electric conduit.   The entry space into the house foundation needed to be about 9 inches x 9 inches.  Granted, the foundation is field stone and quite thick but instead of knocking out one or two stones and making the hole easy to fill, they opened an area the size of a window.  To make matters worse, when they were done the work, they didn't actually fill the gaping hole back up and seal it.  Instead, they tossed a bunch of rubble brick and stone in the hole and put some plastic over it.  They left it.  They left a hole in the foundation large enough to let in animals larger than raccoons, skunks, possums, mountain lions and quite possibly even bear cubs.

We found the hole by accident, when my guys decided that the front flower beds weren't salvageable and were digging them completely up.  They found the seemingly massive hole in the foundation, which was loosely packed with crumbling and disintegrating rubble and had the remains of decades old plastic sheeting, shredded and pretending to offer some sort of protection against the elements and fauna of the area.

Yeah!  Almost done!!!!
I didn't get a photo of the actual hole before the repairs were started.  However in order to facilitate the brickwork, 3 bags of cement were needed to pour a footing about a foot deep. The hopes were to provide support for replacement masonry work.  Several bags of mortar were then used to do the brick and stone work to fill up the hole.  The whole job took the better part of a week and there is still a bit more to finish up, although it is work that can be done from the inside.

It continues to astound me when I think of how many short cuts and cheap solutions the previous owners took instead of just doing a job correctly the first time.  It's like every single simple repair or reno has turned into an epic repair job, even just removing wallpaper or changing out an appliance, sigh.