Pages

April 27, 2016

Blending project update

That blending board spree ended up using almost all of my leftover commercially dyed Corriedale top from the level 4 and 5, Master Spinner programs.  I have an 1880's chest of drawers which I use for fibre and equipment storage and the coloured bits of roving were taking up the bottom drawer.   My aim in doing this was to use up the rovings, free up some space and have a bit of a break from spinning the project fleece.  These are just a few of the blending board rolags that I made.  The orange is a bit misleading as it is much more orange than in actuality.   It was my least favourite of all the colour combinations, although I'd hoped I'd used up all that Chili Pepper Red and I think it was Cheese Cake yellow, in a way which didn't end up looking like clown hair.   I was trying for something autumnal and pumpkiny.
I spun it all using the traditional longdraw.   There are 5 different colour combinations there and while I thought my favourite would be the blue - lower left, I ended up liking it the least.  However the orange turned out to be one of my favourites because it really did remind me of pumpkins.   There are 65g - 75 g of worsted weight yarn for each colour, so enough for mittens at least, or maybe a hat.  
more accurate colour of the orange blend
 I spun and plied more white project fleece yarn.   I did a rough check on yards per weight of the yarn. I counted the wraps on the niddy noddy, did the math and then weighed the skein.  I divided the yardage into the weight and got 1.9 y per gram.  By then weighing the rest of the skeins and multiplying by 1.9, I got a rough estimate of 1398 yards.   While by no means truly accurate, I have enough spun to start looking at sweater patterns.   Hmmmm, leave it white or dye it?
I started with the Raspberry/blue rolags.  They had the most yardage but I should have probably started with the smaller yardage lots.   I will have leftovers from these mitts.  Not enough for a decent project and if I'd made larger mittens, I could have used them as a present for someone with bigger hands than mine.  But since I have small hands and a habit of losing mittens, maybe I shouldn't worry too much.  Of course I usually make my pairs of mittens of similar colours, so I can mix and match.  I wonder if odd mittens are a trend yet?

I'm knitting these on brand new bamboo needles.   The first time I tried bamboo needles, I really liked how light they were but I wasn't sure I liked the feel of them.  However, I received a couple of pair free with a yarn purchase one time and since they were the only knitting needles I had of those sizes, I ended up using them several times.  The first time, they were a bit rough but by the third project, they had been sanded incredibly smooth, by the fibre and were getting a glossy finish, I presume the oils in my hands.  They ended up being lovely to work with.  Hopefully these will turn out the same.  Otherwise, the local store has just stocked Knit Picks wooden needles and they are really nice to work with.  I may pick up a pair just so I can put a second project on the needles, stuff it in to go project bag and drag it along with me.


April 24, 2016

Colours of Spring

 The daffodils are starting to bloom.   The bi-colours and whites bloom a bit later, but these yellows are a beautiful burst of needed colour.

 The hyacinths are bright and cheerful, with an amazing scent.  They start their pretty show  even before the daffodils.
The light pink hyacinths are showing a bit of frost damage, but they are still gorgeous.


Pretty bright green new leaves starting to push forth on the currant bushes.  The lilacs and maple trees will be following soon I hope.


 The Siberian irises bloom very early.  They come shortly after the crocuses and are gone before the daffodils and hyacinths are even thinking about blooming.


The blue scillia carpets the ground and flower beds.  For such tiny flowers, they are a significant source of spring colour.

The never ending job of splitting wood.  This is the rest of a load of large pieces which needed a more macho log splitter than we had.   The axes, mallets and wedges, nor the chainsaw made a dent in those huge chunks, but a 25 ton hydraulic splitter took care of the job in just a few hours.   Despite the mechanical help, there were a couple of tired guys after a weekend of splitting.   They've stacked up almost 3 face cords from this pile already.

April 23, 2016

HFF- Literary Foods - Marigold's Cake

This fortnight's challenge: Food is described in great detail in much of the literature of the past. Make a dish that has been mentioned in a work of literature, based on historical documentation about that food item.

Lucy Maud Montgomery is well known for Anne of Green Gables, but she wrote goodly number of other works, including one of my favourites, Magic for Marigold (1929).  This is a delightful story of a child's adventures, from birth to womanhood,  in a single volume.   I was quite taken with the story when I was 12 and still remember my visions of the chapter, when at age 11, Marigold was left to watch the house, Cloud of Spruce, alone, with no cake in the pantry, because surly nobody would visit.    Cloud of Spruce and the Lesleys were known for their cake!

The references to any particular cake are quite vague, but the cake that I remembered was one with "golden orange crescents on it - the special company cake of Cloud of Spruce".   The only description of it was a delicious feathery concoction with whipped cream, and golden orange crescents on it.   My childhood vision was a cake with little orange slices on it as decoration and lots of chocolate icing.    I went to my copy of The Boston Cooking School Cook Book, by Fannie Merritt Farmer, 1912 (Boston).   The recipe needed to be tasty enough to be a cake that the family had been known to make for some time, which is why I chose the 1912 book.   It also had to be easy enough for an 11 year old to make.   I chose the recipe for Cream Cake
It was an easy enough cake and the spice mixture looked really tasty.   I substituted the thin cream for almond milk and used gluten free flour and xanthan gum in place of the wheat flour.    I would use an 8 in. pan next time, instead of the 9 in. pan.   I think it would fill the pan better.

The icing was from the same book.   This icing was really, really good and super simple to make.  Next time I'd add just a little less icing sugar as it was a bit more fudge like than frosting when it set up.  Not a bad thing by any means.

I chose to serve the whipped cream on the side.  A cake that was kept in the pantry, even in a cake box, wouldn't likely have been covered with whipped cream as it wouldn't have lasted.  It might have been coated with whipped cream just before serving, but I know in my family, the cake wouldn't have been finished for several days, so the cream would have gone bad before we finished it.   I decorated it with little mandarin oranges, from a tin.

This was an awesome combination.   If the cake had been in a smaller tin, it would have been higher and lighter.  The spice mix, with the chocolate and oranges was a really perfect blend.   This is now on my cake for special occasions list.
Cost - .79c  for the tin of oranges
        $4.79 for a box of baker's chocolate.   I used Baker's because it was called for in another recipe.   It is a good thing I am old enough to remember how it used to be made, because the squares are half as deep as they used to be, so I had to use 4 squares, rather than 2.
The rest of the ingredients I had on hand.
It took only a few minutes to mix up, and the icing took only a few minutes to make as well.  It was a quick, easy to make cake, which tasted of much more effort.

April 13, 2016

Spinning, Spring and silly Kevin

 This was the weather just a couple of days ago.  It was frigidly cold, windy and snowy.   What a difference two days can make.   Today, the snow is all gone.  The ground is thawing once again and Kevin is enjoying an afternoon in a sunspot, by his favourite window.

With all that blustery, nasty, not so spring weather, I spent a lot of time at the spinning wheel.   I finished spinning up almost 100 gm of the purple, plied it and wet finished it.    It really does look nice with that green.     I didn't enjoy spinning the purple as much as I did the green.  There were a lot of neps and scrappy bits which slowed things down and made for more inconsistencies that I'd like.  However, the mill ends were  $8 for a very generous pound, so I'm not really complaining.  The price was right and the colours are quite lovely. 


 I was playing with the blending board yesterday.  I am teaching a friend to spin and we were talking about different ways to blend fibre, since that is important to her.  We played with wool hackles, hand cards and the blending board. This is mainly Ashford Corriedale, with a bit of sparkly nylon stuff in it.  I used 2 shades of pink, 2 shades of blue and blue "sparkle on", which is the reflective, nylon fibre that Fibre Garden sells.    You can get it in a big packet of white and it takes dye beautifully, so I often just pop a bit in when I have a dye pot going.  However, they have a few really great colours that are easier to purchase than to do myself.

We were out shopping the other day, having a hard time finding a pair of boots with the particular features I was looking for.  I mentioned to DH that perhaps Fibre Garden had what I was looking for.  He didn't fall for that trick though.  He is a smart guy, obviously.  In general, I dislike shopping.  A trip to Fibre Garden is never amiss, although it always costs dearly.


April 11, 2016

And the Walls Come Down

This is the peach colour scheme of the  kitchen as when we moved in.  Isn't scrubbable wallpaper from what I can tell.   I am pretty certain the the previous owners were smokers, because of all the gunk I have cleaned off walls, draperies etc.   However, the kitchen wallpaper was stained and filthy and there wasn't anything I could really do about it.   I did clean the cupboards and just getting the gunk off the hardware took me all day.  It was amazing to find out it was gold hardware originally and not black iron as it had looked.   
We knew what was behind this wallpaper, luan paneling.  You could feel it and there were hints of it, plus they paneled the whole hallway in it.  YUK!  But we had no idea what was behind the paneling.  There was more paneling; fake tile paneling, without even tile texture, on the bottom and this on the top.


More YUK!  How do you get such a straight line from filthy to clean?   From this layer, we had to check out the walls.   We could tell there were at least 3 layers of wallpaper under this one.  That is quite normal for an old house.   The plaster looks to be in really good shape, that is until you touch it in places.  It is bubbling away from the lath in spots, to big to just fix.   Hubby thinks it is easier to just take the plaster and lath down and replace with drywall.

A bit of research showed that what should be behind the plaster was shiplap, or wooden plank walls.   Apparently you can just removed the top plank to insulate and a bottom plank to do any wiring, put the planks back and it's good to go.  Pinterest showed a whole bunch of very cool renovations using just the shiplap as the walls.  However,  somewhere along the line, some of the boards were removed, so we have incomplete ship lap under the plaster.  Not knowing what else is there, we have to be careful that Kevin doesn't get into the walls, because getting him out again would be a huge operation.

A bit more plaster removal shows the upper walls are likely complete.  It  is also pretty interesting to see that the original shiplap walls have been covered with scrim, muslin or something similar and the original wallpaper is on top of it.  That too is what research suggested we'd find.   Still, it is a very neat find.
green wallpaper dates to at least 1914.


April 09, 2016

HFF- Pretty as a Picture

This fortnight's challenge was Pretty as a Picture; If you’re a fan of cooking competition shows (like I am!), you know how the saying goes: we eat first with our eyes. Make a dish that looks just as spectacular as it tastes.

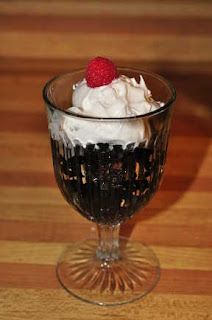
I was in a bit of a quandry this time as my kitchen was/is being systematically deconstructed.  I couldn't do the dish I had planned, which was a moulded blancmange.  Instead I found this recipe in Mrs. E. Haskel's  The Housekeeper's Encyclopedia, published in 1861, N.Y.  


The issue with the generic term jelly is that it could refer to a jam, usually seedless and without skins, an isinglass jelly, a calf foot's jelly.   I don't know when jams and jellies started being used as bread spreads, but before that they were eaten from the spoon as a tasty treat.   The size of the serving, one-third jelly in the glass, with the remaining filled up with whipped cream, suggests that the jelly referred to could very likely be a jam like jelly.   However, I only have pectin jams in my pantry right now and am out of period type jams and jellies.  With my dishes, cookware and foodstuffs spread throughout the house, during the kitchen reno and plaster coming down at the moment, it wasn't the time to suggest to hubby that he clean up a bit and let me spend 2 days making jelly: one for making juice and the next for making the jelly.  

Instead, I made an isinglass jelly because it was simple, fast and it turned out, quite tasty.  Because I couldn't make the juice right now, I used a bottle of organic black cherry juice.  It was on the bottom shelf, in the international foods section, far away from the juices and it was plain luck that I actually found it.   We don't drink apple or grape juice here, so it was a very happy find for this project. 

I substituted gelatin for isinglass.  

1 1/2 tbsn gelatin
2 cups cherry juice
1/3 cup cold water
whipped cream

Sprinkle the gelatin over the cold water and let it sit for 5 minutes while it blooms.   Heat up 1 cup of cherry juice in a pot until it reaches the boiling point.   Dissolve the gelatin mixture in the hot cherry juice.  When completely dissolved and mixed in, stir in the second cup of cherry juice.   Pour into a dish and set in the fridge to set.  Scrape out the jelly into a glass and top with the whipped cream.   I would have garnished with a mint sprig if the store had any.  They didn't so I used raspberries.   The joys of living in a rural area.

It took only a few minutes to make and a couple of hours in the fridge to set.   It was very tasty and even the grouches here liked it.   I think it might have been more accurate using jam or jelly but wasn't able to do that at this time.
 
Cost - Organic Cherry Juice - $6
            whipped cream - $2.79
              raspberry garnish - pennies from the $1.88 packet which I ate for breakfast the next day.


April 07, 2016

More Random Bits

 There was an old woodstove in the basement when we moved in.   It wasn't air tight and it had obviously been sitting there for a while.   A bit of research showed it was an Australian stove of all things.   When the guys were clearing out all the junk that had been left behind by the previous owner, they found out that the stove went together with pins and was easily disassembled.   We only did one sap boil this year, just to say we did and the old stove ended up becoming the wind block around the fire pit.  It speeded up the boiling and you could open the door at the front or side to add wood!   We only got 4 1/2 cups of syrup this year.  Not bad though for collecting 4 pails of sap over 2 days.


One of the spring storms just before the ice storm.  We had a lovely sunny day and then we watched the storm clouds roll in.   I really would like a few days of sunshine now.  At least the last batch of snow pretty much melted today.  Yesterday looked like the middle of winter outside.

This is the new stove in the Misener house at Westfield Heritage Village.  It not only is a handsome appliance but it works like a charm.   It was made in Brantford, Ont, so was made locally.  How could one not enjoy cooking at a stove called the  Happy Thoughts Range?


I was giving a spinning lesson the other day and I had helper kitties or snoopervisors if you'd rather...  Kevin on the left and Cat on the right, just parked themselves like bookends in my pile of fibres.