Pages

December 30, 2016

This Old Table Loom

It's been no secret that I've been looking for a reasonably priced 8 shaft loom and a reasonable priced table loom.  I've whined to all my friends, asking them to keep an eye out for me.  I missed one, which was my own fault because I waited too long to decide.  But sometimes, fate steps in and Lady Luck deals you a good hand.

The day before yesterday, I got a phone call from a friend, who said she'd just picked up this donated table loom and did I want to house it.  It was currently in the back of her car.   Of course I said yes.  She dropped off this baby!  It is made by Metiers Clement Inc, out of Saint Justin, Que.  Interestingly, it seems like the company is still in business, although from what I could tell, they stopped selling looms in the 1980's.

It's big and it's heavy!  It has a weaving width of 24 inches and is solid wood.  It has 4 shafts, strong and secure levers for the brake release, front and back beams.   I played with a Dorothy once, which had a flying brake lever.  If you didn't move the brake lever in exactly the correct way, it flew off, across the room!  It is a jack loom.  It has sturdy metal lams and everything.  The levers to move these are under the loom.   It also has a sectional beam, like an honest to goodness real one, with a 1 inch spacing.  I've never tried sectional warping before and it almost seems like it might be overkill on a table loom, except for the sturdiness of this little loom.
 

The loom needs a bit of TLC as well.  For one thing, it's filthy.  I mean really, dirty.  It had a thick layer of dust and a layer of brownish grime, lots of build up of dirt and oil from handling the beater and spots of something brown and drippy, which I'm hoping was a benign substance.   The front apron needs to be replaced and all the lamms need the decades old greased cleaned off, and replaced.   However once that is done, it looks like it could be a fun little loom.     I did find a photo of one of these looms on a little table stand, with the shaft raising mechanisms attached to treadles.  
I've already spent a couple of hours cleaning the loom up, with at least a couple more to go.   Then I'll figure out how to dress the loom and give it a whirl.


December 28, 2016

Kevin Update

Especially for Christiana -

 I've been thinking that Kevin has been a well behaved boy these days.   Generally, he's got a routine, which he follows to the T.  He's not been naughty, or badly behaved for a while.  In fact, he's almost been boringly good.

But as I've discovered, it was all a sham.   He was just pretending to be a good kitty, and lulling us into some sort of peaceful oblivion, thinking that all was well.  
It's definitely a good thing he looks so cute, sweet, nope, interesting and funny while he sleeps!   Shortly after my heartfelt Christmas Eve post, I had abandoned the baking, finished up the last rug hem and was just putting a gift tag on the final gift.   All of a sudden I heard a resounding crash and a flash of fur dashed by my legs to find some hiding spot.  I ran toward the noise, (in the living room) to see the husband and son standing around a toppled Christmas Tree, surrounded by smashed ornaments.

I grabbed every towel in the house and as they uprighted the tree, I started mopping up about a gallon of water, trying to get as much as it as possible before it soaked into the carpet and gifts.   I was able to get most of the gifts out of the way in time, but a few got wet.  We salvaged everything but one gift bag, which held a couple of books.   So my Christmas Eve was ultimately spent, blow drying books (my own present from the husband), which had gotten a bit wet.  My sweetie had to screw the tree holder directly into the floor, in order to keep the now, bedraggled tree upright.

When we finally were able to sit down and figure out what happened, we realized that earlier that afternoon, when Kevin was sniffing the tree and a few low hanging baubles, he was actually preparing for mayhem.   It was he, who my son saw try to climb the tree a few minutes earlier, despite an admonishment and moving him out of the way, it was Kevin who raced by us all, after felling the tree with his adventures.

 A trip to the big box department store replaced a bunch of broken baubles at half price, but when I took down our now sad, rumpled  tree, I realized that most of the ornaments which had broken, were the old ones, baubles and bits from when my kids were young.   Thankfully, I never got around to putting the really vintage ornaments on the tree this year, or that would have been much more sad.   By the time I was able to get the camera out,  the guys had picked up and vacuumed up a rather large pile of broken bits and pieces.  These were all they had left out for me to document the cat-tastrophe.

December 24, 2016

Christmas Eve Greetings

I got some of the decorating done this year.   I made this wreath for the front door, using some dollar store bits and a length of fake fir tree garland, which has been in  a box for years and years.   I decided to give it a second life, rather than toss it.   I found an old metal hanger and wired the greenery to the hanger with little pieces of craft wire, and wire from a decorative trim.  It's held up to the winds, snows, rains, ice and now the thaws of this December.

I wanted to make a wooden box to use as a centrepiece, so I could fill it with seasonal decorations.  I wish I'd taken photos of the building progression.  Apparently you cannot just cut the wood, glue the sides together and bang in a few nails, in order to make a decorative and not very functional box.  Nope, I needed biscuit joints, routered inlayed bottom, lots of clamps and way more time than I'd allotted.  It finally got some decorative nails about 5 minutes ago, but it won't be sanded, stained or finished.  But it is a box that will withstand the ravages of time.  This thing might never fall apart. 

I've been baking goodies all day.  I still have a couple more things to make for tonight, spinach dip, a fruit laden gluten free cake, and the veggie, cheese, cracker trays for this evening.   I made the cranberry sauce with orange juice and remembered why I don't usually do it that way.. yuk.   Live and learn.   However the gluten free /dairy free nanimo bars came out spectacularly.  I guess sometimes it's a bit of a give and take.
The mittens and scarves are all bundled up and in a basket so the kids can chose what they want. I kept one of the scarves out for me.  I'd been eyeing it for a while.  The scarf I've been using is all handspun, nature dyed Shetland, but it's a bit scratchy, so the wool/silk scarf is so soft in comparison.  The rugs are all done too, although I didn't finish one of them.  I kept putting off binding the ends until I realized I was really out of time.   I guess if I forgo the last cake, I might get to it.    

I'd better go finish up.  Happy Christmas everyone.    May your holiday season be full of peace, joy and sunshine.   I hope the New Year is full of happiness and finished projects for you all.


December 22, 2016

Finishing more things up

 The white Pima cotton is plied.  I'm thrilled with this yarn.  It was fun to spin.   There are 284 yards in this skein, which weighs 44 g.    I'm finishing up the last of the lighter brown cotton right now.

 The last pair of guy mittens are done, just in time for Christmas.  These will be warm and functional, if not pretty or trendy.  I rather like these however.  They'll never show the dirt and if one gets lost, then it isn't like I spent hours on colour work or a fancy pattern

The last scarf is finally off the loom.   I had a bit of fun with this one.  Every once in a while I did a little inlay of varigated blue.  It kept the weaving a bit interesting.  The scarf before this is plain grey.

December 16, 2016

More Spinning

For some reason I had this great idea, to switch up my spinning and spin up this green ramie.  A couple of problems with that though - 1st, there is half a pound of it, which is a lot of roving to go through.  2nd- it's been bitterly cold out and that means our old cottage is much cooler inside.  I like to spin ramie wet, which means a little pot of water to dip my fingers into every few minutes.  It makes a lovely, smooth, glossy thread, but means in this weather, my fingers get chapped. 3rd - it is not my favourite fibre to spin.

So I've taken it off the wheel.  I'll wind this bit of spun thead onto a bobbin and set it aside for the spring or summer, when wet spinning will be easier on me.

I switched back to spinning cotton.  This is white Pima cotton, so a bit longer staple than the coloured sliver.  I'm surprised that this stuff hasn't spun itself  already, because it really is the easiest cotton I've spun to date.  I am sure that it just glides through my fingers, drafting itself into lovely yarn.   Even with being distracted at times, it just seems to want to spin nicely.


The last pair of Christmas mittens for the kids.   I still want to make or remake a pair for me.  I've tried on every pair of girl sized mittens I've made and they are all too big on me.  I believe that I am pretty much over making mittens for the season though.

As an aside, I've been itching to toss something in a dye pot, but have been holding back.  The new sink was supposed to be installed 2 weekends ago.  The sink cabinet needed some specific modifying because the sink is from Ikea, which meant a bunch of other small adjustments.  Then the weekend weather was icky, so we didn't get the wood for finishing the framing around the kitchen window, which needs to be done before the sink cupboard gets installed.   So, I've been hesitant to dye up the laundry tub, in case all my nice, new wash basins, need to be used for dishes. :(

Our guild offers a beginner weaving class, which is an introduction to not only weaving, but colour manipulation.  We use pre-warped 4 harness looms to make tea-towels.   This is our last class' pretty towels.   The next class is at the end of January.  This spring we'll be doing a follow up class, which will include winding a warp, and dressing a loom.   This class seems to attract fun and interesting people, who all make cool towels. 


December 12, 2016

More Cotton yarn, plus Design class

 I've finished up the naturally green cotton.  Both skeins have been simmered.  The instructions and method we used in the Master Spinner classes, had us wind the skeins of a piece of PVC pipe with holes drilled in it, and boil that whole thing.  I did a comparison and didn't really notice much of a difference between using the pipe and just tossing the skein in the pot.  Once it's cooled, rinsed and you've snapped it between your hands, it all evens out in the end.  As much as I thought the second skein was more difficult and uneven to spin, the two skeins look pretty much the same.  The bottom one is the second skein; the one I thought would be lumpier and bumpier.  It's not.

I've started on some more naturally brown cotton.  The bump of sliver is easy-spin cotton that I picked up when I was in Olds.  The sliver is buttery to spin and has a bit of crimp left in it during processing, which I think is why it spins so nicely.  The bump of sliver is the new brown, which isn't labeled except as cotton.  The skein beside it, is the skein simmered in water for about an hour-ish or so.   The last skein is the cinnamon brown cotton sliver I picked up at Gemini Fibres.  Some lovely differences in colour.

I think I'm going to switch to white for a while.

Why does this matter? I'm taking a design course through our guild.  When I signed up for it, I was pretty sure it was going to have some decent content but since we are meeting only 4 times in a year, before the final projects are due, I wasn't sure what to expect.  When we all signed up, it was with the expectations that we will complete all the homework.

There are 8 of us in the class.   Our first class was not a whole weekend, but just 3 hours on a Saturday morning.   We finished early - which was probably a good thing, because we covered so much information about drafting.  This didn't cover draw downs - we should know that by now, but how to set up a design, read it for threading and lift patterns, and then how to change that to a tie up.  We also covered sett and had a whole whack load of homework.

We have sett samples to make, 6 for each type of yarn - 3 in tabby and 3 in twill.  It was suggested that I use my handspun for some of these, because I can actually replicate yarns that I spin.   I quickly thought that I didn't want to waste my handspun but it really was my mouth spitting out words that didn't explain what I meant.  The coloured cotton is harder for me to come by, so I didn't want to use it.   White cotton is easier to find, so if I start spinning now, I might be able to get it done in time for the  next class in March.  I will also see what else I have on hand.   The samples should start at about 12 inches wide, but I think if I'm using handspun cotton, they will be a little narrower.  That is a fair bit of cotton to spin, though if I use a dummy warp, it might be a bit easier.

Then we have pattern gamps to create - 2 of them - eek.....
And we're to start thinking about our final project, using a book to keep ideas in.  I think this freaked out more of our class than anything else.

Now to start looking for equipment to use -

  I'm looking for an 8 harness or more  loom than needs a new home - and a table loom,

though it turns out the guild will rent me one for a reasonable price, so that is where I'll probably start.  We'll need it to drag to classes and for some of our homework, as apparently it is much easier to just flip switches on a lift plan than to tie up treadles.

But - I wonder if a direct tie -up would work to do the gamp on a floor loom?
Now to get the stupid scarves that I don't like off the loom, and get started.


December 07, 2016

Small project progress

The first twill and basketweave scarf is off the loom.  The fringes were twisted, and I tossed it in the washing machine to wet finish.  After it came out, I gave it a good hard press to make it nice and flat and it brought back the shine from the silk.
I really disliked the pattern or the colour or both.  The scarf is soft and drapes nicely, but it is boring.   I knew this when I cut it off, having decided to re-thread in a pattern that I think I will enjoy more.

 I am almost finished spinning the second bobbin of the sage green cotton.  The funny thing is that no one believes that the icky beige colour is actually green.   So I tossed the first skein in a pot of water and simmered it for about an hour.    What an amazing colour change.   It seems that it really is sage green! 

I tossed a few more handfuls of alpaca fibre into the wash basin yesterday.   It is dry enough to put away, but it feels so nice that I'm leaving it out for a bit so that I can run my hands through it everytime I walk past it.

Other than that, I've been working on my cloak project.  There is nothing to show though because I made a mistake and had to undo it all - so I'm right back where I was.   I hate when that happens.

December 05, 2016

Kevin update, crafty stuff and beer

I used some of the remaining lathe from the kitchen walls to make rustic stars.  I had to look far and wide to find a little bag of rafia in the shops.  It seems it isn't in decor favour right now.    If the snow melts, like they say it will, I may dig up a few more pieces of lathe from the scrap pile and make some stars to keep undecorated.


I was tired of this warp before I'd even started weaving.  I did all the math, checked it twice, wound the warp, dressed the loom and had too many threads.  I counted the threads and there were the right amount on the first half of the heddles, so I checked the second half several times and couldn't find the error - so removed the offending threads, thinking I'd miscounted while I wound.   Except that in all the math errors I could have made, it was the simplest one that was wrong... there weren't half the threads on the first half of the threading.   And I missed that stupid error.   When I realized it, I fixed it - added the missing 4 threads, but because they were in one spot, near the edge, I couldn't get the tension right with them hanging off the back.  Argh, I wound off the warp, retied the choke ties so that Kevin could do no harm and then tied the new threads on the back beam and rewound the whole darned thing.  It added an extra day to the process :( and was a pain.  However, it worked and the weaving is going smoothly.

I came in the other day, to find Kevin had pulled down the cloak project and made himself a warm, soft, little bed.  He doesn't look horribly comfortable, but considering the amount of time he was snuggled up there, I think he must have been comfy.  Either that or he was just being obstinate and hogging the fabric so that I couldn't work on the cloak :)


Last year my sweetie received one of those Mr. Brew kits for a gift.   With the kitchen project, he kept putting off trying it out.  Finally I read the directions and a short time later, I had the first batch sitting in the only area warm enough for fermentation -  hello new living room ornament.   It was really easy and online reviews suggest that you get relatively drinkable if uninspiring beer.   Since I don't really drink and don't like beer at all, I'll never know if it is any good or not - but there are 2 more tins of that concentrate, so there will be at least another couple of batches in the future. 

I have a large, clear glass jug.  If I get an airlock for it, can I brew a second batch in that or does the container have to be dark?  I will have to do some research.

  I'd been hoping to have this ready for the holidays, but totally misunderstood the timing.  2-3 weeks for fermentation, 1-2 weeks for carbonation and 1-4 weeks for aging, does not fit into the 3 weeks left before Christmas.  Whoops.


November 30, 2016

Cotton, Cloaks and more Cotton

The first 2 bobbins of the sage cotton have been plied.   The yarn looks amazing considering how different it was to spin, than the cinnamon cotton.  Cotton sliver and punis usually have a grain, so it spins smoothly from one end and a bit lumpy and roughly from the other.  Well, this seemed to have a few issues from either end.  Not only that but the slubs wouldn't pull out with a gently tug, nor would they necessarily rub out with a simple twist between the thumb and forefinger.  Nope, I had to pull each stupid slub out individually, or so it seemed.  Still, it spun pretty quickly.  Bobbin 3 was filled during the Grey Cup game.  OMG - what a suspenseful game that was.   I didn't take enough breaks during the spinning time and went to bed with sore shoulders - but really, that was a lot of cotton spun.  I don't think it will look as nice as this skein though. 


I decided to stick the cloak yardage in the washer and full it up a bit more.  Unfortunately I got a little bit side tracked because my sweetie was home and remembered about it, when the washer started to spin.   It is a bit more fulled than I wanted, but still drapes decently.  It is pretty easy to piece together now.  

I've been butting the two selvedges together and running a thread though the loops made when the shuttle switches direction.   It is like running an extra warp thread though and a great technique for joining pieces for blankets or to make wider yardage as in this case.  If I'd been thinking, I might have used a blue thread to make that blue stripe on the selvedge the same size as the rest.  Still it looks pretty good.   This picture is of course of the best part and what it should look like.  Not all of the seams look quite that invisible.

My sweetie surprised me with a road trip to Camilla Valley Farm, which is a well stocked weaving supply store.  I came home with this little bag of goodies.  I wouldn't let him pay for them because then they would have been Christmas presents and I figured I'd likely want to play with them sooner than that.   They offer great mail order service, but I'd never pass up a road trip there.
   So I know what my sweetie is giving me for Christmas, and I can't touch it now for weeks.... argh.....


November 24, 2016

More cotton spinning

It's been a busy week.  I finished up the cinnamon brown cotton.  I simmered it, although it did boil a bit in there when I got distracted making lunch, for about an hour.  The water was a golden brown, but nicely clear, so free of any nasty gunk.   It took a bit to dry, in this cold, dreary weather though.
I love that feeling when you take your sad looking wet skein and snap it between your hands, and everything comes together.  The threads align.  The twist seems to even out.  The whole skein suddenly looks glorious.   This is 100 g, 490 yards of 2 ply cotton.  It is so pretty and was so enjoyable to spin.

I've started on some sage green cotton now.  There is a little less than 100 g here because I used a bit for some of my master spinner homework or homework practice.   I'm working on the second bobbin.   I know this will go greener after it is wet finished.  Right now it is a rather sad, pale beige/greenish colour.   

I'm just going to spin up cotton as I find it in my stash and hopefully I will have enough for a decent project.   I'm thinking maybe yardage for a shirt, just because I can :)

Look!  Look!  The floor is down and I love, love, love it.  What a pain though.   In order to put it down, the guys had to move everything out of the kitchen.   It took a couple of days, which was really quite a nuisance.   However, they got the floor laid and the appliances moved back in on Sunday night.  On Monday, my oldest son visited, so my man had help for moving the base cupboards back in.   They  have most of them permanently installed.  The sink cupboard is only half made.  It still needs the face frame and the doors.  The old sink and counter has been set on top, so really, the kitchen is useable at the moment.  I certainly can't complain about that.  Since we are still trying to decide on what to do for the counter tops, having at least the old ones to use, gives me lots of work space.


November 20, 2016

yardage done and some spinning started

The wool yardage for the cloak project is off the loom and drying.   It was 9.4 yds and 24 inches wide off the loom.  I tossed it in the washing machine with a bit of laundry detergent and let it agitate until I was happy with the finishing, and then rinsed it twice.   It is now 8.8 yards long and 22 inches wide.     I'm not certain that I don't want to full it up a little bit more, after all a cloak should be warm and windproof.  I'm not sure it's quite fulled enough for that.   I'll see when it's dry, whether or not I'll wet finish it a second time.   It will be lined though, so that will help.
I have to admit that I pretty much love how the blue checks feel a bit like a shadow of the brown.  So far I've found only one weaving error, which thankfully is very near the beginning of the yardage.  How I missed it, I have no idea!  I still have time to fix it I think - maybe a good thing I am not sure the fabric is fulled enough.

 I've been spinning up some naturally coloured cotton sliver.  I have 100 g of this lovely cinnamon brown colour.  It is just freshly spun and plied.  It hasn't been wet finished yet.  If I simmer it in some water, it will likely darken and redden up the colour. There was almost 250 yards, after plying on this bobbin, plus another 32 yards which were on a bobbin that I'd forgotton I'd had, which tricks me every time I use it.   There is something which binds inside and stops the bobbin from taking up properly.  I've run a round file through it, cleaned it, oiled it etc and still it doesn't work right.   I should mark it in some way, to differentiate it from all my other bobbins which work spectacularly.

The kitchen sub-floor is down and the vinyl flooring is about to go down.  I'm currently washing dishes in the laundry tub and cooking in a crock pot, which is sitting on the dryer.   Hopefully this will all be back to normal very soon.


November 16, 2016

ziplock baggie DOS dyeing - weak acid dyes

DOS -  depth of shade
weak acid dyes - use citric acid or vinegar as the acid agent
 ziplocks - because you can dye multiple colours or shades of smaller amounts of fibre or wool in one pot, saving time and energy.


I need to make another pair of guy mittens before Christmas.  I was spinning up some fleece, I think from the stuff I picked up from the Ontario Wool Growers this summer.   It is white.   I really didn't want to knit white mittens, especially for one of my guys.  I didn't think it would work for any of them and be a bit boring for me.   So I decided to dye up the yarn today.   I had 69 g spun, into a worsted weight woollen - gosh I love the long draw - I added another 38 g of a grey woollenish yarn.  My idea was that I would do the cuffs in a dark colour and work my way to the finger tips in lighter shades.  I didn't want a ton of shading to make it totally ombre, but just colour blocks.   Since I still have a whole whack of that 2% solution of Navy Blue dye, that is what I used.  Because I was dyeing 3 skeins, 3 different colours, I also decided to dye in ziplock baggies so I could do it all in one pot.

Step 1 - weigh and soak fibre, then do the math

First thing is to weigh the skeins and write the numbers down!   You need a work sheet for this and it is a pain when you forget to record the original skein weights.
I soaked with just a couple of drops of dawn dish liquid to help the water absorb quickly.

The math is easy stuff.   You want to figure out the amounts of water, acid and salt.   Water is important for ziplock bag dyeing, to make sure you have enough to cover the fibre.
write quantities of additions on bags


The numbers are 40 x water, 20% salt and 33% vinegar.  Write this down on your worksheet and then take a sharpie type marker - indelible and write it down on the ziplock baggies..   As long as it is a decent quality plastic bag, the brand name doesn't matter.   These are just the most economical around here when there isn't a sale, so I keep them in the fibre room..

These notes make it easier to set up each individual bag.  Note the vinegar has x2 because you split the amount and add half at the beginning and the rest half way through the process.

Bags of fibre, salt and vinegar heating up

You need to use something to keep the bags from touching the bottom of the pot.  This can be a stick across the top with the bags pegged to it, or I just use a dedicated vegetable steamer thingy.   Use a thermometer.  Add a couple of inches of water, set the bags in.  The water level may rise dramatically, depending on the quantity of water in your bags.  Turn the burner on and let the temperature rise slowly.   This is wool, so somewhere around 180° F, carefully open up the bag and add the vinegar.   In a perfect world, you would remove the skein, but with larger amounts, I just spurt the vinegar down the side of the bag and squish well to mix.   Once the temperature gets to just below boiling - let it hold there for about an hour.   Squish, mix, wiggle the bags once in a while to keep the fibre/yarn dyeing evenly.
dye is exhausted after processing

Check the bags.  The dye should exhaust, leaving the water clear.  The dye could exhaust earlier - splitting the vinegar helps the colours absorb evenly, but you still need the full hour of cooking time to make sure processing is completely done, making the yarn as colourfast as possible.  

Once the hour is done, turn off the stove.   You should let the bags cool naturally.  However - if your fibre isn't really delicate, and you are in a hurry, you can transfer the bags to a sink or basin.  If you open them carefully - use gloves please, the water and steam are hot, you can dump out a bit of the water, helping them cool down a bit more quickly.

Once they are cool enough, rinse them in water to make sure there is no unattached dye and hang or lay flat to dry.

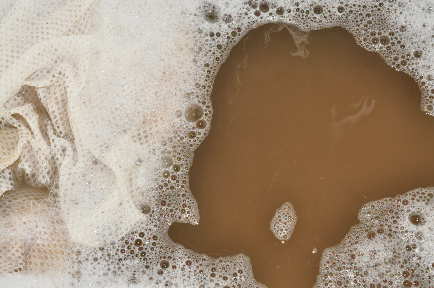
This is my dye pot after the bags of wool came out.   Nothing leaked into the water - the bags held tight.   I only used a tiny bit more water than this for the whole process.

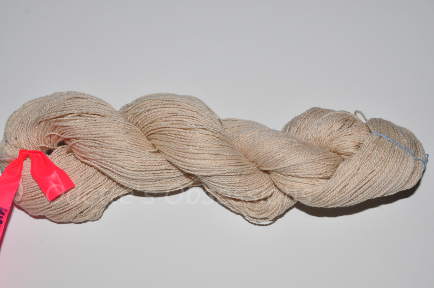
Three shades of blue yarn.  I used a 2% dye stock at dos (depth of shade) .5, 1 and 2.

I love the denim blues I got.  Soooo pretty, but I won't tell my guys that the colours are pretty unless I want the mittens for myself.


November 14, 2016

Project updates

I'm still weaving the yardage.  I think I'm over half way done.   I stopped tracking  and just kept weaving.   One repeat is 6 inches, so 3 are half a yard, which is my minimum weaving goal each day.  I'm trying for a yard, but some days it seems harder to do such a minimal amount, especially with lovely sunny days and rush on to get the kitchen usable before Christmas.

It's sort of usable now, at least for this week.  The top cupboards are in, save for the 2 new ones which need to be built.   The bottom bases are made and the cupboards have been fitted on them for the moment.   This is because the flooring goes in next weekend and as soon as it's done, the base cupboards will be totally ready to install.   Right now, the old, chopped up counter top is just sitting on top, so that there is a work space.   Amazingly, in the new kitchen, with light, clean walls and cupboards, it looks great.   It's made me feel that I need to rethink my counter choices when it's time for the real one.  I was going to go with a darker granite looking laminate but I think I now need to check lighter coloured samples. 

I was running around doing errands on Saturday and stopped in at a couple of thrift stores.  The one, with the habit of mis sizing the sheets, had a bunch in.   I bought a double set for $7, but it turned out to be a twin size but the $5 king size duvet cover has an awful lot of fabric in it.    Then I popped into the Sally Ann.   Apparently they have these special days when you pay only $5 for a bag of specific coloured tagged items.  I ended up with 6 pair of jeans to chop up for rugs (yes, I know I don't like weaving with denim, but it makes lovely rugs) for only $5.  You can't really go wrong with them at that price.  I left the trendy ones with artfully placed rips and holes in them and the ones with fancy brand names, or in really good shape.   It won't  make any difference for my use and might for someone who really needs those jeans.

It's rather nice though that the weather has gotten unseasonably nice.  Yesterday I washed and hung out all those sheets for future rugs.  Today most of the jeans got washed.   Gotta love these lingering autumn days!

November 09, 2016

coat/cloak yardage

Ages ago, sometime last December, I started winding the warp for this project.  It is yardage for a sacque coat, although I have cloak in brackets on my project notes.  I had two bouts wound and tied off.  I set them in a bag and proceeded to get involved in other things.   Right now there are at least a half dozen project for my loom, using new techniques or big things like coverlets.   There are at least another half dozen  of really should do/ want to do projects.   Some of the above dozen even have projects sheets written out, drafts done and fibre collected.   

Sometimes though I get a bit overwhelmed with what to do next.   There are way too many choices and which one do I do next?   So I ran across the warp chains for this project and realized that getting it out of the way would be a good thing.  Plus of course, winter at Westfield does need winter outerwear.  While the costume department is well stocked, having my own is always a nice thing.

The yarn is 100% wool.  It is carpet mill ends from a now out of business high end rug manufacturer.   It is amazingly soft.   They called it a 4 ply crepe yarn, but after looking at it, it is a 4 ply chained yarn.   I've no idea if it is crepe or not, but it is definitely a chained yarn - not chained as in Navajo/chain plying though.

I wasn't sure of the yardage as we bought it by the pound and I have a fair bit of it, 2 cones of the white and one each of the brown and blue.  This meant I had to make an educated guess at how long a warp to make and if I could actually get the project I wanted out of it.   I ended up with a 9.5 yard warp which was 26 inches wide in the loom - sett of 10.  The yarn wpi was 14, 15 if I pushed them close together, so a sett of 10 should work for a twill.  I did a quick test swatch back when I was planning this and it looked okay.

I was lucky that I wrote down the numbers of threads in the colour order on my project notes.  What I didn't write down is that when winding the first 2 chains, I changed the number of white threads in the large section.  So instead of 30 threads, it was 32.   This meant that as I was threading the loom, I had to run back to my warping board and wind off 6 more threads, plus 2 for floating selvedges.   What a pain that was.   None the less, it went on the loom perfectly.  I wound off the remaining 2/3 of the warp, sleyed the reed, threaded the heddles and wound it on on a single day, with the help of a lot of Star Trek - the original series. That evening I wove the first 14 inches :)

Now I'm looking for the sacque coat pattern.  I know that I have a copy someplace.   I remember tracing it off.  I remember folding it up and putting it in a plastic ziplock bag.  I remember putting it away.   It isn't anywhere I can find.   It sure isn't where I thought I'd put it.  It isn't with the rest of my historical patterns - in 3 different bins no less, nor is it with my fabric or even my weaving supplies.   At least I have a bit of time - or I can just make a cloak with the yardage.   However, I do have the yarn already set aside for the actual cloak project....   

I'm taking my time weaving this off.   It requires counting threads as well as treadles.  Luckily with a plain twill, my feet can pretty much go without actual counting. 

November 04, 2016

Alpaca

The first time I went to Olds Fibre Week, was just after the devastating floods.   As we flew towards the Calgary airport, you could see the swaths of water, creating ponds and lakes where farmland should have been.  A local spinning guild had a space in the sales room where they were running a fundraiser for one of their members who had been affected by the flood.   They knew someone who had alpaca but they were just pets.  In exchange for shearing the animals, the guild got to keep the fleeces, which they were selling off to help their member replace equipment.   They had a number of different fleeces, all for $20 a piece.   I was happy to help and it was a pretty small fleece, so I could find the space for it in my luggage. 
 It was grey.  It looked grey.  They said it was grey.   I thought it was grey.

I fit it all into several large ziplock bags and yesterday I emptied one of those into a net bag and within 2 minutes of setting it into a laundry tub with hot water and Dawn dish washing liquid, it looked like this.   I figured that maybe it wasn't quite such a grey fleece after all.   The second wash water was fairly clean.  It only took 2 rinses.

Oh my!  It is white, really white.  It's not the finest alpaca.   There is a bit of guard hair that I've been pulling out.  Some of the hair is obviously neck or maybe belly/leg hair.   But that which isn't guard hair or thicker and short, is quite nice.   With a little bit of work, it will be a great bit of fibre for blending with some Merino.   Plus with all that white, it is a great canvas for dyeing.


A good few years ago, a friend of mine from Tenn. was visiting family in N.Y. where she stopped to visit an alpaca breeder who was selling off the previous years fleeces for next to nothing.  She sent me a whole box of fleeces (2 of them) for a Christmas present that year.   I'm still working my way through it.  This is the rest of the first one.  It is prime alpaca, with no guard hair and I'm guessing only the blanket.  It's a lovely light fawn colour and the other one is a bit darker.   This fleece will be so enjoyable to work with, since it will require almost no effort.  It has no vm and required only one washing to get it clean.   It's first wash water was cleaner than the second one from the above!

November 03, 2016

Kitchen update! and yarny things of course

Oh my goodness!  Look what is happening with the kitchen renovation!!!  The walls are painted and I will have to say that my sweetie did an awesome job with the drywall.  They are perfect.   The cupboards are going up.    A few inches of space were lost when the outside wall was insulated, which has meant a shift of all the cupboards.  It won't make much different to most of the room, but the top cupboards on either side of the sink don't quite fit.   We could do it by switching two of them around, but then the cupboards would only be 12 inches wide.   He says if he makes them to fit, they would be 16 inches wide, which would make so much more sense for dish storage.

I've been doing a bit of Xmas knitting.   These are simple wool mittens sized to fit any one of my guys.   My sons and my husband all fit the same size, so this is pretty easy.   I can make several pair and they can choose which one suits their fancy.   That little piece of yarn is all that I had leftover from this pair.   Admittedly, I used a partial skein and if I'd made mitts for myself or daughter, there would have been plenty left.  But, really, I didn't need plenty left ;)  The remaining 24 inches of yarn is much easier to dispose of than a partial skein.

This is the 50% alpaca/50% merino blend.  It is a lovely yarn and the mittens are quite soft and yummy.  I'm making another pair of "guy" sized mittens and did have a few moments of angst where I almost ripped them out and made a pair of mittens for myself.   I decided that I actually have enough alpaca in my stash to blend up another batch and make myself mittens from that.
 The needles are Knit Picks.  They come in a 6 pack and are made from brightly coloured wood.  They are some of the sweetest needles I've ever used.  They have a perfect point , weigh practically nothing and slip the yarn across them just nicely.  I will have to keep my eyes open for more of these.