Pages

Showing posts with label using handspun yarn. Show all posts

June 25, 2026

Another Shawl You Say!


I know I told myself I would knit any more shawls, but they are good evening knitting projects.  If it's simple enough, I can knit while talking or watching a show or even reading a book!   This one is entirely handspun yarn.  The grey is Corriedale and the white is Shetland /Blue Faced Leicester cross.  Both were lovely to spin, although the Shetland cross is taking a good while to process to get the VM out.  I found combing was very effective but a bit more work than I wanted to do.  Instead I've been flick carding the locks and carding them with hand cards to make rolags.  Takes a bit of time but I can do more at a time.  If I get industrious, I may call up a friend and see if I can use her picker to loosen all the locks.   A lot of the VM will fall out during that process, making the carding easier and faster.

I carefully measured the centre line, which is a cable to make sure that the shawl wasn't too large.  I then wet finished it in the washing machine with a bit of Eucalan.  I was careful about only letting it agitate for a minute or less at a time, checking regularly and letting it soak in between.  I was trying to get a balance of yarn blooming and just a bit of fulling to keep the shawl from becoming too big.   I'd use a larger needle size to make sure that the Corriedale stayed soft, so stretching was definitely something to take into consideration.  Well the wet finishing worked really well, and the stitches all evened out.  The yarn bloomed nicely and I'm impressed with how well the Eucalan worked to get the yarn really clean and it stayed soft.   It did however, not full much at all and it's a lovely, airy and large shawl.  I'm disappointed at how little the cable shows against the grey yarn.  While I know that cables show up better on lighter yarns, in my mind the grey was lighter than it actually is.  Still, it's a soft and cuddly shawl.  If I don't use it, it may go on a sale table sometime.


I did play yarn chicken with the bottom white stripe.   I was sure I had enough yarn left in the ball to cast off after I'd knit the required rows.   I got to the half-way mark and thought that  for sure there was enough to finish.   When I was 3/4 done the cast off row I was starting to wonder whether it would be better to switch out the yarn now, or to risk running out with 3 or 4 stitches left.   I kept knitting and yes, I won with 6 inches of yarn to spare!  Phew!


January 11, 2022

New Year Projects

The first scarf woven on the rigid heddle loom is done.   I'm super happy with it.  This photo doesn't quite show the colours accurately, but it's a denim or greyed blue in several different tones and some rusty oranges and reds.   It's quite pretty and wove up even nicer than I expected.   It wasn't quite what I was going for when I dyed the yarn, but I used a warm colour tone set, rather than the cool colours that I normally use.     The colours were a warmer blue, which I adored and a soft red, rather than the cool fuchsia.   The denim blue is a great colour, soft and warm.     The scarf is long enough that I can double it and weave the ends in the resulting loop, for a cozy and fancy scarf tie.   It has enough drape to make it hang nicely, but not so much that it scrunches into a scarf that won't keep you warm.  It is wool though, so I'd expect that.    Being that it was $12.99 for an 8 oz ball, with 465 m, it's really cost effective for a single scarf.   And it was unexpectedly soft for the double win!

These are the mittens I knit from the fibre exchange.   I got some shetland/blue faced leicester cross and some of the same blended 50/50 with alpaca.   I'm still of the opinion that crossing the shetland and the BFL doesn't make a nicer fibre.  However, blending it with the alpaca blend did improve it a lot.

The shetland/BFL was a very, very dark navy.   The alpaca blend was a natural colour.   It was all carded into rolags, although the natural coloured rolags were quite fat and didn't hold together in the roll.   As I was going to re-card the natural anyway, I took both colours and randomly added them to the hand cards and carded them.   If I'd wanted a homogeneously coloured yarn, I would have weighed out the rolags and divided them up with exactly the same weight of each colour in each rolag.   Because I wanted some variation, I just put a bit of each colour on the cards and went to town.    I'd card up about 5 or 6 rolags at a time and then spin.    I did divide the yarn on to two bobbins, partially filling them up, making sure that one had more yardage.   Then I plied them together.  When the bobbin with the lesser yardage had emptied, I wound the rest of the singles from the 2nd bobbin into a centre pull ball or cake, and plied the ends together.   I knew I would need most of the yardage to make a pair of mittens for me, and I didn't want to waste any.

I knit it up using needles a size or two too small.   This took extra time to knit, but the tight stitches make them more wind-proof, so well worth it.   It also uses more yarn, but I have small hands so just had enough.   The mittens are warm. They are thick, stop mos of the wind and are great for hauling buckets of water and food out to the barn.   They have also become my go to mitts for our walks.

These are this year's festive Christmas socks.   This was just when I'd finished the second sock and they haven't been blocked or washed yet.   They knit up quickly and easily.   I was quite happy with them.   The price was good too, as it was just under $10 for the 100g skein, which is for 2 socks.   Considering I was also knitting a pair of socks from a skein which cost $35, I was quite impressed.  

Yes, the expensive yarn is softer.  It was a fancy hand dyed yarn.  Plus the yarn, while stunning in the skein and most alluring, knits up to a pooling pattern.   The colours which took centre front in the skein are not the ones which really show up much in the knitted fabric.  Not only that but I couldn't find any pattern which would work.   My first two socks were in my standard 3/1 ribbing pattern, and even that was too much for the pooling.  

  I ended up knitting most of the second sock before I realized (yes, tried it on) that it really wasn't going to fit.    I had to rip back almost two full socks.   The third sock I started using plain stockinette stitch, works better with the pooling, however that sock is too big.    Right now, the yarn is in a time out, in a ziplock and going into the sock yarn bin.   I won't let myself be lured in by spectacular dye jobs anymore.  


January 04, 2021

New Mittens

 I decided to make a new pair of mittens.   There was nothing wrong with the ones I made a couple of years ago.  They were still in good shape and were still two of them, which seems to be important :)   I was a bit concerned that I'd be in a bit of a bind if I lost a mitten when on a trail, or getting groceries.  It's happened before, but I usually have a couple of spare pairs lying around.  However this was the spare pair before and I haven't replaced them, so it was time.

I had a bunch of Corriedale roving bits and pieces, so I dragged out the blending board.   The blending board is a fun tool.  I have mine because it was a lovely gift.  My first introduction to the blending board was a demo one of the students did at a class.   She brought out the board and a gazillion bits and pieces of fibre, piled them on the blending board haphazardly while poking them down once in a while.  Then she pulled off a single, gigantic, messy rolag.  I couldn't understand why anyone would want a tool which produced what was likely a difficult to spin, chaotic mass of fibre.    Luckily there are a myriad of videos out there which show how easy it is to make functional rolags on a blending board.    I wish I'd taken photos of these rolags, because they were much prettier than the resulting yarn!


This is a soft, bulky yarn, using  purple, raspberry, navy and pink colours. I used the rolags and a long draw to make the Corriedale soft and airy.  The yarn is thicker, on purpose, than I would normally spin for mittens, but I was looking for something warmer than my current ones.   By spinning the yarn thicker and then planning on knitting it on smaller  needles, I could create a dense mitten fabric which held the heat better, and let less air whistle through on blustery days.  I've done this before and they are great mittens for scraping the snow off the car, walking and general outdoors activities.  Not so good if you need to manipulate a camera button or other things that require a bit more precise finger action.   

The mittens were quick to knit up because of the bulky yarn.   I was using bamboo double points, 3.5 mm and I was worried one would break, but they did just fine.   The mittens fit pretty perfectly, which is nice but of course I did have my hand easily accessible for when I wanted to try it on while knitting.    I didn't use a pattern because I've knitted a lot of mittens over the years and a plain mitten with a thumb gusset is pretty formulaic.   I just had to play around with a couple of gauge samples before I started to knit for real.

It's a good thing I had them finished and ready to go.   On Friday they were calling for a crazy amount of freezing rain.  The forecast I checked showed about 8 hours of freezing rain and another 4 of snow/freeing rain mixtures.   We'd battened down the hatches here, gassing up the generator, bringing in 3 days worth of wood, scrubbing and filling up buckets with water.    We're on a well and if the power goes out, so does our well pump.  I didn't want to run out of water for the chooks.

It ended up that we had a limited amount of freezing rain.  Just enough to make the world sparkle.   On Saturday, when the temperature was warming up, we went for a hike.   I brought both pairs of mittens for some reason, which when we got to the trail, turned out to be that my sweetie had forgotten his thick gloves.    Now he has my old mittens and I have these new ones.  Not horribly pretty but happily, they are really functional.

The world was beautiful with a crystal sparkle.   Because the temperature was just hovering above the freezing mark, we did get dripped on a bit.  The trail however, was snowy and not icy at all.  The sun shone for a bit, which made it a spectacular and fun short hike.

January 03, 2018

Small projects

 For the Master Spinner level 6 dye day we needed to dye a multi step gradient colour scheme using fibre reactive dyes on wool  yarn.   I spun a 3 ply yarn, and dyed it two different sets of colours.   I started these shortly after the class but just finished them today, because with this stupid, freezing weather, my hands are cold and there is only so long I can bury my fingers in a cats fur to warm them up.  All I had left to do was sew in the ends and cast off one thumb.
I've spent days untangling dyed cotton yarn.  The cats had decided that the skeins were fabulous cat toys. There were enough ties to keep most of the order in, but lots of weird pig tailing, twists and crossed fibres, made it much harder to wind into balls.   I ended up winding the turquoise one by hand and then running it through the ball winder.   Amazingly, the skein that Kevin had gone crazy with, that looked like a pile of green spaghetti noodles, wound off with the least trouble.  Eventually, this should become instrument straps.

This however has taken up a lot of my time.   My 1st banjo is a resonator banjo, loud and proud.   I kind of mentioned that it would be nice to have an open back banjo, for several reasons, including less weight and the ability to stuff a bit of cloth in the back and just pick quietly, with virtually no noise, so people could do other things while I practiced.

Mainly I was having a mental issue with clawhammer style and the resonator banjo, which was all in my head because either style can be played on any type of banjo.  Turns out I'm still having issues with clawhammer style, but because of a previous injury, not the style.  However, I've found thumb/index lead style, which fits in with my 3 finger picking, so it's all good.   The tone on this instrument is different than the resonator and with the dark fret board it's sometimes easier to play.   At any rate, I sort of fell into the trap of 2 instruments, means 2 times the practice.   It's been eating my time - not sure it's productive, but it's fun.  And maybe by the SCA event, FOOL, I'll be able to play Horses Bransle on it.

February 22, 2017

Mmmm Maple Syrup

What a fiasco the first syrup boil was!   I thought that my sweetie was only cooking up 5 gallons of sap.  Instead he did 10 gallons.  He was out there boiling all day Monday and I finished it up yesterday.   I didn't have enough jars sterilized, so one pint went into the fridge for immediate use.   We ended up with about 2 litres from the effort though.  It's light amber and a bit watery, more like a high grade syrup.   It has a good flavour though.  That being said, we prefer the darker syrups which are supposed to come a bit later in the season.   Still, I'm having waffles for lunch ;)

The handspun BFL sett samples are off the loom and wet finished.   They need a good hard press.   While I wouldn't want to spin enough for sett samples every time, it was pretty interesting to see the differences in the fabric which was made for each sett.  With the twill, there was one I'd use for a blanket or shawl and another which I'd use if I wanted to make an item of clothing.   Good information to know.

I'm winding a warp now for a set of rugs, just for some fast, fun weaving.  I'm spinning more of the BFL, but a trip to Fibre Garden last weekend netted me a whole pound of cotton sliver to play with.

The Japanese Indigo is growing nicely.  I have 2 pots and some soil to transplant these into at some point.   I should probably do it sooner rather than later, but I'm concerned that Kevin will try to eat the seedlings.  He's taken to chewing up a pot of cat grass, which is fine because that is for him.  However, there are teeth marks on both Christmas cacti, the snake plant and an aloe vera plant.   I'm not sure that these little seedlings could stand the wrath or curiosity of Kevin yet.


November 16, 2016

ziplock baggie DOS dyeing - weak acid dyes

DOS -  depth of shade
weak acid dyes - use citric acid or vinegar as the acid agent
 ziplocks - because you can dye multiple colours or shades of smaller amounts of fibre or wool in one pot, saving time and energy.


I need to make another pair of guy mittens before Christmas.  I was spinning up some fleece, I think from the stuff I picked up from the Ontario Wool Growers this summer.   It is white.   I really didn't want to knit white mittens, especially for one of my guys.  I didn't think it would work for any of them and be a bit boring for me.   So I decided to dye up the yarn today.   I had 69 g spun, into a worsted weight woollen - gosh I love the long draw - I added another 38 g of a grey woollenish yarn.  My idea was that I would do the cuffs in a dark colour and work my way to the finger tips in lighter shades.  I didn't want a ton of shading to make it totally ombre, but just colour blocks.   Since I still have a whole whack of that 2% solution of Navy Blue dye, that is what I used.  Because I was dyeing 3 skeins, 3 different colours, I also decided to dye in ziplock baggies so I could do it all in one pot.

Step 1 - weigh and soak fibre, then do the math

First thing is to weigh the skeins and write the numbers down!   You need a work sheet for this and it is a pain when you forget to record the original skein weights.
I soaked with just a couple of drops of dawn dish liquid to help the water absorb quickly.

The math is easy stuff.   You want to figure out the amounts of water, acid and salt.   Water is important for ziplock bag dyeing, to make sure you have enough to cover the fibre.
write quantities of additions on bags


The numbers are 40 x water, 20% salt and 33% vinegar.  Write this down on your worksheet and then take a sharpie type marker - indelible and write it down on the ziplock baggies..   As long as it is a decent quality plastic bag, the brand name doesn't matter.   These are just the most economical around here when there isn't a sale, so I keep them in the fibre room..

These notes make it easier to set up each individual bag.  Note the vinegar has x2 because you split the amount and add half at the beginning and the rest half way through the process.

Bags of fibre, salt and vinegar heating up

You need to use something to keep the bags from touching the bottom of the pot.  This can be a stick across the top with the bags pegged to it, or I just use a dedicated vegetable steamer thingy.   Use a thermometer.  Add a couple of inches of water, set the bags in.  The water level may rise dramatically, depending on the quantity of water in your bags.  Turn the burner on and let the temperature rise slowly.   This is wool, so somewhere around 180° F, carefully open up the bag and add the vinegar.   In a perfect world, you would remove the skein, but with larger amounts, I just spurt the vinegar down the side of the bag and squish well to mix.   Once the temperature gets to just below boiling - let it hold there for about an hour.   Squish, mix, wiggle the bags once in a while to keep the fibre/yarn dyeing evenly.
dye is exhausted after processing

Check the bags.  The dye should exhaust, leaving the water clear.  The dye could exhaust earlier - splitting the vinegar helps the colours absorb evenly, but you still need the full hour of cooking time to make sure processing is completely done, making the yarn as colourfast as possible.  

Once the hour is done, turn off the stove.   You should let the bags cool naturally.  However - if your fibre isn't really delicate, and you are in a hurry, you can transfer the bags to a sink or basin.  If you open them carefully - use gloves please, the water and steam are hot, you can dump out a bit of the water, helping them cool down a bit more quickly.

Once they are cool enough, rinse them in water to make sure there is no unattached dye and hang or lay flat to dry.

This is my dye pot after the bags of wool came out.   Nothing leaked into the water - the bags held tight.   I only used a tiny bit more water than this for the whole process.

Three shades of blue yarn.  I used a 2% dye stock at dos (depth of shade) .5, 1 and 2.

I love the denim blues I got.  Soooo pretty, but I won't tell my guys that the colours are pretty unless I want the mittens for myself.


November 03, 2016

Kitchen update! and yarny things of course

Oh my goodness!  Look what is happening with the kitchen renovation!!!  The walls are painted and I will have to say that my sweetie did an awesome job with the drywall.  They are perfect.   The cupboards are going up.    A few inches of space were lost when the outside wall was insulated, which has meant a shift of all the cupboards.  It won't make much different to most of the room, but the top cupboards on either side of the sink don't quite fit.   We could do it by switching two of them around, but then the cupboards would only be 12 inches wide.   He says if he makes them to fit, they would be 16 inches wide, which would make so much more sense for dish storage.

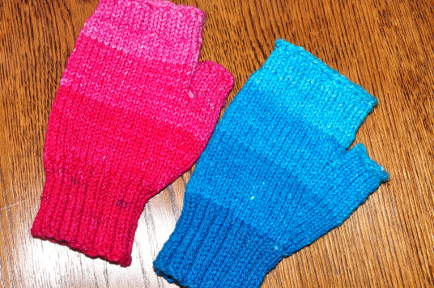
I've been doing a bit of Xmas knitting.   These are simple wool mittens sized to fit any one of my guys.   My sons and my husband all fit the same size, so this is pretty easy.   I can make several pair and they can choose which one suits their fancy.   That little piece of yarn is all that I had leftover from this pair.   Admittedly, I used a partial skein and if I'd made mitts for myself or daughter, there would have been plenty left.  But, really, I didn't need plenty left ;)  The remaining 24 inches of yarn is much easier to dispose of than a partial skein.

This is the 50% alpaca/50% merino blend.  It is a lovely yarn and the mittens are quite soft and yummy.  I'm making another pair of "guy" sized mittens and did have a few moments of angst where I almost ripped them out and made a pair of mittens for myself.   I decided that I actually have enough alpaca in my stash to blend up another batch and make myself mittens from that.
 The needles are Knit Picks.  They come in a 6 pack and are made from brightly coloured wood.  They are some of the sweetest needles I've ever used.  They have a perfect point , weigh practically nothing and slip the yarn across them just nicely.  I will have to keep my eyes open for more of these. 

April 27, 2016

Blending project update

That blending board spree ended up using almost all of my leftover commercially dyed Corriedale top from the level 4 and 5, Master Spinner programs.  I have an 1880's chest of drawers which I use for fibre and equipment storage and the coloured bits of roving were taking up the bottom drawer.   My aim in doing this was to use up the rovings, free up some space and have a bit of a break from spinning the project fleece.  These are just a few of the blending board rolags that I made.  The orange is a bit misleading as it is much more orange than in actuality.   It was my least favourite of all the colour combinations, although I'd hoped I'd used up all that Chili Pepper Red and I think it was Cheese Cake yellow, in a way which didn't end up looking like clown hair.   I was trying for something autumnal and pumpkiny.
I spun it all using the traditional longdraw.   There are 5 different colour combinations there and while I thought my favourite would be the blue - lower left, I ended up liking it the least.  However the orange turned out to be one of my favourites because it really did remind me of pumpkins.   There are 65g - 75 g of worsted weight yarn for each colour, so enough for mittens at least, or maybe a hat.  
more accurate colour of the orange blend
 I spun and plied more white project fleece yarn.   I did a rough check on yards per weight of the yarn. I counted the wraps on the niddy noddy, did the math and then weighed the skein.  I divided the yardage into the weight and got 1.9 y per gram.  By then weighing the rest of the skeins and multiplying by 1.9, I got a rough estimate of 1398 yards.   While by no means truly accurate, I have enough spun to start looking at sweater patterns.   Hmmmm, leave it white or dye it?
I started with the Raspberry/blue rolags.  They had the most yardage but I should have probably started with the smaller yardage lots.   I will have leftovers from these mitts.  Not enough for a decent project and if I'd made larger mittens, I could have used them as a present for someone with bigger hands than mine.  But since I have small hands and a habit of losing mittens, maybe I shouldn't worry too much.  Of course I usually make my pairs of mittens of similar colours, so I can mix and match.  I wonder if odd mittens are a trend yet?

I'm knitting these on brand new bamboo needles.   The first time I tried bamboo needles, I really liked how light they were but I wasn't sure I liked the feel of them.  However, I received a couple of pair free with a yarn purchase one time and since they were the only knitting needles I had of those sizes, I ended up using them several times.  The first time, they were a bit rough but by the third project, they had been sanded incredibly smooth, by the fibre and were getting a glossy finish, I presume the oils in my hands.  They ended up being lovely to work with.  Hopefully these will turn out the same.  Otherwise, the local store has just stocked Knit Picks wooden needles and they are really nice to work with.  I may pick up a pair just so I can put a second project on the needles, stuff it in to go project bag and drag it along with me.


February 22, 2015

Pin Weaving

One of the Master Spinner 5 homework assignments is to spin a warp yarn and a weft yarn, and then weave a 5 in sample, showing how they work.    For the warp, I spun a worsted yarn, though not a true worsted, using sliver and a short forward draw.    I wasn't sure what piece of equipment I'd use to weave with, so I spun 2 different wefts.  One was a slighter larger grist yarn using a point of contact long draw.  The other was pretty similar to the warp yarn, short forward draw from sliver.  

I can't use my floor loom yet and besides, the amount of loom waste for a sample of this size would be  huge.  I'd have to use a dummy warp and until I have clearance to bend, twist and fold myself into the loom, that just isn't going to happen.   I did think of borrowing one of the guild table looms, but then the message came out from the President, that the table looms were dressed for the next scarf workshop.  My friend Maureen had offered to loan me her granddaughter's rigid heddle loom, but it has a project on it, albeit a stalled project and there was no way I was going to take a child's work off the loom for this.   I was going to borrow my girlfriend's table loom for a few months.  Arrangements had been made back in the autumn, but I forgot to remind her to bring it to an SCA event in November and she forgot to bring it.  That would have been the best solution.

The last time I had to weave a small sample, I'd used a cardboard, makeshift pin loom, which really didn't make the grade.  It bent and I couldn't get a decent sett for the silk yarn I was supposed to use.  So, what to do?  I asked my sweetie to make me a wooden pin loom.  It didn't have to stand the test of time, just survive through one project.  I figured some scrap wood and finishing nails.

This is what he made me.  It is assembled with 2 wood screws at each corner and nicely squared.   The frame will not fall apart.   I lost one of the finishing nails when I was trying to figure out how to remove the woven piece from it.   It was easy once I realized I needed to use my little bodkin needle to flip each yarn loop over the nail head. Someplace hidden in the folds of a pile of fibre, is a lone finishing nail, either happy to have escaped, or mourning,  missing his spot in the upper left corner of the loom.

Because I had requested the nails be set at 5 per inch, which gave me a sett of 10, each nail holding 2 theads, I used the weft yarn which was similar or pretty much the same as the warp.  It is my preferred weaving materials anyway.    I decided to do a straight twill instead of a tabby weave.  That was interesting.  I highly recommend manual weaving like this to truly understand a weave structure.   It is one thing to set the loom up according to a diagram and another to have to pick each row up with a needle.

What I notice the most was how long it took.  It thought easy, peasy, it would be done in no time.  It took a couple of minutes to wind the warp on the loom and 4 hours or so to weave it off.    I only had to unweave a couple of rows and I caught them right away, so that was good.  The bad part was that it was a Ground Hog Day mistake.  Like the movie, I made the mistake 3 or 5 times in a row, after picking out the error each time, before I realized that it was time to take a break.

A couple of hours later I was back weaving. The last few rows were easier than I'd thought.   I knew not to let the warp get too tight while winding it on, so I had enough play in the threads at the end.  I'd used a bodkin, for threading cords, rather than a sharp needle.  This turned out to work really well, as I didn't ever catch the warp on the needle.  When it was off the loom, I wet finished it with a bit of agitation in some warm soapy water.  After rinsing, I was going to give it a hard press, but not only can I not bend enough to  access the outlet to plug in the iron, but Kevin kept trying to sleep on the wet sample.  I decided to let it dry au natural, up high, where Kevin can't reach it.


 I really dislike the selvedges.  They are a little loopy and look sloppy.  I don't know if it is my technique or just a result of the pin loom itself.    However the weaving is fine.  I caught all my mistakes and it is nice enough for my homework sample.   It would have been better if it were hard pressed, but maybe I'll remember it before my homework is ready to ship and can re-finish it then, if I really think it needs it.

I can't imagine doing a large project with this method of weaving though. 

January 02, 2015

2014 Final Project Wrap up

 One night just before Christmas, the sky looked like it was on fire.  It was a totally awesome sunset!  I was glad I looked up when I did as I had time to grab my camera and get outside for a few shots.  I couldn't go far because I didn't have my coat, my mittens or time.   It had faded after a couple of minutes, but was glorious while it lasted.

 I finished one quilt but not the second one.  I just did straight stitching along the blocks, but I did a large stipple on the black border.  The backing is a green print that isn't related to the blocks in any way other than some of the greens are similar.   It was well received.   I wrapped up the second quilt top and gave it anyway.  It is sitting on my sewing machine, waiting for me to finish it up.  I have all the supplies except thread. 

I finally found the rest of the alpaca/superwash merino yarn.  I knit the second mitten and finished it the evening of Dec. 31st.   They are soft, pretty and very warm.   I was glad to have gotten that project finished before the new year.

September 26, 2014

Pretty Colours for September

 This is a handspun 3 ply Blue Faced Leicester/Nylon sock yarn, from a commercially blended roving.  The skein only weight 105 g though and measured up at just under 300 yards.  I don't think it's quite enough for a pair of socks with cuffs of my preferred length.  I will either spin up some extra to use for the toes, heels and ribbing or finding some odd bit that coordinates in my stash, just to be certain I have enough yarn.  I dislike socks which are too short in the leg or cuff.  It's dyed with weak acid dyes.  I used Navy and magenta, which work really nicely together.

I'm trying to find an interesting pattern for these socks, but so far all I'm doing it stashing new ideas for future projects. 
 I've not been very successful with getting home started perennials to survive over the summer.  The past couple of autumns though, I've just sprinkled the desired seeds in a suitable garden spot and walked away.  Both times I've tried this, I've come back the next fall to find big, beautiful plants.  The Phlox is lovely and so is this lovely Pink Fall Aster.  So pretty and so very pink!
  The wild purple asters are abundant this year.    Even though some of the flowers are starting to fade, the bees and few remaining butterflies are out in full force.  We don't seem to have the Yellow Jacket Wasps this year, but have Bumble Bees galore.  Luckily they aren't aggressive and just keep working away.  Today's weather is perfect for their last minute foraging with the mild temperatures, sunshine and gentle breeze.

I've started on the second Christmas quilt.  I've 2 of the 3 sets of blocks cut out.  I realized after I was half through cutting the second set of blocks, that I could have save a whole bunch of time by strip piecing and cutting out whole rows of pieced squares.   Now I have to lay out every set of squares for each row, making sure that the blue print is running the same way, since it's directional.   Oh well, the quilt is only going to be about 55in. x 65 in., so it shouldn't take that much time to piece together, even doing it the long way.

Now to get the third fabric cut up and to sit down and piece this baby together, in time to get it quilted.  


April 17, 2014

Using my handspun yarn and making more

 I've spent the past few days winding a warp with the pink yarns and dressing the loom.  I'm using a soft grey Shetland for the weft.  It really softens the depth of pinks.      I realized that I could have dyed the grey and my first thoughts were that I could have dyed the grey, the same array of pinks.  It would have made the fabric much bolder in colour impact.  However, I love the soft shading of the grey and I think it will make the shawl much more wearable.

I tie up my treadles so I can use a walking motion when I weave - left, right, left, right.   I've always had my tabby tied up on the two outermost treadles.  However, I changed that up for my last project and didn't switch it back.   I hadn't realized how ingrained the muscle memory has become.  My legs really want to treadle a straight twill with the previous tie up, that I've used for years and not the new one.  It's making the process a bit slower than usual, though enjoyable none the less.

I spun up a sample of Kinred's fleece.   I combed it out, pulled sliver and spun with a short forward draw.  It's a nice yarn and spins up nicely.  However the fleece has a lot of waste with combing, as it's an old style Shetland fleece.  I'm not sure I want to waste 50% of the fleece by combing.   I'll try carding some fleece and sampling next to see what the differences are.  I was trying to match the grist of some wools I'd spun for embroidery, but I couldn't get it quite fine enough.   The fibre is quite springy and really bloomed when I wet finished it.

April 04, 2014

Pink - lots of pink

I spun and spun and spun.   I had lots of 2 ply white Shetland yarn spun to weave with.   I sent a cryptic email to hubby, with 3 colour choices.  I didn't tell him what it was for, just choose one of Pink, Blue or Purple.   He chose pink.  

With the magenta acid dye, I did a Depth of Shade study including .05%, .1%,  .5%, 1%,  and 2.%, using a 1% stock solution. 

I couldn't believe how long it took to dye this.  I had two dye vats going and started at about 10 am.  I finished up at 10.15 pm    Phew, that was a long day.   While it wasn't all spent at the dye pot, much of it was, keeping the temperatures from going too high or too low.  The darker colours took much longer to exhaust.

A few weeks ago I was playing with my new wool hackle.  Hubby made it for me as there were a couple of colour exercises in my homework.  I was pretty certain I'd never, ever use a hackle again in my life, so instead of putting out the $ for a commercial one, he ran to the hardware store and for $26 he got supplies.   It was -25 in the garage, but he persevered.  It took him the better part of a week, but he presented me with a hackle to play with.
 Here is where I say, NEVER say NEVER!   This was such fun to play with.   I loved the way the fibre came off in lovely sliver using the diz.  It was easy and gave a lovely blend.  I could have kept blending it to get a more even mix but I really liked this one.   It spun nicely too.

Yep, the hackle will be a fun tool for bits and pieces leftover from other projects and to just play with when miles of whatever I've been spinning just seems to need a fun break time.

March 28, 2014

This is how we roll

to steal the words from a currently popular song..
Despite the helper kitty, who is breaking more threads than he fixes, some weaving is getting done.  Okay, Kevin doesn't fix any threads, but he is indeed breaking them as he walks around on the warp beams, parks himself to have a gander outside or just pretends he's playing the harp with the warp threads.
  This photo is of him practicing just as I was about to start dressing the loom.  He's decided that my loom is his personal gymnastics equipment.   It has created a few minor problems with the project, but not insurmountable.  Certainly not as bad as my first few woven inches, when I realized that the tension kept releasing.   Linen thread needs to be kept under an even tension.  The brake kept slipping, releasing the tension, making weaving almost impossible.   After crawling around under the loom, changing tie ups and fiddling about, I checked the Leclerc online info about brake assembly.  

It's a really simple piece of equipment consisting of a drum with a tensioned metal band around it.   There seemed to be only 3 main problems.  The band could have stretched; it looked fine to me.  The drum could have gotten some oil on it or the band could have smoothed the drum.  Either way, my brake drum has a light layer of rust, so it's neither been lubricated in any way nor is it too smooth.   Finally I noticed the turnbuckle in the brake assembly.  It felt loose, so I twisted it around a few times until it was much tighter..  I was really careful about making sure it went the right way and I didn't unscrew it completely.   That would have been a horror story and project wreck at the same time.

However, it worked.  I ratcheted down the brake band and it tightened up perfectly.  No more slipping and my warp is lovely and tight.   I can weave properly and my fabric is nicer.     It's a much nicer experience than the frustration of the loose warp.   Now if I can only convince Kevin that he doesn't want to hang out on my loom while I'm weaving this.


March 21, 2014

Flax and Wool


 With spinning up what I'd hoped was enough linen thread for the warp, I decided that I'd better get around to scouring it.  It was dark, harsh and a rough feeling thread.  I used the recipe from Linen: From Flax Seed to Woven Cloth by Linda Heinrich, which uses Soda Ash and dish washing up soap.  It worked well the last time I tried it.   I weighed up what I needed, using about 3/4 the amount of soap and soda ash because I was going to do at least two scouring baths anyway.  My pot was only so big and I had my imagination run wild with visions of all that dish soap, bubbling up, over the pot and onto the floor.    I figured that was reason enough to do a 3/4 recipe the first time and do it a second time if needed.

I did indeed do a second scouring bath.  After cooking it for a couple of hours, it was lighter, but I wondered how much lighter it would get with a second bath.  Really, the scouring time is minimal, since I really can't justify adding the time I spent doing other things while the pot simmered.  It is just the time to measure the chemicals, set up the bath and check on it periodically.    The second bath made a huge difference.  Not only was the linen lighter, but it was much softer.  If I'd taken the time to whack it while drying, it would have been softer still. 
The threads were all curly and kinky though, since they are singles.  Heinrich says in her book, to give the skeins a good snap after scouring.  It was an amazing transformation.  The skeins went from curly and impossibly messing looking, to smooth, flat and lovely.  It was the a wonderful moment when this happened.  I'm sure that was when I went from enjoying spinning flax to loving spinning flax.  It was pure magic!  I love fibre moments like that.  It makes all the effort so very worthwhile.


After drying, I wound some of the skeins into cakes so that I could wind the warp.  Today I did a bit more research and changed my mind about sizing the warp.  I wasn't going to bother with it as the warp threads are plenty strong.  However, a perusal over some old documents suggested that sizing would keep the singles from getting hairy, keeping them smoother.  It's another short time project so I decided to mix up some double strength gelatin and bite the bullet on drying time.  I'd wanted to start dressing the loom today because tomorrow is planned to be another Maple sap boiling day.  None the less, the warp has been soaked in sizing and is now drying.

I also finished up spinning a skein of the brown wool for the weft.   There are 530 yards of yarn in this skein.  Combined with the tan wool singles, there should theoretically be enough.  I know there won't be though as a) wool stretches on the niddy noddy, making counts overly generous sometimes and b) I'll weave as much as the loom waste as I can, so as waste as little of the handspun weft as possible, since I didn't put a dummy warp on the loom for this project.

For fun, I tossed off a dye vat of a sunny yellow-orange colour and dyed up a skein of 2 ply sock yarn.  I'm pretty sure this is Blue Faced Leicester and nylon, that I spun up a couple of years ago.  It's been sitting here, waiting, because, well, I'm a much better spinner now and my 3 ply sock yarns are nicer.  But I didn't want to waste it, so it's now dyed and into the sock yarn stash.