I've finished spinning the 100 g of natural green cotton. I'd forgotten to divide it up in half before I started spinning, so part way through, I took 50 g off the end of the sliver and hoped it was good enough. Sometimes the labelled weight is a few grams off, or more than a few, which can make a difference in the spun yardage. In this case though, I had only a 3 yard or so difference in bobbin yardage, so all was good.
The light skein is 227 yards of 2 ply cotton before it was wet finished. The darker green is 345 yards of the same cotton after wet finishing. I simply tossed the skein in a pot of water and simmered it for about 40 minutes. I so love the colour changes with coloured cotton after wet finishing. Be aware though that white cotton can turn off white or tan after simmering.
I put some roving mill ends, which I'm pretty sure are superwash BFL with a bit of nylon on the Minstrel. I am doing some natural dyeing on the long weekend in May and thought maybe I could get enough spun for the dye pots. Just in case, I'm going to hunt down some commercial white wool yarn as well. I'm planning on having 4-6 dyes going, using several different mordants and maybe some after dips for colour changes. We'll need a bunch of yarn for all that.
Our weaving/spinning guild has to move. We've got almost everything packed up but decided to thin out a bunch of our stash. We had 8 stacking bins of stuff that no-one had touched in years, as well as a huge tote of donated bits. I was looking at a bag with a warp in in, wondering what I could do with it, when Judy gave me another bag and said here, this one says 2 warps. They came home with me, since I'd been complaining that there is a 4 x 8 sheet of formica on the floor in front of my warping board, so I can't wind any warps.
Only one warp was labelled and it was with an approximate end count. The other 2 had no labels at all. No wonder they sat in that bin for ever. How could anyone figure out what to do with them, with no info! This morning I counted ends and measured yardage. They are all different. One is probably 2/8 stark white cotton, is 11 yards long and would only be wide enough for mug rugs. 11 yards of mug rugs - eek. The next one is only 3 yards long but has 298 ends and finally a 6 yard warp with 208 ends, in what looks like mercerized cotton. It's not like I can even mix them together to make something wider because of the length differences. The 11 yard warp has a cross only at one end, or I could have easily cut it in half and doubled it up. Right now it's really only wide enough for mug rugs and really, who would want to do 11 yards of mug rugs.
Natural Dyeing, Spinning, Weaving, Other Fibre Arts, Gardening, Cooking, Costuming, and...
May 03, 2017
April 26, 2017
Signs of spring
There are signs that spring is really here! There are leaves on many of the trees. In town, where it seems to leaf up a little earlier than out in the country, there is already a canopy of green. The magnolia trees were flowering and so beautiful. Magnolias are a bit of an iffy proposition as we can get late frosts which stop the flowering abruptly some years.
The leaves are bursting forth out in the country too. This photo was taken a few days ago. Yesterday there was the slightest green haze on the trees, but today, they are that bright spring green. So pretty!
The currant bushes are getting ready to flower. The one on the left is a native currant bush while the one on the right is a European currant variety. Both are supposed to be hardy in this area.

The tulips are in full bloom today, but yesterday they were just starting to open. The sunny daffodils have been happily blooming for a few days now.
These are some of the Japanese Indigo seeds that I started early this year, in hopes of getting them to seed. I transplanted the seedlings into several larger pots. This one is doing the best. You can see that the leaves already have a bluish cast to them, so they are developing pigment. I need to transplant them again, into a larger pot which will go outside, but there is still too much of a frost risk to do so yet. They are doing much better than I'd expected, so this is making me very happy.
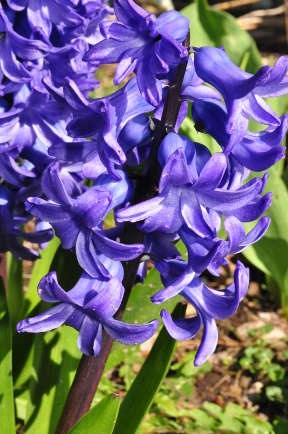
The Hyacinths are out in full force. They are beautiful and I love the scent. However it's been grey, dull and too cool for the scent to throw far, or it's been warm and too windy. Either way, I get to see them, but having a cup of tea on the deck, surrounded by the scent of the Hyacinths has not happened yet this year.
The leaves are bursting forth out in the country too. This photo was taken a few days ago. Yesterday there was the slightest green haze on the trees, but today, they are that bright spring green. So pretty!
The currant bushes are getting ready to flower. The one on the left is a native currant bush while the one on the right is a European currant variety. Both are supposed to be hardy in this area.
The tulips are in full bloom today, but yesterday they were just starting to open. The sunny daffodils have been happily blooming for a few days now.
These are some of the Japanese Indigo seeds that I started early this year, in hopes of getting them to seed. I transplanted the seedlings into several larger pots. This one is doing the best. You can see that the leaves already have a bluish cast to them, so they are developing pigment. I need to transplant them again, into a larger pot which will go outside, but there is still too much of a frost risk to do so yet. They are doing much better than I'd expected, so this is making me very happy.
The Hyacinths are out in full force. They are beautiful and I love the scent. However it's been grey, dull and too cool for the scent to throw far, or it's been warm and too windy. Either way, I get to see them, but having a cup of tea on the deck, surrounded by the scent of the Hyacinths has not happened yet this year.
April 21, 2017
This week's wrap up
Now if only the sun would shine, because I'm tired of all this grey weather.
Labels:
banjo,
pysanky,
Spinning,
spinning cotton
April 17, 2017
Waffle Weave update, spring cards and woad seed planting
I planted some more Japanese Indigo seed, these ones are destined for the garden, whereas the first batch was grown early, in order to try to produce my own seed. I also planted some woad seed. I used old seed and only a few germinated. I took some of that seed and soaked it overnight, and a few more germinated. I soaked some seed overnight, layered it in paper towels and set it in a plastic bag, like that grade school science experiment with beans. A few more seeds germinated. Then I found the last remaining seeds that a friend gave me more recently. I soaked those over night and planted them. So far, none of these last batch have germinated. But... (happy smile here ) so far enough of the old seed has germinated, using all those extreme methods, that I should have enough to play around with woad pigment later this summer, if I can keep them alive. I think I have 20 seedlings so far. If the fresher woad germinates, then I'll have a safety net as well.
I have fresh Madder seed if anyone needs any. It's from last fall.
Labels:
block printing,
waffle weave,
weave structures
April 12, 2017
Pysanky Process
Apparently, like icons, pysanky are written, not drawn. There is lots
of symbolism in the designs. The first found wax resist dyed egg dates from
about the 15th century. There are decorated eggs found from the
neolithic era, although they are made of ceramic. There is an ancient
history for decorated eggs, that is for sure.
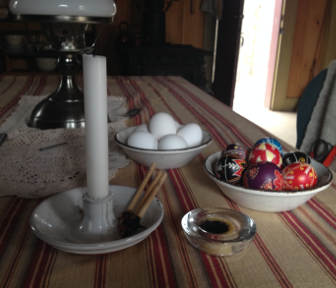
2 kistka and a beeswax disk used to draw the wax lines on the eggs. The small, pointed tip of the kistka is heated in a candle flame, then dipped in the wax, which melts and fills the reservoir, allowing lines to be drawn on the egg shell, like a pen. Lightly drawn pencil lines can be used as guidelines, especially useful for long, straight lines. The beeswax turns black when the candle soot mixes in. This makes the wax easier to see on the egg, but doesn't affect the outcome.
All the areas which you want to be white are covered with wax first. The the egg is dipped into the first colour. Once the egg is dyed to the desired depth of colour, it is removed from the dye and allowed to dry. Then the areas which you want to be the next colour are covered with wax. Here the orange egg has been dyed twice, with the white, yellow and orange areas covered with wax. The dyes need to be applied in a particular order. Green can contaminate other colours so is often painted in areas specifically and then covered, rather than dipping the whole egg in the dye. Blue and green are usually dyed before red, but the blue will make the red turn a bit purple, so it is useful to plan out the colours ahead of time. Brown eggs may not show all the colours clearly and the colours won't be as bright s on white eggs.
To remove the wax after all the dyeing is complete, the egg is held near the flame and the wax is wiped off as it melts. You can only do a small area at a time as the wax cools down fairly quickly. I'm a little disappointed in the yellow dye. It has weakened fairly quickly and it doesn't dye the eggs evenly. I don't know if that is an issue with the eggs or the dye. Because of the weakness of the yellow dye, the contrast on the yellow and white triangles isn't quite enough to be really effective. On the other hand, the purple egg, which is a replacement for the one I found cracked, is much nicer than the one that I originally made.
I've 6 finished, although I really made 8, but 2 had cracks in them. I might have time to make 1 or 2 more before I need them to fill the Easter Basket.
April 11, 2017
The week before Easter
I cut the purple waffle weave off the loom on Sunday and wet finished it. I started sewing between each piece, to secure the threads when I ran out of thread of an appropriate colour. I had no white thread left and only purple of an odd shade which looked horrid with the towels. I had to go to town anyway yesterday, to get to the guild room, run some errands and get my cute little car in for an oil change, so I just added one more stop to pick up some thread. Hopefully I'll get started on hemming the face cloths tonight. This run of face clothes was done at a sett of 24, which makes for a very nice looking fabric. I'm going to do a comparison of the waffle weave I did at sett 20 and these at sett 24. The slightly looser ones have a lovely drape are are soft and absorbent when in use. It will be interesting to see if these work the same way.
I started on the candy for the Easter Basket. Milk chocolate rooster lollipops and peanut butter filled, dark chocolate frogs. This is pretty easy stuff, melt the chocolate, pour in a mould, chill till hardened, pop the candy out and bag. The gold twist ties make them look special though. I wonder if I should get some jelly beans to add a bit of candy colour?
Every Easter basket needs Easter eggs. It is hard to believe that it takes about 3 hours per egg to make these, and these are simple pysanky, done mainly freehand. There are fancy electric kistka, the stylus used to spread the wax, lathes to make lines perfectly straight and even etc. I just use a candle, a little tub of beeswax and very basic kistka, although I have 3 different sizes for thick, medium and thin lines. The one on the bottom right egg was cracked, so I need to make a replacement. The blue egg, has turquoise details, but the colours are too similar to show well. I'll redo that egg as well. I was supposed to demonstrate these on Friday, and then could give them to my kids on Sunday. I was going to use these as samples for the demo. However, because of a work schedule, we're gathering on Friday, so the original plan won't work, if I'm able to switch the demo to Sunday. Not sure how I'm dealing with that yet.
I just realized that this stuff should all have been done last week, to keep this shorter week less rushed. I guess that didn't work out in my planning.
I started on the candy for the Easter Basket. Milk chocolate rooster lollipops and peanut butter filled, dark chocolate frogs. This is pretty easy stuff, melt the chocolate, pour in a mould, chill till hardened, pop the candy out and bag. The gold twist ties make them look special though. I wonder if I should get some jelly beans to add a bit of candy colour?
Every Easter basket needs Easter eggs. It is hard to believe that it takes about 3 hours per egg to make these, and these are simple pysanky, done mainly freehand. There are fancy electric kistka, the stylus used to spread the wax, lathes to make lines perfectly straight and even etc. I just use a candle, a little tub of beeswax and very basic kistka, although I have 3 different sizes for thick, medium and thin lines. The one on the bottom right egg was cracked, so I need to make a replacement. The blue egg, has turquoise details, but the colours are too similar to show well. I'll redo that egg as well. I was supposed to demonstrate these on Friday, and then could give them to my kids on Sunday. I was going to use these as samples for the demo. However, because of a work schedule, we're gathering on Friday, so the original plan won't work, if I'm able to switch the demo to Sunday. Not sure how I'm dealing with that yet.
I just realized that this stuff should all have been done last week, to keep this shorter week less rushed. I guess that didn't work out in my planning.
April 06, 2017
Spin Patterning project update
Spin patterning project update...
I've spun about 1000 yards of Z twist singles from the Falkland top. They are wet finished and dried on the niddy noddy to keep the active twist tamed for the moment. I am pretty sure that I'll size them using double strength gelatin because that is the process I've used successfully with wool singles before, but I'm still thinking about it. They are very evenly spun, the twist is consistent and they seem to be quite strong, so I might not bother with the sizing.
I've started on the S twist singles, which look pretty much the same from a distance. Except for the way the bobbin spins, and the way you need to twist the thread when you want to thin out a slub, it all spins the same. Because of this sameness, I am spinning some Blue Faced Leicester sliver on the Sonata, just to switch things up. The funny thing is that it's off white, so still white but it's destined for a dye pot, so it feels different, even though it isn't.
I almost wound off the partial bobbin to free it up and start spinning some cotton for a demo day at the Marr shop at Westfield Heritage Village. I'd started the process and put it back on, deciding it wouldn't matter. Wouldn't you know that over half the visitors asked about cotton and it would have been the perfect teaching opportunity. I spent the day spinning with Cat, who grows and processes flax. She's really interesting and great fun to chat with.
I put a narrow waffle weave project on the loom. There are 2 threading errors. I noticed them almost right away, while I was testing in the first inch of weaving. However, I realized that I'd have to re-thread 3/4 of the heddles. I looked at my timeline and decided that I really didn't want to spend 2 more days redoing the heddles and then rethreading the reed, thereby having to rush the weaving and finishing of the project. These need to be woven off, wet finished, hemmed and turned into decorative bunnies before next Friday. That timeline means my kids will get bunny shaped face cloths with threading errors. The waffle weave should hide them pretty well though.
I'm reading some textile books at the moment, Ann Richards' Weaving Textiles That Shape Themselves, which is really interesting and Susan Faulkner Weaver's Handwoven Tape: Understanding and Weaving Early American and Contemporary Tape, which is just a little dryer but still really interesting, and finally an old copy of American Woven Coverlets by Carol Strickler which is my "easy" read for sticking in my bag when I have to sit around waiting for any reason.
I've spun about 1000 yards of Z twist singles from the Falkland top. They are wet finished and dried on the niddy noddy to keep the active twist tamed for the moment. I am pretty sure that I'll size them using double strength gelatin because that is the process I've used successfully with wool singles before, but I'm still thinking about it. They are very evenly spun, the twist is consistent and they seem to be quite strong, so I might not bother with the sizing.
I've started on the S twist singles, which look pretty much the same from a distance. Except for the way the bobbin spins, and the way you need to twist the thread when you want to thin out a slub, it all spins the same. Because of this sameness, I am spinning some Blue Faced Leicester sliver on the Sonata, just to switch things up. The funny thing is that it's off white, so still white but it's destined for a dye pot, so it feels different, even though it isn't.
I almost wound off the partial bobbin to free it up and start spinning some cotton for a demo day at the Marr shop at Westfield Heritage Village. I'd started the process and put it back on, deciding it wouldn't matter. Wouldn't you know that over half the visitors asked about cotton and it would have been the perfect teaching opportunity. I spent the day spinning with Cat, who grows and processes flax. She's really interesting and great fun to chat with.
I'm reading some textile books at the moment, Ann Richards' Weaving Textiles That Shape Themselves, which is really interesting and Susan Faulkner Weaver's Handwoven Tape: Understanding and Weaving Early American and Contemporary Tape, which is just a little dryer but still really interesting, and finally an old copy of American Woven Coverlets by Carol Strickler which is my "easy" read for sticking in my bag when I have to sit around waiting for any reason.
Subscribe to:
Posts (Atom)