Pages

December 21, 2019

Merry Christmoose!


I was so not on the ball when it came to Christmas cards this year.   I finished these 2 days ago.    I only printed up 5 of them, because obviously I didn't have time to mail them out.  So please excuse my tardiness and enjoy my silly card and the honest sentiments sent with it.

Happy Christmas to all. 
  Best wishes for a  New Year full of Joy and Sunshine.  


December 18, 2019

Hedeby Bag

Every time I've tried to update my blog, something has happened to distract me.   There was even a power flicker, shutting down the computer just as I went to start writing.   So right now, I'm just ignoring everything else and just sitting down and doing it.

I'd love to say I woke up early to get this photo, but really it was 7 am and still dark out, but the moon was incredible.   Because I could see the sun starting to rise behind me, I didn't have time to grab the tripod which would have made the photo so much better. The view lasted only a few minutes but it was pretty and intense while it did.


I stumbled upon some information on Haithabu or Hedeby bags, and got drawn into finding about more.  I decided to weave some fabric and turn it into a bag, based on some of the information.   I realized that I wasn't going to be able to weave reproduction  fabric for the bag, in the timeline I had in mind, so I went with all wool, in a sett much coarser than the extant fabrics, but in a checked pattern which was my interpretation of a description of an extant textile find.

I decided to only put one project on the loom.  That wastes fibre in loom waste, but is much faster to wind, thread and weave.   Since I really only was doing a single project, I felt it didn't matter.    It took only 1 day to wind the warp, and dress the loom.  I was ready to weave but getting dark out, I decided to wait until the morning to weave.

The bag has wooden handles, which I didn't get a photo of before I assembled the final project.   Normally I would have tried to make them myself but as I'd given myself only 5 days to get the bag completely done, I asked my husband to cut the handles out.

 His first thought was that we'd do it on the weekend, only I had wanted to use the bag on the Saturday, so as I started on a Monday, that evening we ran out to get some 1/4 in wide wood.  I drew the pattern, traced it onto the wood and he drilled out the holes on the Monday and then cut it out on Tuesday.  I sanded it, stained and oiled it during the rest of the week.  I used tung oil to finish it.   I'm sure there is some varnish someplace around here, but I use the oil on one of my wheels, so I knew where it was. It seemed easier that way.

Weaving should have taken no time at all, despite the checks, but Phil kept "assisting"me.  That meant lots of tea breaks while he kept watch over the garden.   As soon as he was bored, I could get back to weaving.


I lined the bag with some hand woven cotton.  It was a tea towel which for some reason, was funky on one end and never got hemmed.  I put in a totally non-period zippered pocket to hide things like my keys.  

I sanded the handles and had them ready to stain on Wednesday.   On Thursday, I coated them with tung oil.  I didn't have time to put a second coat on though since I was assembling the bag on Friday.

I had been hoping to sew the bag and lining on the Thursday, but it was an off the chart hectic day, where I was hardly home and crazy busy.  Sewing instead happened on Friday.  

I wasn't sure how to attach the bag to the wooden handles, so I used the leather and rivets I'd used for banjo and guitar straps.  I cut some thin ones for the centre slot, but the bag seemed to be sturdy enough without those particular bits, so I left them off.  All I needed to finish it off was a strap.  I need to make a new one, but this was a piece of tablet woven trim I found in my trim bag.  It's too narrow and the wrong colours, but if I was going to use it on the Saturday, then I needed a strap.

Saturday I was sick so ended up staying home.  Go figure.

  Still, I'm happy with the bag and I will get to use it.  I have time to make a proper strap, as long as I don't put it off too long.  I have to admit that I so loved doing this project.  It was a lot of fun.  It didn't take forever to make and I'm thrilled with the results.  It brought back lots of memories and urges to do more.


December 01, 2019

CP Holiday Train

 The CP Holiday Train has been running for 21 years.  It's an effort to raise funds and food for local food banks across southern parts of central and western Canada, and parts of the US.  The highly decorated train goes into towns, large and small where local charities collect food and monetary donations from the event attendees and also get a large donation from CP Railway. 

Besides having a train decorated with all sorts of lights,  musicians perform a mini-concert, and the whole event is free.   Mind you, if you want to see the performance, you need to come early and our weather is unpredictable, so it could be cold, wet and sloppy.  But it's free and fun.  There are people of all ages out to enjoy the event.

Last year we showed up shortly before the train rolled in.   We were actually still walking to the old train station when we had an amazing view of the entire train coming in to town.   It was incredible.   We got to hear JoJo Mason and the Sam Roberts band.  I say hear because we were at the back and I'm short, so I got to see the shoulders of everyone.  It was still fun though.

This year we arrived early and still only made it to the second row from the safety barriers.  However I was able to see and had enough space to stick my camera between  bobbing heads to get a few shots.  I actually took a ton of photos, because people were sort of dancing, kids were bouncing and there was a lot of crowd movement.   Alan Doyle and Beautiful Band played.   It was a concert that wanted a lot of crowd participation, but there were a lot, and I mean a lot of children and he played a song or two, which nobody seemed to know, so the crowd was pretty quiet.    It was fun though, and worth the 35 minutes of hanging out in the cold waiting for the train.   

The train itself is quite a view.  It's more than a couple of cars, and there are lights all over it.  It is a great way to get a start to the holiday season. It did make me wish I knew more of low light photography, and had a faster, closer lens.  It's always something lol!

November 24, 2019

Fall crafts and colours

I finally found enough copper jelly moulds to be able to display them on the wall.  Only one of them on the wall looked really odd, so I took a few trips to various thrift stores when I was out and about over the summer and autumn, and found these.   There are a huge number of different designs, but the curved fish, the heart and the fluted circle with flowers are on my hopeful to find list.  They are fun, pretty, the copper alloy colours are often quite different and they are inexpensive.  The most I've paid for one was $2.

 My Christmas wreath was looking rather sad.  It's been in use for a couple of years and we forgot to take it down last winter and it stayed up until I put the autumn wreath up in September. That means it's weathered, worn and wilted.   I made it from an old wire hanger and some old artifical pine  greenery garland.   Today, I grabbed my pruning secateurs and trimmed back a bunch of Bittersweet vines which were trying to grow up a Lilac.   I wound the larger ones into a circle.  To secure them, I wound smaller vines around the circle.  I slipped as many vine ends as I could inside the wreath.

It's a little lop sided and there are a few places where the vines snapped when I tried to twist them around and they didn't want to bend that way.   The vines aren't very flexible this time of year and soaking them would have helped immensely, but while it's warmer outside today than recent temperatures, being about 4C, it is still too cold to be dunking my hands in a bucket of water outside.   This is definitely an outside or at least studio appropriate craft.   I left it on the patio table for a few hours to help it dry, but it gets little sun this time of year. It's now drying in front of the fire.  I know it's going to warp a bit and won't dry flat, but at least it will dry.  I've some holly and some glittery silk flower poinsettia picks to hide the uneveness.   

Bittersweet has a lot of little pointy things and sharp bits, so you need to wear gloves.   In the past, I've used a lot of Virginia Creeper vines to make wreaths, and they work really well.  However any viney thing can be used to make a wreath, as long as it's not too thick.   This time of year it would be easy to mistake poison ivy for benign vines, so make sure you know for sure, what you're snipping off.

The leaves were just starting to fall when we had snow.  Not just a flurry, but enough to stick to the ground.  The leaves all fell quickly and got covered with more snow.  Finally, it's melted and dried up enough that they can be dealt with.   Leaving them on the lawn isn't an option, if at all possible, because it encourages mice to run about safely.   With the lawn short and the leaves gone, the crows and neighbourhood kitties seem to be able to find rodent snacks much more easily and they tend to stay away from the house.  A win/win situation in my opinion.

My man has been out on his little tractor, mulching the leaves.   We used to bag them with a mulching push mower, and using them as mulch in the garden.  However, that is a lot of work.   With this little lawn tractor, it chops them up and they can be pushed to the side hedges.  It's fast and efficient.  Considering I don't even know if we have  a working push mower, this works just fine.

While I told myself that I really didn't need any more lustre ware doll dishes, I found this little teapot for $4 when I was Christmas shopping.   Almost all of my doll dishes are in sets, mainly full but some partial.  I think this is the only single I have.  But it was cute, in good shape, had a lovely and clear identifying and dating mark on the bottom.  I've rarely seen them with clear Made in Occupied Japan stamps on them.   It just slipped into the basket full of gifts I was purchasing and before I realized it, it was cleaned up and in my china cabinet.  Oops!

From when I was a kid, I've always had a thing for china doll dishes, and there were a couple of other complete sets which I lusted after, but left behind, so I'm telling myself I was good.


November 19, 2019

Crazy small projects

 I used to make soap.  Lots of soap.  Mainly cold process, although I did try hot process once.  I didn't like the hot process as it just took too long, and I wasn't in a hurry to have soap ready.   I haven't made soap in ages though.   However, I found some melt and pour soap supplies on sale and thought I'd play around a bit.   The clear base didn't even look all that clear in the block, and it certainly didn't finish clear.   I'm not horribly impressed with my first efforts.     I have some shea butter base and another base which I'll try next.   If nothing else, I have lavender oil to add in them, and the bars of soap can be used in wool storage bins to help keep the moths at bay.

And yes, they do have little toys embedded in them.   The round one on the far right has a snail in in it, while the shark and whale ones were obviously too big for the moulds.  The turtle was just a tad too tall but the lobster and frog were perfectly sized.

I whipped up some placemats.  I used cotton warp and the weft was commercial yarns or home made t-shirt yarn from new t-shirts which were on sale for cheaper than the thrift store.  The solid coloured yarns was a new recycled t-shirt yarn which I tried out.   It's great fun to work with, fast to weave up, but turns out to be quite expensive if you wanted to do a large project with it.

I made a wool worm holder.  Wool worms are the strips of wool used in traditional rug hooking.  After cutting the wool into worms, I was stashing them in large zip-lock bag, depending on project.  That meant there were a bunch of colours in each bag.  As I was hooking away on the rug, I realized that I had no idea how many worms I had left.  So I made an organizer to help keep some semblance of order.   I quilted up a mat, adding snap tape to the inside.  Then I bound the whole thing in bias tape.   It works a treat.   For this particular project, I would need either a larger one or a second one though as it doesn't hold all the colours and textures that I need.   I've also been working on a smaller project, still working out of the bags since the worms are much thinner that these ones.    It looks like I'll need to make a couple more holders in the near future.  They take up less room than the plastic bags and make it easier to find the particular colours needed at any time.  Plus the worms just slide out of the holder with a little tug, which is so much easier than prying them out of a ball of thin strips of wool in the bag.

Currently the loom is empty.   I need to make a rug, as per a family member's request but I just finished a run of rugs, and am dithering over my next project.    The wheel has cotton on it, and I need to finish up some rug hooked ornaments.   Sometimes what I picture in my mind's eye, doesn't actually materialize when I work on it.  Thus my embellished with beads and embroidery, hooked ornaments don't actually match my expectations.  Now if they'd been felted, it would have been a different story.

We've been running both wood stoves with the unseasonably cold and snowy weather.   It seems between loading the stoves and keeping the humidifier running, that sometimes there is little time for anything else.  But we're warm and the humidifier runs in the corner with the instruments, so they are looked after.  The cats like to cuddle in the cooler weather, so there is that as well.   Phil has no issues in coming up to me and demanding that I sit on the couch so he can curl up on my legs.    I don't always give in to him, unless it's lunch time or I'm ready for a tea break.  He is a darned good snuggler though.

October 22, 2019

Crafty Update


I was making place mats - sort of like this.  I wound a warp long enough for 10, with lots of loom waste and then added an extra yard last minute.    I warped from back to front and thought all was well.  I started weaving and my tension started getting wonky.  First one area of a few threads and then a different area.   After fussing with it for a while I realized that it would be faster to just unwind the whole warp, chain it as I was going and rewind it on.   I'm almost at the end of winding it off and chaining.   What a pain this is though.  More than once I thought how much easier it would have been to just cut it off and restart.   But that would be a huge waste.

It was Fleece Festival last weekend.  My guild was there.  We answered a gazillion questions about weaving and spinning.  Tons of people got to try their hand at throwing a shuttle on our demo loom.   I helped a number of people with spinning issues/questions they had and was a focus of many.    We handed out tons of information and even sold a few items.   It was a hugely busy weekend.   I even managed to get all the ends twisted on my pile of scarves.

It was Pumpkin Sunday at Westfield.   The weather was perfect and there were many visitors.  We were all cooking all sorts of pumpkiny things.   I worked with a family of 3 who were great fun.   I'd researched some recipes to cook, with a pumpkin/squash theme from 1850-1860. I had to modify them for a couple of reasons.  The soup was scaled down to a usable volume.  We did a vegetable soup, with squash grown in the Lockhart garden which was substituted for turnip, as per possibilities in another recipe in the same book.  Then we made a pumpkin cornbread and a steamed pumpkin pudding.  The pumpkin pudding was a bit of a historical stretch, but very delicious.  It was PUMPKIN Sunday after all and felt it important to follow the theme.    I'm a bit ticked that I didn't get a chance to photograph the rest of the foods since they looked so good.  However it was too busy to haul out the electronics and then we ate lunch together.    It was a lot of fun and so tasty

October 02, 2019

Alpaca Walk and Talk!

 For Mother's Day, I received a gift certificate for an Alpaca Walk at S.A.M.Y's Alpaca Farm.   My husband had arranged this with my daughter.   We weren't quite on the ball when we reserved our dates, so ended up going in September.  It was a wildly windy day, but the rain held off and temperature was  perfect, just comfortable.

When we arrived, we were greeted by an absolutely enormous St. Bernard dog.  He was an overly friendly, energetic, but gentle and somewhat slobbery giant.  We were told his background story: he was a rescue, and it's amazing that he is as well socialized and friendly as he is.

 The gal, whose name I don't remember, who hosted our adventure, was extremely knowledgeable.  Her talk included a ton of information and she answered our questions nicely.  She was welcoming, friendly and put us at ease immediately.

We got to bottle feed Elizabeth, who was an orphan alpaca.  She's 5 months old here, and really didn't need a lot of feeding.   It was fun to do though.

We were given containers of sweet feed to feed to the ladies, who  were a tad pushy, but not aggressive. They did like the grain and weren't pushy towards us, but towards each other, vying for that little handful of grain and molasses.  The girls were incredibly gentle to us, veritable strangers in their midst.
They have several guard llamas who were very gentle as well.  I'd only met very aggressive  llamas in the past, so this was a good experience.  The stories told, showed us the llamas were worth their while, since they had trampled several coyotes in the past and kept the herd safe from predators.

After meeting the girls and doing a walk by the boys, we went into the barn where we met the working boys, who do the walks.  There were 5 of them, who were pretty, trained to walk on a lead and quite accepting of strangers.   We got to choose from 3, as 2 of the alpaca had already been out in the morning.    They were easy to halter and lead nicely, however Rusty, my daughter's pick, wasn't happy about being on the roadside.   With the wind, I could hear the chuff, chuff, chuff of the wind turbines in the distance, so I wondered what the alpaca could hear and if that was why they weren't overly enthusiastic about walking outside.  So when my alpaca decided to balk as well, we went the opposite way and got a short walk in the other side.  We were told that usually they are quite compliant and enjoy the walks.   They were certainly appreciative of the little patches of alfalfa clover that we lead them to here and there along the way.
Nope, not going there!

This was a fun way to spend a couple of hours and I think well worth the nominal fee.   I would have brought home a fleece, if Nick's fleece had been in the little shop.  He's a dark grey and was incredibly soft.  The other items were quite reasonably priced, however I didn't need a mug, no matter how cute it was and I don't generally buy yarn.
I have to give kudos to hubby for finding this place and making arrangements for me to visit.  It was brilliant!

Nick sure liked his hay. I liked his fleece!


September 25, 2019

The Rugs are ready for the Floor

 The rugs are done!  Yay!  I finished weaving the last one today.  I cut them off the loom and raced to the sewing machine.  I needed to secure the warp between each rug before cutting them apart.  I used a zig-zag stitch to secure the threads, making the stitch width a bit smaller than the default size.  This holds the stitches securely.  I could have done it twice, but all the threads seemed to be safely stitched down, so I didn't bother.

I don't like fringes on rugs.  They wear out quickly, dogs and cats like to do unnatural things to them, like chew or play with them, and they rarely look neat and tidy in my opinion.  Fringes are fast to tie, so that is a bonus.  However, I weave in 3-4 inches of tabby at the end of each rug and fold a hem on either end.  I fold the raw edge in, then fold again.  I use my sewing machine to stitch them down, rather than sewing my hand.  It's not only easier and faster, but I think it's more secure.  I want my rugs to be machine washable, pet safe and tidy looking.   Hems give me that.

All the rugs are 26 in wide.  The first one in the photo is 53 in. long, the second one is 51 in. long, and the third just squeaked in with an acceptable 41in long.  I used ever last scrap of fabric for that last rug.

The red tent made this pumpkin coloured yarn look really bright
Other than that, I've been doing a lot of spinning.  I've spun up some merino, a lot of BFL, 4 skeins of that rug yarn, and this orange superwash merino that I spun as a demo.   I was doing a spinning demo at a local fair and it was a lovely, albeit incredibly and unexpectedly warm day.   The fair is small, and definitely geared to families.  They had a huge homecraft display, including photos, school entries, agricultural items as well as preserves, baking, quilts and other crafts.  I even got to see a pig do the dog agility course, not very well, but it was hot and you could sort of see why he tried to go around the jumps rather than over them!  The craft display tent was full of extremely talented people.  The embroidery guild had some amazing pieces, including a little 3inch tall goldwork squirrel, which was perfectly executed.   I got to sit beside the rug hooking guild, who had the nicest people there.  It was a lot of fun.

September 22, 2019

Rag Rug Update

Rug two with a jersey yarn weft

I put a warp for 3 rugs on the loom.  Only 3 because the Fanny isn't a rug loom and that is all that I am comfortable with on the front beam.  It's a simple tabby warp in 2 colours.  The Sett is 12, using 4/8 cotton.

For rug number one, I used a cotton sheet which was white with blue stripes for the weft.   For rug number 2, I used a brown jersey sheet.  It was only a twin size and I wasn't sure I'd have enough, so I used a bit of leftover blue jersey sheet from a previous project and some very large tan t-shirts I'd purchased on sale.

Rug three using a mottled coloured medium blue sheet for weft
I started rug number three this morning.  I'm using a  blue sheet, which has largish squares printed on it, with a mottled medium blue colour.
The squares on it are not noticeable when it's cut into strips, so that they are outlined in dark blue doesn't seem to really matter, with a specific pattern, unlike the blue and white stripes.

I simply sliced the white and blue striped sheet into pieces the width of the sheet, trimmed each end to a point, inserted each strip by hand and overlapped the trimmed ends to reduce blue.  The result is a fairly smooth rug surface.

Rug one, using a white and blue striped sheet for weft.
The jersey sheet was also cut into strips, but I put a tiny slit into each end.  I threaded 2nd  piece through the tiny hole of strip one, and then fed the end of that strip 2, back into it's hole, tightening it to create a strong join for the 2 strips.   It leaves a small bump where the join is though.

For rug three, I sewed the sheet sides together to make a tube and have been cutting long, continuous strips which I've been folding in half before winding on a rug or rug shuttle.  There are a few little bumps where the sewn ends are, mainly because I didn't trim off the selvedges.

All three techniques make nice rugs.  I am not sure that one is any faster than another.  I do know that I really like weaving rugs with jersey though.  Jersey is t-shirt knit fabric.   After you cut it into strips, across the grain, you pull them to stretch them out.  The edges roll in on themselves, making a lovely non-stretch, round yarn.


September 08, 2019

A simple rug and jam -

The loom is dressed and I've started weaving.  I've got it set up for 2 rugs.   I only put 2 on because I've found that with any more, I have to cut the first 2 off and then retie the warp.  It's not an awful chore, but I know that the last rug might take a while if I put on too many at a time.  I need to make a house warming gift, so letting a project languish at this time, is not a good thing.   I know with only 2 rugs, they will get done in a timely fashion.    I purchased 10 cones of 4/8 cotton, in natural a couple of years ago, meaning to make guitar straps.   I was going to dye all the colours I needed, only it turned out that a) dyeing all the string for the colours I needed turned out to be a lot more work than I wanted for this project and b) the 4/8 inkle woven straps were just a bit thinner than I expected.  While I knew they were strong enough, they bend and fold a bit more easily than I'd like.  I'm using one on my open back banjo and it's serviceable and pretty, but a bit fiddly sometimes.

Anyway, with all that natural 4/8, I had to dye the warp stripe.   It is a dark teal blue.    The blue warp shrank a bit in the dyeing process, which made for an interesting time dressing the loom.   The weft is a sheet that my daughter gave me when she cleaned out her closets.   It was a fitted sheet, so a little less fabric, but there are also 2 pillow cases, if I need them. I like the way the dark and light warp stripes are so effective when woven up.    I had been looking for a jersey sheet.   Jersey t-shirts and sheet make awesome rugs, but I didn't think I had enough of any one colour and I wasn't sure that weft stripes, along with the warp stripes would be effective in this case.

blackberries were purple in real life, not bright red.
 I made some seedless blackberry jam.  I had a whole set of photos to show the process and I was going to do a blog post on making it.   However I think I messed up when I transferred the photos to the computer and then since they were on my phone, I deleted them.   Yay me!

after much fiddling with colour, I left them red .
After heating up the blackberries, I ran them through a strainer to remove the seeds.   Blackberries have a lot of seeds and mine are semi feral, so pretty seedy in comparison to pulp for some of them at least.   I much prefer the seedless jam, which requires pushing them through a strainer of some kind.  I wish I had a food mill of some sort, but I don't, and I couldn't remember what I did the last time I made it.  I first tried a plastic colander, which let many of the seeds through, requiring me to re-strain the batch.  Then I tried a wire mesh strainer, which was too fine.   The next one I tried has a tiny hole in it, that got much bigger before I noticed it, requiring me to re-strain the whole batch to get all the seeds out, again.   Finally I got a strainer which worked adequately and it took a lot of effort, pushing the berries through.  The aim is to get the juice and the pulp through the strainer but not the seeds.   You don't want a clear jelly, but a jam, without the seeds which get caught in your teeth.

I addedd lemon juice and sugar.  I used pectin because I didn't want to spend a lot of time in front of the stove.  When it looked right, I popped it into hot jars, put new lids (always new lids) and finger tightened the rings down.  Then they go into the hot water bath canner for 10 minutes, once it starts to boil again.   I set a timer, so I have an audible reminder to take the jars out of the canner.   I lift them out of the water bath, and set the jars on the counter to cool.    I know every one who cans jars of anything, waits and listens for the pings that say the vaccuum seal is secure and all is good  with this batch.   They all pinged.   I opened a jar, as there wasn't any left for tasting, after the jars were filled.  It's good - not overly sweet and very blackberryish.   Yum..

I'm still finding spatters of blackberry pulp around the kitchen, in places it shouldn't be; the stove backsplash, counters, cupboard doors.  It was a messy but delicious job.    I've made apricot and blackberry jam.   I was trying to decide between plum or cherry for my final batch of the year.  Both of those rank very high for flavour.  I'd better decide soon as the blue plums won't be available for much longer.

August 30, 2019

Back after Camera difficulties

I had horrible issues with my camera.   It would only take dark, under exposed photos.  It was horrid and it was frustrating because I can't afford a new camera and it's likely not worth repairing this one as it's pretty old.    I ignored it for a while.  Today, I took it out again, fussed with a few things, still no luck.  Then I tried it with the flash -  worked perfectly... without the flash, too dark.   It turned out, it was a stupid dial that I was moving by accident.    Sheesh... talk about operator error of the stupidist kind!   As okay for photos as my phone camera is, it's not really good enough for a lot of what I like or at least usually need to photograph.
This is the almost finished - it's now completely done - traditionally hooked rug that I made with my handspun, hand-dyed yarn.    I'm really happy with it.  I learned a lot, and for a learning project, I think it turned out quite nicely.   Some areas are over packed, and learning how narrow lines work was interesting.   I was going to put a border on it.  While I started it, I wasn't sure I had enough yarn in the colours I wanted, and since these colours were one offs, using up old dyes, I opted for the smaller rug, to be certain of having enough yarn.

Before we left on holidays, I started this shawl.  I knitted a few rows in the car and hotels each night on the way down.   I knitted some while we were in Nova Scotia and then on the way home, despite my issues with motion sickness, it was a godsend.   It started to rain the moment we hit the New Brunswick/Quebec border and was scary, torrential downpours until just outside of Montreal.   I got a lot of knitting done in those hours.   I wasn't driving ;)

It's a simple shawl- Danish/Icelandic style wrap shawl in garter stitch.   Perfect for keeping the hands busy without a lot of though.    I just finished it a couple of days ago.  The thing is huge.   It's warm and cuddly though. 

 I had some scraps of handwoven wool fabrics that I ran though the washer to full up.  They fulled up more quickly than I'd expected and more than I'd wanted.  I set them aside until a couple of days ago.   I dyed them up in yellows and oranges.  The greens were blue fabrics to start with.    I've started making some proddy hooked sunflowers.   I wish I'd dyed more yellow fabric though.   It makes for pretty flowers.   The centres should be larger, but I'm using scraps of linen hooking fabric up and they are only about 4 inches wide, so this is about it for flower size for these ones.

Here is a photo of a sunflower from my garden for comparison.

I've been working on a rug warp.   I dyed it to get the colour I wanted because I'd bought a whole whack of natural coloured 4/8 cotton a couple of years ago.   Now I need to wind 22 more threads of the white stripes, because I managed to miscount the first time.    It's an easy threading project though as it's only 27 inches wide and there are only 2 rugs to weave in this warp.


August 01, 2019

Adventures in Rug Hooking

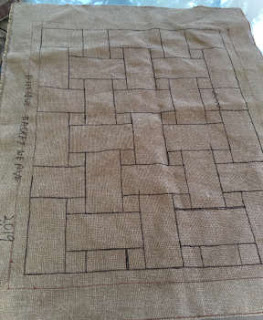
 This is the new pattern I've drawn up for a hooked rug.   I saw pictures of several antique rugs using a similar basket weave design, though many of the rugs were quite large, mine is sized for a mat.    I had some bristol board marked with a grid, and just used a straight edge to draw out a pattern in a scale which looked suitable for the rug size.    I had linen rug hooking backing for this project. I didn't however, have any red dot or any other tracing type material for drawing the pattern on the linen.  I'd cut out both pattern pieces, and was going to trace them onto the backing.  It turns out, I didn't need it.  The backing is quite an even weave.  All I had to do was follow the lines of the fabric with my felt tipped marker, checking the sizes with my pattern pieces.   I spent way more time trying to figure out how to do this, than the actual time needed to draw out the pattern this way.   Once I realized that I didn't need a straight edge or pattern, it just seemed to happen in no time at all.
Strips of wool for hooking however, are taking forever!   First I had to hunt down fabrics.   There was no suitable wool available in local shops.   I had some in my stash, which I raided.  I had lengths for tunics but not enough for 1860 skirts, so not needing a new wool tunic, I took a half yard from each length.   I had some scraps too.  I also found a couple of short wool skirts and 2 wool mens jackets in the thrift stores.   Men's jackets are a bit expensive and have a lot of waste, as only the sleeves and parts of the front are useful, but they have a good range of patterns and fabric weight compared to the skirts.   I wasn't able to find any old, old skirts, which would have been longer and slightly heavier.  But since everything needs to be felted up anyway, even the lighter weight skirts were usable.  

I wanted to use a #6 cut, but that is 3/32 in.   I don't have a cutter and the rug hooking guild doesn't meet in the summer, so I've resorted to using a rotary cutter.   I tried measuring it out, ended up with 1/4 inch, which is about an 8 cut, but most of it is slightly wider because the wool seemed to spread under the ruler.  In the end, I am just eyeballing it and my cuts are closer to the size I want.

It takes approximately  4 times the amount of yardage as the area of the space you need to fill.   It feels like I've been cutting wool strips for days, but I think I have days more cutting to do.  I figure that right now I've only got enough strips to fill about 1/4 of the rug.    I can see why people hook with yarn rather than wool strips.    One snip on a skein and you've tons of yardage cut.

I'm using this rug as a demo project for when I'm at Westfield.  I think it will be an easy project to pick up and put down without worrying about mistakes.  There isn't any shading, difficult bits to hook so showing people how it's done, will be easy.  The plus is that when it's hooked, every rug I've seen was pretty impressive looking.

Just a warning, I found some fabrics in the wool department at a local store, but they don't full up or felt and I'm pretty sure they are not natural, or at least a crazy blend.   I also found out that manufactures can label their wool as 100%, but it can have 10% of other fibres in it.   This really affects the way it felts up or doesn't felt  when you wash it.

July 17, 2019

Singing the Blues

 I started the Japanese Indigo seeds in February, in hopes of getting some seed.  I planted it in the garden a bit early, putting it under plastic cloches from the dollar store.   I planted a couple of plants without the cloches to see what difference they really made.   The Indigo plants under the cloches were definitely happier, with more growth, larger, and noticeably more lush.   This enabled me to do a small dye vat the other day.   I cut 550 g of leaves and stems.   I took some of the leaves from the stems, but I'm not horribly careful about it.  It's a lot of extra work and I don't think it makes a lot of difference.

I set up a double boiler system with my dye pots, putting some water in the larger one and then setting the smaller one inside it.   This makes it much easier to keep the Indigo leaves from getting to hot.    I put the leaves in the pot and filled it with lukewarm water.   I use a candy thermometer to keep an eye of the temperature.   It needs to cook for about 2 hours, getting up to about 160° F, and no higher than 180° F.

Every once in a while, I stir and squish the leaves  to make sure every one of them gets time covered in the hot water.    It's also important to keep an eye on the water level in the larger pot, to make sure the water level doesn't drop too low.

When the temperature gets warm enough and is there for a bit, the leaves start to look a bit wilted and a scum forms on the top.   This is a good thing as you know the pigment is being released.  The scum is a brownish colour, sometimes with a bit of blue or green in it.

When the 2 hours of cooking time is up, it's time to drain the leaves into another pot.   Using rubber gloves, squeeze the hot leaves to get as much of the brown liquid as possible.  They are really hot, so I take very small handfuls, which are easier to squeeze out anyway.    The remaining leaves can be boiled up for a second colour, but I`ve only ever done that with Woad leaves.  Because the Japanese Indigo has so much more pigment, I`m usually ready to clean up when I`m done with dyeing blue.

Anyway, take the brown liquid and add some soda ash or baking soda.  You can also use ammonia, but it smells.  Baking soda works just fine.   Then you need to aerate the liquid by either pouring it back and forth between two buckets, or I use a dedicated stick blender.  It`s permanently dyed blue, so easy to know it`s not for blending foods.

When I`ve aerated the liquid from Woad plants, I usually get little specs of dark blue sitting on top of the foam.  With the Japanese Indigo, the foam often just goes a pale blue, greenish colour.

The final step is to add a reducing agent.  I use Thiourea Dioxide (Thiox).   It`s neat to watch the foam break down and disappear almost immediately after adding the chemical.  You can use spectralite as well, but thiox is available more readily around here.

You need to let the vat sit for a while while the air is worked out of the vat.  A metallic looking scum will form on the top and the vat will turn green or greenish brown when ready.

I had put some fibre in a tub to soak part way through the initial heating time, so it had been soaking for over an hour.   I put it in the vat, let it sit for a few minutes and then pulled it out, carefully squeezing out the excess liquid near water line, just as the fibre came out of the dye.  This supposedly helps eliminate excess oxygen getting into the vat.  

It comes out green and as the air hits it, it starts to turn blue.   If you want darker colours, you need to use multiple dips with airing time in between each dip.

Eventually, I ran out of fibre and the vat was giving lighter blues, taking several dips to get to where I wanted the colour.    Indigo doesn`t need a mordant.  Although it is a little bit of a fussy process, it`s fairly simple if you follow the steps put out in most of the natural dyeing books.  I like Rita Buchannans  A Dyer`s Garden.   Look at the pretty blues!