Pages

Showing posts with label jams and jellies. Show all posts

October 04, 2022

Rigid Heddle with 2 Reeds and cooking!

On the rigid heddle loom right now, are a couple of tea towels using 2/8 cotton.   The sett for a tabby weave with 2/8 cotton should be 18-22 epi.   To get that range with my rigid heddle, I'm using 2 10 dent reeds, for a sett of 20.   This has been an interesting experiment, using double reeds.   The way this particular one is set up, is to use both reeds at the same time, as they are threaded in alternate order.  This is giving me a sett of 20.  However, even with beating with a closed shed, I'm having a hard time getting 20 ppi.   It is a few picks less than that, and not ideal.  I'm hoping it will be fine and just make for a soft tea towel.   This was relatively quick to dress the loom.  It took me a bit of time to get started because there is some definite technique needed to make weaving with 2 reeds on a rigid heddle loom easier.


I made a batch of plum jam.  I usually make it with prune plums which come out in late summer.   When you first start the batch up, the cooking plums have a rather odd yellowish colour.  If you chop them up a bit before starting the jam, the skins will not only release their colour, but start to dissolve into the jam, making it a lovely purple/red colour.   I'm a bit sad that I ended up using pectin for this recipe, because I don't normally do so.   It was however, weirdly 32⁰ C, with a humidex of  over 40 C and we don't have AC.  The kitchen was so uncomfortably warm that I used the pectin to make the jam, rather than risk the plums going to waste.   The result is a lot more jam than I needed and a bit sweeter than I usually get.   It's still yummy though.


Hearth cooking again on Sunday past.  I was making gingerbread cookies on the griddle.  Not so much of a success this time as I let the  griddle get too hot.  The cookie dough was also a bit soft, so started to burn before I could flip them.    Live and learn

In the dutch oven, is a loaf of pumpkin bread, from an 1854 recipe.   I wish I'd taken a photo of the bread itself, because it was a beautiful, round braided loaf.  The interior was a pale yellow and it had a lovely taste.   

Next Monday I'm cooking at the Misener House, which has an amazing cook stove.  It has 6 burners, a functional oven and throws lots of heat to keep the little house warm.   I'll be cooking up pumpkin goodies for the staff Thanksgiving potluck on Monday after the village closes.

April 13, 2022

Gooseberry Jam

New technology sometimes sucks -  just saying that if you get a new coil top stove, the safety burners don't allow you to keep something boiling easily.  It's a pretty stove,  but inefficient and causes emergency burner changes when trying to heat a canning kettle for heat processing yummy jam.

I have to make room in the freezer so I can shift the freezer contents of the fridge into said freezer next week, and then empty it enough to eventually defrost it.   I have gooseberries from last year and the year before that I've been wanting to use for jam.  I didn't really have enough  any one year because they are so tiny.    It turned out there was also an old packet, which was freezer burnt, so it went to the compost bin.
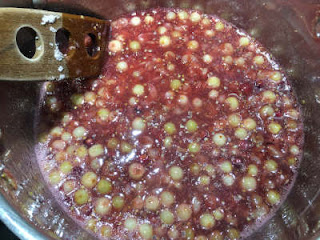
the few red gooseberries turned the jam red!
But I had over 1500 g of berries, maybe 1700g.   I sorted out the best 1000g and put them in a pot.  The best producing bush is very old.  It has hard green berries which never ripen because the birds get them first, or they get some sort of bug or blistering as they get softer.   So I harvest the tiny green berries unripe, top and tail them and if I'm not using them immediately, toss them in the freezer.   I have a newer bush, but it has just started bearing fruit.  It gave me about 15 lovely deep red berries last year, which I'd tossed in with last year's harvest.

I was using an 1832 recipe from Cooks Own Book, which is a delightful encyclopedia style cookery book.  It's easy to read and find recipes.   It calls for only half the weight of berries in sugar or a ratio of 1 part sugar to 2 parts gooseberries.   Other period recipes call for 3/4 lb of sugar to each 1lb of berries to as much as a 1:1 ratio of sugar to berries.  I opted for  using 750g of sugar to my 1kg of berries, because they were still pretty tart.

The because the berries were frozen, there were enough ice crystals to keep them from burning as they thawed and started to cook.   I turned the burner off after they started to thicken up.  Gooseberries have a lot of pectin in them, and I still hadn't added the sugar.   After the boiling stopped, I added the sugar in small amounts, stirring it in to dissolve between additions.  This helps keep the sugar from sticking and burning.   Then after we finally got the hot water bath to boil - we had to change a burner out on the new stove -   I brought the jam back up to a boil and boiled it until it started to thicken once again and a dollop on a cold plate showed it was done.   


I put the jam into hot jars, added lids and tossed them in the canner.  Once the water came back to a boil, I let it boil for  10 minutes.  Out came these beautiful little jars of jam.   Gooseberries are indeed an old fashioned flavour, and it does take a lot of extra work to process the berries at first, but oh, it's lovely, lovely jam.   What is also nice is that those few red berries dissolved giving the jam a lovely red colour.


Recipe -  Gooseberry Jam

1 kg gooseberries

750 g sugar

1 1/2 tbsn lemon juice

1/4 c water if berries are fresh or dry frozen.

Top and tail the gooseberries, removing the stem and flower ends from each berry.

Put in a large heavy bottomed pot with water if necessary and the lemon juice.    The lemon juice is a modern precaution to make sure the jam is acidic enough to prevent bacteria from growing or so I've been told.

Cook the berries up on medium heat, stirring periodically until the berries start to get soft.  Take the pot off the heat and when it is slightly cooled, add the sugar in several additions, stirring in between until the sugar is completely dissolved.

Put the jam back on the heat and bring to a boil.  Boil about 5-10 minutes, stirring constantly and scraping the bottom of the pot, so that the jam doesn't scorch.    Test the jam on a cold plate to see if it is of a jam-like consistency, holds it's shape when you run your finger through the dollop etc.   With a funnel, pour the jam (I use a stainless ladle) into prepared (clean and hot) jars.   Wipe the rims of the jars to remove any spills and traces of jam.  Put new lids and clean rings on the jars.    Put into a hot water bath canner which has reached boiling.   Bring the water back to a boil and then start timing.  10 minutes for 250 ml jars 15 minutes for 500 ml jars.   Remove jars and let them sit over night without moving them.  Any jars which don't seal properly, with an indent or the lid concave and secure, should be stored in the fridge and used within a few weeks.


September 17, 2021

How Time Flies!

I wanted to knit a new winter toque.   The pattern called for a heavy worsted weight yarn.    I tried with a commercial yarn but it wasn't heavy enough, plus the colour didn't rock my world.   The pattern has a wide, cabled band.  I hunted through my stash and found some merino which I thought was an appropriate grist, which I'd spun worsted.  A worsted spun yarn would give really nice definition to the cables.   First, I dyed the white yarn to a mottled ecru colour.    It was nice and I liked it.   I started knitting and the cables looked wonderful.  By the time I was at the final 10 rows, I was questioning my choice.  The yarn was obviously just a tad bigger than needed, so even with my choosing a smaller size, the hat was too big.   Plus, this was a robust yarn.   My hat was really heavy!   So it's been frogged, with nary a photo for remembering it.

I made and canned salsa.  The recipe said it should thicken up with about 10 minutes of boiling.   It took over an hour.   Next time, I'll just run all the veggies through my food processor to rough chop as hand chopping took forever.  I have enough for half our winter needs though.

Apricot jam made from an 1832 recipe for Apricot Marmalade.   It's very delicious.   Apricots were crazy expensive at the market this year so it's also the most expensive jam I've ever made.   It's a good thing it's so tasty!  Just to mention that I've no problem using grocery store fruit, but I only found imported apricots this year and no little baskets or containers of local apricots.   I was happy to find them at the market.


This bowl of garden fresh tomatoes and basil became a really good marinara sauce.  I didn't peel the tomatoes though.  I just chopped them up, added some onion, garlic, parsley, carrot, zucchini, and a bit of dried italian spice.  I tossed everything in the slow cooker and set it on low.  I stirred it twice, otherwise ignoring it.   About an hour before it was done, I shredded and added the basil leaves.   I liked it as is, although hubby added some chopped leftover hamburger patty to it.  It was good day one, but it was spectacular on day two.   There are several meals of pasta sauce in the freezer too!

This is a bad photo of this year's bounty of canned tomatoes.   I ended up with 38 pints.   I actually ran out of clear jars and had to use a green glass jar, so one of the jars looks like it has ugly brownish tomatoes in it.  I'm aiming to using that one first.

Hubby has been chopping and splitting wood.  Not only did we get several loads of logs delivered, but a huge willow tree dropped a couple of branches on the neighbour's field, so he was out there cleaning up that as well.   The neighbour is in his 90's.  It really seems like there are not a lot of young independent farmers out there.


September 21, 2020

Colours of September


 I dressed the loom with the Kool-aid dyed warp using the Wall of Troy pattern from Margarite Davison's green book.  It's a fairly striking pattern but still an easy pattern to both thread and weave.   I'm done the first scarf and there is another left to weave.   Progress has been interrupted by helping my son-in-law build garage doors, canning, teaching a socially distanced rug hooking class at the park, hydro issues which mean the whole electrical panel needs to be replaced and a scary and irritating trip to the car dealer for a simple service on my cute little car, where they made all the motions of masking and social distancing, except for the part where they actually did it.  

The new hens have settled in nicely.  It only took them a couple of days to fully integrate.   After months of waiting for new birds, the feed store was able to get ready to lay hens delivered two weeks in a row.   Yay, to him finding independent breeders to supply us with hens!

 These ones are laying little pullet eggs.  Pullets are young layers.  They should start off laying tiny eggs like these, and gradually their eggs should increase in size.   Sadly, some of the hybrids we've had start off laying huge eggs and it can't be healthy for them.

I found prune plums in the stores, although not at the market. They were wonderfully ripe and two containers came home with me.   They make a wonderful jam or preserve.  I didn't chop them up, so my jam has chunks of peel and fruit in it.  Normally I chop the plum halves up a bit, and then the skins seem to just dissolve completely.  Still, the jam this year is pretty awesome.  It finished to a deep reddish purple colour, from the skins.  It's so pretty.

I dragged out the blending board.  I played with some colours of commercial corriedale.   They're not quite felted and they look fine, but they were just not quite easy enough to pull off the rolags, so slightly compacted perhaps, from sitting in a drawer for however long it's been.  Still it was fun to do.  


Blogger has been switched over to the new version, which I didn't want to use whenver they first introduced it.  I liked the old Blogger format and it was easy to use.  Now I'm finding a new learning curve and having to figure out new glitches.  It doesn't seem as easy to drop photos where I want them amongst a few other things I need to figure out.   This means that my layouts and formatting may be a little off until I muddle through it all.  I'm sure it will all come together at some point.


August 24, 2020

Jam Time

One of the largest apricots in the container
I made both Peach and Apricot jam last week.  Apricots aren't easy to find in this area for some reason, and this year has been even more difficult.  People are saying they haven't seen any.   I was lucky when my son found some and presented me with a plastic clam shell container full of these teeny, tiny apricots.   I think in other years, they wouldn't even qualify for seconds they were so tiny.  In most of them, there was more pit than fruit!

foam shows jam is not ready
I sliced them in half, took out the pits and gave them a quick buzz through the food processor, in hopes that I had enough for a decent batch of jam.   I needed 4-5 cups of fruit and I had barely 2 1/2 cups.  I popped them in the freezer and checked the shops the next time out.  I would have been happy with a few imported apricots to add.  But not a single apricot, local or imported was to be found.  

foam subsiding and jam is clear
I used them in a 19th c jam recipe which calls for equal weights of sugar and fruit.  It made a spectacular jam, albeit a very small amount.   I was hoping to have enough for Christmas presents, but all I have is a personal stash.  Better that than no apricot jam at all though.

Jam with pectin has a pretty exact process to follow and if you do it with the correct timing, and quantities, you have jam!    Making it without pectin has a bit more of a margin for error.  It's easy to over cook it and get a solid, unspreadable  mass in your jar.   Been there, done that, couldn't eat the jam :)

Apricot Jam

You start off heating the sugar and fruit.  The sugar draws out the fruit juices, very quickly making a liquid which then easily comes to a boil.   It gets quite foamy and with a small amount like this, the pectin starts to do it's gelling thing almost right away.   Once it starts to turn clear and the foam subsides, you're almost there.
I keep a glass plate in the freezer.  I pull it out when I think the jam is close.  I put a dollop of jam on it and give it a second to cool.  I run my finger through it to divide the dollop in two.  If the jam doesn't run back together, then it's ready to go.

I ladle the jam into hot jars, wipe the rims, put on new lids and rims and pop the jars into a hot water canning bath.  Once it comes back to a boil, I process for 10 minutes.  If the jars were filled correctly and I get the rims completely clean, I get to hear those lovely little pings as the jars seal.   I do like that sound.

Peach jam which is sunnier and brighter than photo shows