Pages

Showing posts with label gluten free. Show all posts

October 09, 2018

Eeek how time flies

A perfect gluten free and dairy free pumpkin pie.  The crust turned out to be quite easy to work with, unlike my previous attempts at gluten free pie crust.   The pumpkin was one I processed myself and the whole pie turned out to be not overly sweet with a tender crust which wasn't soggy or gritty.    It was absolutely delicious.   It was pretty too!

 The navy and brightly coloured yarn plied together.   This is the partial bobbin that I'd spun up as a tester.  I'm still spinning the rest of the navy for the full bobbin.   It definitely subdued the bright colours, but since I was worried about muddying the colours up when they were plied, this is definitely not muddy!  I rather like this combination of colours, even though I'm not always a huge fan of marled yarns.
I had just about 100 g of superwash merino left in the bag.  I tossed it in the pot with some brown, blue and black dye.    I'm really happy with this bit of fibre.  I like the more subdued colours in this batch.  It's a bit of a change from the bright colours I often use.  I used weak acid dyes, with a low immersion technique.


It's been crazy busy here.  Some days I didn't even get a chance to practice the banjo because it felt like I was hardly home.   The grey, wet weather has been putting a damper on things too, as it's been delaying projects.


I made this hat.  I need to needle felt some decorations for it.  I made a second hat in a different style, without the brim, which is going to get some embroidery on it, if I get the time.

March 14, 2016

Stardate 3.14 Pi Day


 Happy Pi Day!

March 14 usually comes and goes with me being too busy to play in the kitchen.  Today I decided to take the time and try a new gluten free pastry recipe.    I sort of wish I had made 2 pies, just so the grammar would work.   However, I have 1 square tart pan or I could have used cake pans, which would have meant double the ingredients, having 2 pies of which 1 would go to waste and of course double the effort.   So I made only 1 pie and tried to ignore the grammar issues....

                                   Pie are squared

Pastry -

1/3 cup sorghum flour
1/3 cup millet flour
1/3 cup brown rice flour
1/3 cup tapioca starch
3/4 tsp xanthan gum
1/4 tsp salt
2 tsp cider vinegar
3-4 tbsn water
1/2 cup shortening


Mix all the dry ingredients until well blended.   Cut the shortening into the flour mixture until it resembles flakes and lumps the size of peas.   Drizzle in the vinegar and stir, while adding the water 1 tablespoon at a time, just until the dough comes together in a ball.   Let sit for a couple of minutes while you grease your pan.   Put the ball of dough on parchment and gently press until a flattened disk.  Cover with plastic wrap or parchment and gently roll from centre out to the edges  until the dough disk is large enough to fit your pie plate.   I removed the top layer of plastic/parchment and flipped it upside down (gently) onto my greased tin.  Then I gently pushed it down as I peeled off the bottom parchment.   Repair any tears and rips by patching and smoothing the area with a wet finger.

I have no idea what this tastes like yet, but it was pretty easy to work with and looks fine.  There was just enough to fill the tart tin and make the little pi symbol.     If it tastes great, then I won't have lost my recipe.  If not, well at least this year I celebrated PI day!

January 26, 2016

Madeleines

I'm not a huge fan of most single purpose kitchen tools.  I mean, it is easier to separate an egg just using the egg shells, or by pouring the egg in your palm and letting the white slide through your fingers, than using one of those egg separating devices, and a knife really does a decent job of cutting up an apple instead of needing one of those round apple slicing tools.   They take up space and generally they get used rarely to never. 

Sometime before Christmas, I must have come across a 19th c recipe for Madeleines.  It sort of stuck in my mind as I'd never seen a Madeleine pan in any shop I had ever been in.   A Madeleine pan is really a single purpose piece of bakeware, and not a small one you can hide in a drawer.   This one has 18 decent sized shell shapes and it is as large a a cookie sheet or a big muffin pan.   Anyway, I was looking for a particular mug for a present and this outlet store had Madeleine pans of all things.   I popped back in last week and they still had them, for $8.    I couldn't resist bringing it home with me.  

I haven't looked for the period Madeleine recipe, but I did adapt a modern one to be gluten and dairy free. Oh MY GOODNESS!   This is a single use pan that deserves space in my cupboard.  Yes, I could use a little mini-muffin pan.  I already have one of those that sits rarely used, but the little shell shaped Madeleines are so pretty and so very delicious! 

 Madeleines
 (dairy/gluten free)

1/4 cup brown rice flour
1/4 cup white rice flour
1/4 cup tapioca flour/starch
1/2 tsp xanthan gum
pinch salt
1/2 cup sugar
2 tsp vanilla
2 eggs
3-4 tbsn vegan margarine 

melt the margarine.   In a bowl, mix the flours, starch, xanthan gum and salt, stirring well to completely blend them together.   In a separate bowl (I used a stand blender) beat the eggs until thick and light.  Add the sugar and vanilla to the eggs and keep beating until well blended.    Turn the mixer off, add the dry ingredients to the wet and then the melted margarine.  Mix until all the dry ingredients are fully incorporated.    Pour the batter into a ziplock bag, squeeze out the air and set in the fridge for an hour or so.     Oil and flour the pan (I used tapioca starch and that really didn't work all that well)   Preheat the oven to 375° F.     After the batter has set for an hour, cut the corner off the ziplock bag and pipe it into the Madeleine pan.  This really limits the mess but you could use a spoon or a reuseable piping bag as well.   This recipe filled all 18 shells with little leftover.   Bake for about 8 - 10 minutes until the cakes are browned and spring back when touched gently.   Let cool for a few minutes in the pan and then turn out on a rack to finish cooling.  When cold,  dust with icing sugar or you could dip half in chocolate, however taste testers decided that the chocolate was overkill and these were plenty good enough without.

  These are a little too brown but ohhh, they are so delicious.


November 08, 2015

In which it seems like little was accomplished, but...


 It has been difficult getting anything done right now.  The weather got cooler.   This combined with the fact that the garage has been a kitchen cupboard making assembly line this summer and the fronts, frames and some of the cabinet boxes are being stored there, all the painting made it's way into the living room of all places.   Well, the living room and the hall way.  Large flat work surfaces have been erected so that painting and drying can happen in a warmer room.

All the priming had been done already, during the summer.   I got to help with that because the work surfaces were at a height that worked for me.   With all this inside stuff, the height of the work spaces just doesn't work for me, so hubby has been puttering away at the painting.   There are just 2 edges left to finish up on the upper cupboards, which I think were misses rather than planned for the next session.  The yellow paint colour, which I chose for the upper cupboards will be used for the walls as well, when we actually get to that point.   However, it looks really pale everywhere except in the kitchen, where the light makes it look just fine.   The bottom cupboards will be red.  Doing them all red was just going to be too dark, so by splitting up the paint colours, I still get my red cupboards.  However, because of all the painting, it's been difficult to actually get anything done and really, I can't complain at all.

We've had some lovely bonus days lately, with very unseasonably mild temperatures and sunshine.   We actually didn't run the stove at all for 4 days as it was just too warm.   Kevin wasn't impressed at all with this.   He loves to sleep in front of the stove when it is pumping heat out.   When he wants to warm up, and there wasn't a fire, he started crawling right up to the window and staring in.  Luckily he doesn't do it when the stove is warm, so we don't worry about him being hurt when he presses his little nose to the glass. 

I've been playing with gluten free ginger cookie recipes.  So far I've gotten cookies which are edible, some which are decent but not any which are perfect and worth sharing.   Meanwhile I am getting my ginger cookie fix. 

Knitting happening.   I'm finally on the second front of the cardigan but because I had to rip out half of the first side, it's taken a bit longer.   Not so much that much extra knitting time, but you know that week and a half or more that I sat around staring at the fact that I had knit 6 inches using the wrong pattern instructions and wondering how I managed that.   Then I was finally able to rip out and reknit the offending 6 inches.

  Lots of spinning, but I forgot to take photos!  Like really!  That is a new one for me.   I did manage to make a dust cover for my sweetie's practice amplifier.  It is a good thing to keep the sewing machine working  once in a while.    While it seems to me like I didn't get much done, I think I might actually have done so.


August 09, 2015

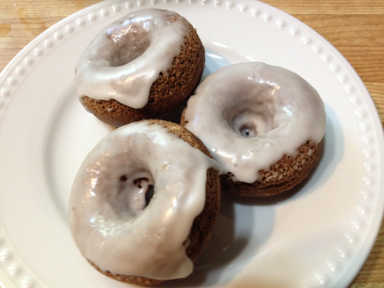
Gluten Free Baked Donuts


These are my favourite quick baked treat. They mix up quickly with no fuss and they bake just as quickly.  They aren't really donuts, since they are baked and not fried, but are pretty close.  However, these are gluten free, dairy free and fairly low fat.  They mix up quickly and bake in just a few minutes, using a donut cake pan.   Because there is no oil in the batter, they will go stale a little more quickly.  Really though, how long will a batch of 12 small donuts last anyway?  They go so nicely with a big mug of tea.   nom, nom, nom

1 cup gluten free flour
1/2 tsp Xanthan gum
1/2 cup sugar
1/4 tsp salt
1/2 tsp nutmeg (freshly grated if possible)
1 tsp vanilla
2 eggs
1/3- 1/2 cup almond milk


Mix the dry ingredients in a bowl.  Stir well to blend the Xanthan gum.   Add the wet ingredients and stir to completely blend.  The mixture should be a little bit thick and not runny. Lightly oil the donut cake pan.    Scrape the batter into a large ziplock bag.  Squeeze out the air and close the bag.  Snip off a bottom corner of the bag and use as a piping bag to easily and neatly fill the donut indentations in the pan.   Bake at 350° for 7-10 minutes or until the little donuts spring back when lightly touched.

Let cool -

Glaze - 1 cup icing sugar, 1/2 tsp vanilla, 2 tbsn water or enough to make a fairly runny glaze.  Dip donuts, set on a cake rack to dry.   Put a piece of paper toweling or waxed paper under the rack to catch the drips for easy clean up.

Chocolate variation -  Use a scant cup flour and add 1 1/2 - 2 tbsn real cocoa powder.   I sift the cocoa in to get rid of the lumps.   Omit the vanilla.

To make them with real wheat flour  - omit the Xanthan gum and use all purpose flour in place of the gluten free flour.