On Good Friday, I was at Westfield, in the Lockhart house. I had a bunch of jars with natural egg dyes, making pretty coloured eggs. It takes much more time to dye an egg with nature dyes than it does with food colours. The results were pretty, albeit more pastel than I'd have liked. If it weren't for the ice storm and the lack of power, I could have started a few batches a day earlier and had spectacular results to show off. Maybe if I get to do this activity next year, I can plan ahead enough for a before and after display, which would be very informative, not to mention awesome.
Because we had no power when I left home, I grabbed a roast from the freezer and some potatoes, carrots and parsnips. I tossed them in my dutch oven and slow cooked them by the fire all day! It was a pretty decent meal, considering I'd forgotten to bring any seasonings with me. I've always appreciated that we can do this while we interpret. Plus everyone was commenting on how delicious the building smelled when the walked in! It made lots of people smile.
Blue Faced Leicester superwash yarn. By the extra lustre, I'm going to guess that there is some nylon in this blend. It was mill ends- super cheap mill ends, which require a bit of picking of short, cut bits and a very occasional bit of hand processing, but there is minimal loss and it spins up beautifully. I don't know what I'm going to use it for yet. I've spun up about 800 yards so far. It is an easy spin and can keep it consistent when I'm chatting or otherwise preoccupied so spinning a lot of it, is fun and relaxing.
I'm working on some green right now. I don't know if there is any nylon in this BFL superwash mill end. I wouldn't normally be attracted to this lurid green colour, however it looks quite intriguing when side by side with that purple-reddish colour. I think they would be very fun socks. I am hoping that I have enough fibre to spin yarn for knee socks, but that is probably pushing it. I only have about 120 gm of the green and a little bit more of the purple. There may be a bit more stashed away, but in making room for the kitchen reno, everything has been piling up in the fibre storage area, and it's a bit hard to get to it right now. Since I've found not 1, not 2, not 3 but 4 pair of started and not finished socks, making a pair of knee socks in the near future is a moot point anyway. I am out of sock knitting needles until some of the above pair are finished. As an aside, I really didn't realize that I had that many sets of knitting needles in 2.25mm.
Natural Dyeing, Spinning, Weaving, Other Fibre Arts, Gardening, Cooking, Costuming, and...
March 31, 2016
March 26, 2016
Ice Storm 2016
The beginning of the ice storm. Trees across the way are already heavily coated.
More freezing rain is falling. The world is looking like a set from a sci-fi movie, all glass and diamonds.
It's pouring rain in earnest now, but still not warm enough to melt the ice.
This tree limb is from the tree beside the house. It is an old silver maple which would take two and a bit people to reach around it. This branch is about a foot in diameter. It missed taking out our roof by just a few inches!
A start on the firewood for next year.
And through it all the crocuses kept blooming.
The power was out for only 30 hours. The generator kept the basement from flooding. Lots of branches and limbs to be chopped and moved. The lilacs came down from the ice as well, so there will be no blooms this year. Other than that, all is well.
March 18, 2016
HFF - A Dish of Strawberries
Juicy Fruits - It’s fruits! Do something
with fruits. It doesn’t get more simple than that. Bonus points for use
of heritage crops and ingredients!
No fruits are in season up here yet. I have some red currants in the freezer from last year, but some of that is destined for jelly which hasn't yet been made. I'd have to use either frozen or imported fruit for this challenge, or winter storage apples or pears. Then I found the following strawberry recipe and my choice was made.
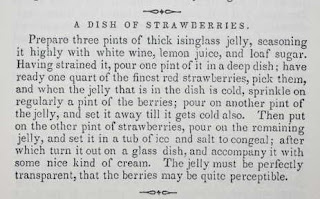
This recipe is from the Kentucky Housewife, by Lettice Bryan 1839, Cincinatti. I really wanted to use of of my ceramic jelly moulds, but the only one remotely big enough for this recipe was this one. It has a lovely design, but there is a crack in it and some of the glaze is showing some crazing, plus there is that weird blue stain. The recipe calls for it to be put in a deep dish and requires 3 pints of jelly, with the additional strawberries. I ended up using my steamed pudding mould, which was both deep and big enough to hold the required ingredients.
Isinglass is a gelatin thickener made from fish swim bladders. I think you can still get it at some brewing supply stores, but not available locally, so I substituted regular, granulated gelatin which is available at our bulk food store quite inexpensively. A bit of research showed that I would need 1 tablespoon of gelatin for every 2 cups of liquid to get the liquid to form jelly and if I wanted to mould it I would need at least 25% more. Remember that gelatin needs to be soaked in cold water to "bloom" before it is dissolved in hot liquid.
I used 5 tablespoons of gelatin and sprinkled it over 3 cups of cold water to bloom. I then made a simple syrup of 2 1/4 cups water and 1 1/4 cup sugar. Making the syrup is the easiest way I know of making sure the sugar is completely dissolved. When it had cooled just a little bit, I added the soaked gelatin mixture and stirred until it was mixed in. Then I stirred in 3/4 cup freshly squeezed lemon juice which had been strained through a very fine mesh strainer to remove any pulp, seeds or unwanted bits.
I put a layer of this gelatin mixture into the pudding mould and set it into the fridge to partially set. The fridge is much more convenient that ice and salt. When the gelatin was very thick but not firm, I added a layer of cleaned an trimmed strawberries by pushing them into the gelatin. Back into the fridge it went until firm. The gelatin has to be firm enough to hold the first layer of strawberries as otherwise when you add the next layer of gelatin, the warmer gelatin will melt enough of the lower layer that the strawberries will float to the top. It was a little dismaying when I saw all those strawberries floating happily after I'd though they were set. Once the second layer is almost set, add more berries and continue until the mould is filled.
I chopped the berries for the bottom layer as the imported strawberries are huge and too big for a third layer. In retrospect, I would just chop the berries in half, making them all smaller as I think it would work better.
The mould needs to set until completely firm. I left it overnight in the fridge to firm up and unmoulded it for lunch the next day. I could tell from the wobbly jelly, that it needed either a little more time to set up, or a little more gelatin in the liquid mixture.
I'd hoped the jelly would slice nicely for presentation purposes, but the bottom didn't have enough structural integrity to hold together. More gelatin next time, but also, I think the chopped strawberries changed up the fruit to gelatin ratio as well.
Despite the way the jelly collapased, it was really, really good. Good enough that I would do this again and again. It looked pretty spectacular before I cut into it.
Time - 1/2 hour to start, plus a few minutes here and there for the layers, plus overnight to set
Cost - $7.50 - Two packets of berries $5, gelatin $1, lemons 3/$1.50
Accuracy - except for the gelatin substitution and the fridge, pretty good.
March 16, 2016
Tired of White
Not of snow and winter white, but of spinning the white fleece. I decided to take a break and spin some grey Icelandic. I loved the fleece when I bought it. It is clean and washes up beautifully. However, I think that I like the idea of spinning Icelandic fleece, more than the actual practice of spinning of it.
This fleece in particular, has a very short tog, which is clumping in places and making it rather irritating to spin. It really doesn't play nicely with the drum carder. Instead of lovely batts, I was getting tufty bits all over the place. It only takes a couple of passes on the hand cards, but it doesn't roll up nicely unless I make punis, which don't spin as nicely as the ugly rolags.
It just doesn't make me happy, the way some yarns I've spun. The contrasts in greys are nice though.
The pie crust recipe from a couple of days ago turned out to be the best so far. It is nice too, that it isn't just starches like some pie crust recipes.
Gosh, I just checked the preview. I'd better grab my camera and get a new background photo. It sure doesn't look all sparkly white and frosty like that anymore.
March 14, 2016
Stardate 3.14 Pi Day
Happy Pi Day!
March 14 usually comes and goes with me being too busy to play in the kitchen. Today I decided to take the time and try a new gluten free pastry recipe. I sort of wish I had made 2 pies, just so the grammar would work. However, I have 1 square tart pan or I could have used cake pans, which would have meant double the ingredients, having 2 pies of which 1 would go to waste and of course double the effort. So I made only 1 pie and tried to ignore the grammar issues....
Pie are squared
Pastry -
1/3 cup sorghum flour
1/3 cup millet flour
1/3 cup brown rice flour
1/3 cup tapioca starch
3/4 tsp xanthan gum
1/4 tsp salt
2 tsp cider vinegar
3-4 tbsn water
1/2 cup shortening
Mix all the dry ingredients until well blended. Cut the shortening into the flour mixture until it resembles flakes and lumps the size of peas. Drizzle in the vinegar and stir, while adding the water 1 tablespoon at a time, just until the dough comes together in a ball. Let sit for a couple of minutes while you grease your pan. Put the ball of dough on parchment and gently press until a flattened disk. Cover with plastic wrap or parchment and gently roll from centre out to the edges until the dough disk is large enough to fit your pie plate. I removed the top layer of plastic/parchment and flipped it upside down (gently) onto my greased tin. Then I gently pushed it down as I peeled off the bottom parchment. Repair any tears and rips by patching and smoothing the area with a wet finger.
I have no idea what this tastes like yet, but it was pretty easy to work with and looks fine. There was just enough to fill the tart tin and make the little pi symbol. If it tastes great, then I won't have lost my recipe. If not, well at least this year I celebrated PI day!
March 10, 2016
HFF - Roasts #2
Yesterday, a facsimile copy of The Kentucky Housewife arrived on my doorstep. I was quite excited because I'd tried to order this book before and it was never in stock. As well, my efforts to find a free digitized downloadable copy have so far proved fruitless.
online 1839 edition It is online reading - ick
1885 book with same name by different author
(wrong cook book)
So I made myself a huge mug of peppermint tea and sat down to peruse the hard copy which was now in my hands. I found this recipe for Baked Pork! It seemed quite obvious to try this one since I was thawing some pork for supper.
Baked Pork
Take a leg, shoulder, or part of the middling, rinse it clean, and score the skin crosswise, so as to form diamonds, season it with salt, pepper, and sifted sage; brush it over with sweet oil, lard or butter, and put it in an oven with a small quantity of water, having placed in the bottom some suitable vegetable, such as squash, tomatoes, sweet or white potatoes. Bake it with moderate heat, till it is thoroughly done. If the meat is large, it would be best to bake it till about half done, before the vegetable is put in. Thicken the gravy with brown flour, and flavour it with any kind of catchup you choose.
I substituted pork tenderloins for the pork roast. It was the only pork in the freezer and what I had already taken out for supper. I rinsed and trimmed the silver skin from the tenderloins. I sprinkled them with salt, pepper and in lieu of sifted sage, because I was out, I used an 1845 herb combination which was parsley, thyme,lemon peel, tarragon. Not the same as sage, but a tasty blend non the less.
I patted the herbs and seasonings on, drizzled a bit of oil over it and set it over some chopped and peeled butternut squash cubes. I added a little bit of broth instead of the water, simply because there was about 3/4 cup left from a previous meal, which desperately needed to be used up. I popped it into the oven at 350° until done. I forgot to check the time, but I'm guessing it was about an hour. I thickened the gravy or pan juices with a bit of starch.
Oh my! This was incredibly good. The squash was amazing cooking in all the juices. The pork was flavourful and being tenderloin, very tender. No catchup was needed to flavour the sauce though. It was good as it was.
Cost - $2.10 squash ( approx. as it was in the larder needing to be used)
$6.85 for 2 (eating out of the freezer in order to make space)
$26.96 The Kentucky Housewife :)
Accurate save for the cut of pork suggested.
Now to find a copy of The Carolina Housewife. It is next on the list.
HFF - Roasts
Historical Food Fortnightly - Roasts They’re a staple of the
historic table, in many different shapes and forms and types. It’s also a
cooking technique. Try a historic recipe for a roast, or a recipe that
involves roasting, and tell us how it turned out.
What I discovered was that in the early and mid 19th century, roasting was still a term which was associated with hearth cooking on an open flame. Roasting as we do it today, in an oven, was often called baking. The American Economical Housekeeper (1845) says the following, suggesting the difference between roasting and baking meats, back in the day.
I chose to bake my challenge as, that is what we consider roasting today and because I didn't have an open hearth available to play with.
In several different cookbooks, it suggested that spring fowl should be roasted unstuffed. They would then be frothed, which is sprinkling the skin with flour and melted butter. Because various members of my family cannot eat wheat or dairy, I didn't froth my chickens as my current gluten free flour doesn't sprinkle nicely like wheat flour. I chose the spring chicken recipe, because the 2 fowl I purchased were small and since the current industry standard seems to be 6-8 weeks for broiler/fryer chickens, I figured they were pretty close to what a spring chicken would be. That is the only type of chicken which is available in local stores, so it limited my choices.
I stuck 2 chickens in a roasting pan, basted lightly with olive oil and stuck them in a pre-heated oven. I basted them once or twice more before they were done. After removing the chickens from the pan, I thickened the liquid in the pan, using starch instead of the suggested flour, to make a gravy. Served with Potato Balls from an earlier challenge, salad and broccoli, it made a delicious and simple to prepare meal.
Recipe Date: about 1830-45
Cost: $11 for 2 chickens
Time: 1.5 hours
Successful: Very tasty indeed and super easy
Accuracy: It was baked meat using the limitations of modern stoves and diets - close enough, although I'm pretty certain that it would be recognized for what it was regardless of time period.
Picture of Kevin the Obnoxious, for Christiana.
What I discovered was that in the early and mid 19th century, roasting was still a term which was associated with hearth cooking on an open flame. Roasting as we do it today, in an oven, was often called baking. The American Economical Housekeeper (1845) says the following, suggesting the difference between roasting and baking meats, back in the day.
I chose to bake my challenge as, that is what we consider roasting today and because I didn't have an open hearth available to play with.
In several different cookbooks, it suggested that spring fowl should be roasted unstuffed. They would then be frothed, which is sprinkling the skin with flour and melted butter. Because various members of my family cannot eat wheat or dairy, I didn't froth my chickens as my current gluten free flour doesn't sprinkle nicely like wheat flour. I chose the spring chicken recipe, because the 2 fowl I purchased were small and since the current industry standard seems to be 6-8 weeks for broiler/fryer chickens, I figured they were pretty close to what a spring chicken would be. That is the only type of chicken which is available in local stores, so it limited my choices.
The cat only sniffed, didn't eat :) |
I stuck 2 chickens in a roasting pan, basted lightly with olive oil and stuck them in a pre-heated oven. I basted them once or twice more before they were done. After removing the chickens from the pan, I thickened the liquid in the pan, using starch instead of the suggested flour, to make a gravy. Served with Potato Balls from an earlier challenge, salad and broccoli, it made a delicious and simple to prepare meal.
Recipe Date: about 1830-45
Cost: $11 for 2 chickens
Time: 1.5 hours
Successful: Very tasty indeed and super easy
Accuracy: It was baked meat using the limitations of modern stoves and diets - close enough, although I'm pretty certain that it would be recognized for what it was regardless of time period.
Picture of Kevin the Obnoxious, for Christiana.
Subscribe to:
Posts (Atom)