Pages

August 29, 2018

Solar Dyeing Experiments

 Solar Dyeing Experiments

Equipment-
canning sealer jars - quart or litre.  I used both sizes.
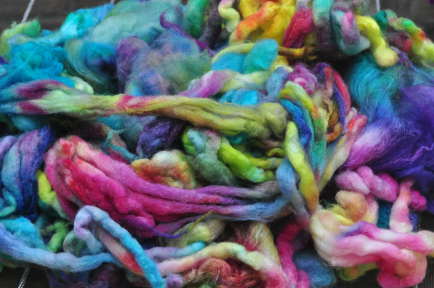
Clean wool fibre
Dyes -  Acid, Food Colours, Fibre Reactive
additives for each dye -
vinegar or citric acid
synthropol for Fibre Reactive Dyes

quantities - 
Wool enough to fit in jar allowing water to circulate

1/4 c vinegar

water to top up

dyes -  a few ml of fibre reactive or acid dyes
dabs of food colours

synthropol if using fibre reactive dyes


Method -

Soak wool fibre in water for at least an hour before starting dyeing.

Add vinegar and some water to jar.

Add water saturated fibre to jar.

Top up with water.

Add dye and sythropol if needed.

I just dabbed the food colours in various placed on the fibre.  I used a craft stir stick to add the food colour.  It only took a tiny bit to get a lot of colour.  With the Fibre reactive dye, I used a syringe to measure out a few ml of dye and added it lower down on the fibre.

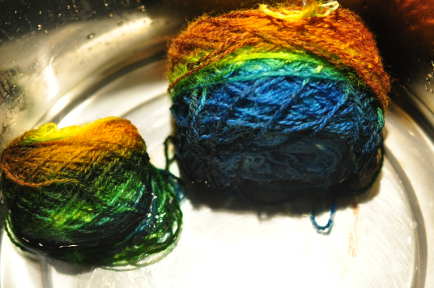
Add lids to jars and set in the sun to warm up.  They need to get to about 185 degrees for an hour or so.   

This time of year, at our more northern location, the sun is too low in the sky to warm up the dyes in the jars.   I ended up steaming the jars to get the dye to exhaust.   (remove the lids first).   You could put them in a dark plastic bag, your car in the sunshine or paint the jars black to absorb more heat.

  It was fun to do but really, it's just a small amount of fibre, so not really productive here unless you have a lot of jars going.  Earlier in the summer, one could probably spray paint buckets black and do larger amounts in the sun - maybe some sort of foil reflector would help.    I also think that further south, this is likely a much more effective method of dyeing.

So fun, but not effective in late August, in my back yard or front yard, since I tried both.  Not enough fibre dyed for my projects or preference.   I generally like to dye in at least 100 g quantities.  Would I do this again?   Maybe, earlier in the year.  A few years ago I did a lot of indigo vats using the painted buckets, starting in June and it was pretty decent results.

August 20, 2018

Felting and spinning and spinning and spinning

 It was Textile Day at Westfield yesterday.  I ran an activity for making wet felted beads.   These are the samples I made up ahead of time.  I have another container full, but it's in that super safe place and really, I didn't have the energy to dig it up.  It was easier to just make new ones.  I started decorating a couple of them just because.   Most of the kids and adults who made a bead, had a great time and were very successful. We made necklaces and bracelets with a little bit of embroidery floss.   Once people started coming in, it was non-stop beadmaking.    I haven't been that tired at the end of a Westfield day in a while.   Silly me though.  I'd brought my wheel and some cotton to spin during the down times.   I probably got 4 or 5 yards of cotton spun as there was no down time during the whole afternoon. 

Just a heads up that if you come to Westfield on Sept. 2nd, I'm currently planning to churn ice cream!   Yay!   That's a good way to end the summer. 

 When I got home, we had a campfire.  I picked some of the drying Tigerlily (those orange ditch lilies) leaves and turned them into cordage.   My sweetie thought it was a lot of work, but really, I was sitting around the campfire doing nothing otherwise.  Now I have 2 metres of cordage suitable for basketry.   I'm drying some of the still green leaves to see if they make a difference in workability.   I wonder if bull rush leaves would work as well?   There are a bunch in the ditch, up the road!
 This is some ramie I dyed when I was first playing with Fibre Reactive dyes.   It is definitely a bold colour.   The ramie sliver was pretty compacted when I was done dyeing.  I tried shaking it out,  spreading the fibres manually, carding the fibres and then finally just stripping the sliver into thin bits.   The carding worked reasonably well, but of course was extra work.  The stripping into thin bits of sliver worked the best though and was quite fast.   There was a fair bit of short bits and neps in this fibre, but it looks pretty decent despite that.

This is more ramie.  The right skein I spun up in the past two days.   It was a bit of roving which was perfect.  All long staple lengths, with no short bit or neps.  It flew out of my hands and onto the wheel.  It was a joy to spin.  The skein on the left is from a previous batch of this same colourway.  What a difference in dye lots!   Just a reminder to get enough of one dye lot if you need it for a particular project.   I didn't believe they were the same colourway at first, but I'd been storing the skeins in their original packets, and sure enough - same colourway, just a different colour.   It won't really matter for what I have in mind though, so I'm happy enough with it.

I've two projects to put on the loom, which I'd planned to do over the summer.  I guess since summer is almost over, I should get started on those.   :)


August 14, 2018

More Colour Experiments


I did a few more low immersion dyeing experiments last week. I had some fibre reactive dyes which needed using up.  Dyeing protein fibres with fibre reactive dyes is a similar process as using acid dyes.  Slightly different percentages, and a bit of synthropol added to the mix.  Heat is needed to set the dyes on wool, rather than time as on cellulose fibres.   This multi-coloured batch is a bit larger than the others as well, as I had about 130 g of the same blend fibre left in 2 bags, which I combined. My main worry with this batch was the fibres were a bit crowded.  I had to be quite careful that the bottom layers of fibre were dyed adequately.   It turned out quite spectacularly for a random blend of colours.

I had enough old dyes for two experiments.  Then I took the time to mix up new dyes.   This is fuchsia and  turquoise.  It is 100 g, which seems to be a good amount in my pan for this type of dyeing.   It turned out quite lovely, with the bright but not glaring colours and gentle colour transitions.  I lay the roving in the pan in a zig zag fashion, across the narrow end of the pan and back again.  I poured the dyes on in layers or in rows, from lighter to darkest, in the pan, keeping the same back and forth motion with the dye application as I'd used with laying the fibre in the pan.  This one was fun to see take up and set.


 Oh, the brightness of this one.  This is for spinning on a dull, grey, winter day.   I used yellow and fuchsia, in random splotches.  It made my day when I pulled that out of the dye pot. 

The one below used fuchsia, blue and black.  It was also with the end lot of the old dyes.   I left a bit of white fibre on purpose for mellowing down the colours.   This is a blend which I'm betting looks awesome when spun.  I love to see how some of the fibre colours appear to change once they are spun.  The blending of the colours makes a lot of difference sometimes.

Today's experiment is solar dyeing.   Really, our weather in July was the prime time for solar dyeing, but I'm doing this at Westfield on Sunday, so thought a few experiments to show would be nice.  These two are using fibre reactive dyes.   I've also got food colours and the Kool-Aid powder that we found when my daughter and I were out fabric hunting in July.   I've lots of bits of fibre from random fleeces which I'm using.   
 I'll do up a post with a better explanation of the solar dyes, once I've got a few more samples.  The pink jar is leftovers from the last dye session and the multi coloured jar is just splashes of 3 different colours, applied to different areas of the fibre in the jar,  with a syringe


August 07, 2018

Random Shots of a Summer hike

Snapshots from a very short hike when it was way too hot.

It was interesting playing around with settings with the heat and the resulting haze.  The grey sky and the background which looked misty were odd as it was fairly breezy and the sky was cloudless.
 The breeze was bending these spent flowers around like crazy!  I was happy to get to play with faster shutter speeds.

 It was too hot for any wildlife.  We saw one bird and a single butterfly.  This was the turn back point, when the heat was starting to defeat us.

 One last shot before we headed to a nearby town for wonderful ice cream.   They had a gazillion flavours to choose from, including Moose Tracks. Yum!


August 03, 2018

More summery colour

Four red and grey scarves off the loom.    I was certainly happy to get these finally done.  I'd put them on 2 months ago and just couldn't find the incentive to get them done.   I'd tied on to the last warp and I'd been a bit iffy about whether I'd liked doing that pattern or not.   By the time these were off the loom, I knew for sure I'd done enough of that pattern.   They are a wool and silk blend. I used grey and a darker shade of red for the warp and a lighter shade of red for the weft, to try to add interest to the scarves both in appearance and for weaving them.     I'm not sure that it accomplished that aim.   However, I do know that I now have an awful lot of ends to twist.
I experimented with cake dyeing, another low immersion technique.  I tried to make loose cakes, but my ball winder is old and still very efficient.  I'm not sure it could have made anything looser wind on than this.

 I soaked the cakes of yarn in water for a good part of the morning.   Having seen the results, next time I'd soak the cakes over night.  When dyeing, I also forgot to give a nod to Loki, to whom I always acknowledge when I'm dyeing, just to be on the safe side.   With all this going against me, despite the dyed balls looking promising, I ended up with this.   There is a lot of white on this yarn, which I'm not sure I like.   Luckily my not so brilliant outcomes are far less than the good ones.  


My next experiment was using only blue and yellow dye.   This is what it looked like in the pot while it was still getting started.  It took a bit to get the green bits to exhaust, but after adding a touch more vinegar and more time heating, it all came together.
 The finished roving is just lovely, with a wide range of greens, with a touch of yellow and blue.  It should spin up nicely.


I dyed these Blue Faced Leicester skeins using the same low immersion techniques, using blue, red and black dyes.   There wasn't much black left, and I wasn't in the mood to clean the jar and make a fresh stock solution, so I left it as it was.  The colours turned out perfectly and the skeins are so enticing.  I want to slap them on the loom and weaving something with them, though I'm pretty sure there is just 200 g or maybe 250, so not really enough to weave with.
I finished spinning up the last batch of blue/purple low immersion experiment roving.   It spun beautifully and the colours are lovely.  I had thought that maybe the blue and red would be a bit more purplish when plied, but I'm extremely happy with the blocking and distinctive colours which happend in the end.   To show the difference in the two techniques, I've put  kettle and low immersion pan dyed yarns side by side.  The two bottom skeins are the low immersion dye and the the upper one is the last skein of Polar Vortex which I'd kettle dyed a while ago and just finished spinning,  I like them both.