Pages

Showing posts with label natural dyeing. Show all posts

June 21, 2026

Happy Summer Solstice

Our guild dye day was somewhat disappointing.   We had two options and you could do both.   Nature dyes, with 4 different pots and weak acid dyes, because you could easily paint a warp or a skein while we waited for the nature dyes to take.

I pre-mordanted all the wool for the natural dyes with 10% alum.  We had easily 2-5 times the dye materials to WOF ratios so there should have been lots of dye pigment available.  The only issue we really had was that there wasn't enough power to keep all the pots simmering on the hot plates.   The walnut dye went outside in the sun.  The madder ended up in a crockpot and the dandelions on a hot plate, which never got past a very low simmer.   The stinging nettle went inside onto a stove, was forgotten about and ended up bubbling gently and happily away.   Until this combination, we kept blowing breakers.   Hindsight being what it is, we should have moved another pot or two to the inside stove and left one on the hot plate in the garage.   Live and learn.    The stinging nettle was an experiment and I'm pretty happy with that colour.  It was a lovely green.  I left this one 48 hours before rinsing and it's a little darker than another sample that I'd seen which was rinsed shortly after being removed from the dye pot.  

I'm not sure what's up with Kevin.  I've absolutely never, ever seen him being silly.  He is a very proper kitty, who never seems to do anything to make me laugh.  He was waiting for me to turn the tap on.   He usually comes up to me and stares until I notice him and guess at what he wants.   He usually leads me around to various places in the house before ending up at his desired goal.   I'm guessing that he didn't want to play that game that day and just waited patiently.  While he likes to drink fresh running water, his water bowl was also full of fresh water.  When he's at the sink, he sort of gently puts his front feet in as little as possible to reach the tap, like it's some sort of great irritant.  He does squint his eyes at me if I don't figure out what he wants quickly enough though.


September 26, 2023

Fall Fair Weekend

 Last weekend I was one of the hand crafters asked to demonstrate their craft at a local Fall Fair.   On the Saturday I was asked to demonstrate spinning.   This is my display table.  The colour wheel is of nature dyed yarns.  Almost all of them were either harvested locally or grown in my garden, except for the Cochineal reds and a logwood purple.  The rest of the yarns were examples of different yarn structures or different fibres.   Sadly this is the only photo I took.  It was a lot of fun.  I talked with a lot of people and even helped a few gals with some spinning issues they had.  It's amazing how many people see spinning as "keeping a skill alive", and don't realize that there are many modern spinners out there, making miles of yarn.

On Sunday - and I wish I had photos- but I forgot to bring my phone or a camera.  On Sunday, a bunch of us got together to do a Sheep to Shawl demo.   The demo was nice because we didn't have to rush things.  It also allowed us to have a beginner spinner with us, who learned but was under no pressure to produce yards upon yards of consistent yarn.   We had a shawl warp on a table loom and 4 spinning wheels.  I also brought the same table cloth  (which is an old sheet) and the nature dyed colourwheel.  The colour wheel became a good talking point, which lead to the spinning and weaving.   And the loom became a talking point which lead to the wheels and the yarns.  The spinning wheels became a talking point which lead to the dyed yarns and the weaving.   We talked with so many people.  At one point, 4 of the 5 of us were talking with small groups of people.  There weren't many slow times, but mainly steady people through.  

The whole team was comprised of SCA members and we were all dressed in garb; mainly viking.  People commented on how good we looked (yay us!) and how right it looked that we were weaving and spinning.   I had to appreciate that people recognized that the skills were ancient but no one realized that our equipment was thoroughly modern!  Still, a good impression was made and many people were amazed and intrigued by what we did.  And nope, we didn't finish the shawl.  I think we got it half woven.  However we went in with the goal of education, and there was no need to finish.   Regardless, it was an awful lot of fun, with much socializing.  We took lunch breaks and saw some of the fair.  It was a very good day.   I'm a bit sad that I didn't get photos though.


May 30, 2022

Garden update and weekend dyeing - dyeing with a Y

 I feel like I've hardly done anything in the past few weeks.  I was scheduling classes and taking registrations for those classes for a Victoria Day weekend event.   The weekend came, I spent some time with friends I've not seen in a couple of years due to Covid.  A huge storm came through and flattened all the sunshades on the camping field, and a couple of modern dome tents.   We were in a cabin, so just had to deal with no hydro for 30 hours.   It came back on the evening before we had to pack up and leave!

Now I'm finishing up my class on Spinning to Weave, which is next Saturday.   It's a 2 hour virtual class.  I find virtual classes so much more intense than in person classes, so being over prepared is taking up all my time right now.  I'm not normally nervous about this stuff, but this time, yup, just a little.   All this has taken up my time to weave, spin and sew, which I'd normally have, which is making me feel unproductive, even though I know it's just a different productivity.   I like seeing a finished project.

My son got me this lovely blueberry plant for Mother's Day.   We went to a different nursery and all the plants were so much nicer than elsewhere.   He also added not one, but two gooseberry bushes.   Both were red gooseberries, but different varieties.  One is early and the other is mid-season and supposed to bear heavy crops of berries.   We'll see in a couple of years when they really start to give fruit. 

 I'm looking forward to those gooseberries, but also the blueberries.   We planted a few blueberry bushes a couple of years ago, but mostly they haven't really done well.   They were very small to begin with though as we hadn't found this nursery yet.   I will need to protect them in the fall because one had a bit of bunny damage.  They ate the tender tips off the bushes.    


This is the first Allium of the season.  I do love the deep purple flowers that are so early.  This one popped up earlier than the rest.  It's also in an area where hubby stacks the wood he uses for making maple syrup, so it must be hardy.


 Only about 4 more weeks of hockey!  Yay!   Enough said about that, but really hockey games shouldn't run until almost July.  Just sayin'!


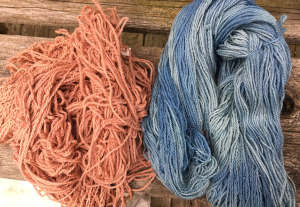
On the camping weekend, we had some natural dye classes.   The pink yarn is from a madder exhaust dye bath.   The blue is from an Indigo fructose vat.   I've never had the uneven dyeing from Indigo before.    I'm not sure why it happened.   Yarn was soaked before it went into the vat.  I did use several dips and having never done a chemical fructose vat, don't know if it had anything to do with colour stripping from it as the vat became exhausted.   We really used up the entire vat and there was no colour left.   The blue yarn is a skein of 430 yards of BFL superwash with nylon, which I spun up for sock yarn.


July 17, 2019

Singing the Blues

 I started the Japanese Indigo seeds in February, in hopes of getting some seed.  I planted it in the garden a bit early, putting it under plastic cloches from the dollar store.   I planted a couple of plants without the cloches to see what difference they really made.   The Indigo plants under the cloches were definitely happier, with more growth, larger, and noticeably more lush.   This enabled me to do a small dye vat the other day.   I cut 550 g of leaves and stems.   I took some of the leaves from the stems, but I'm not horribly careful about it.  It's a lot of extra work and I don't think it makes a lot of difference.

I set up a double boiler system with my dye pots, putting some water in the larger one and then setting the smaller one inside it.   This makes it much easier to keep the Indigo leaves from getting to hot.    I put the leaves in the pot and filled it with lukewarm water.   I use a candy thermometer to keep an eye of the temperature.   It needs to cook for about 2 hours, getting up to about 160° F, and no higher than 180° F.

Every once in a while, I stir and squish the leaves  to make sure every one of them gets time covered in the hot water.    It's also important to keep an eye on the water level in the larger pot, to make sure the water level doesn't drop too low.

When the temperature gets warm enough and is there for a bit, the leaves start to look a bit wilted and a scum forms on the top.   This is a good thing as you know the pigment is being released.  The scum is a brownish colour, sometimes with a bit of blue or green in it.

When the 2 hours of cooking time is up, it's time to drain the leaves into another pot.   Using rubber gloves, squeeze the hot leaves to get as much of the brown liquid as possible.  They are really hot, so I take very small handfuls, which are easier to squeeze out anyway.    The remaining leaves can be boiled up for a second colour, but I`ve only ever done that with Woad leaves.  Because the Japanese Indigo has so much more pigment, I`m usually ready to clean up when I`m done with dyeing blue.

Anyway, take the brown liquid and add some soda ash or baking soda.  You can also use ammonia, but it smells.  Baking soda works just fine.   Then you need to aerate the liquid by either pouring it back and forth between two buckets, or I use a dedicated stick blender.  It`s permanently dyed blue, so easy to know it`s not for blending foods.

When I`ve aerated the liquid from Woad plants, I usually get little specs of dark blue sitting on top of the foam.  With the Japanese Indigo, the foam often just goes a pale blue, greenish colour.

The final step is to add a reducing agent.  I use Thiourea Dioxide (Thiox).   It`s neat to watch the foam break down and disappear almost immediately after adding the chemical.  You can use spectralite as well, but thiox is available more readily around here.

You need to let the vat sit for a while while the air is worked out of the vat.  A metallic looking scum will form on the top and the vat will turn green or greenish brown when ready.

I had put some fibre in a tub to soak part way through the initial heating time, so it had been soaking for over an hour.   I put it in the vat, let it sit for a few minutes and then pulled it out, carefully squeezing out the excess liquid near water line, just as the fibre came out of the dye.  This supposedly helps eliminate excess oxygen getting into the vat.  

It comes out green and as the air hits it, it starts to turn blue.   If you want darker colours, you need to use multiple dips with airing time in between each dip.

Eventually, I ran out of fibre and the vat was giving lighter blues, taking several dips to get to where I wanted the colour.    Indigo doesn`t need a mordant.  Although it is a little bit of a fussy process, it`s fairly simple if you follow the steps put out in most of the natural dyeing books.  I like Rita Buchannans  A Dyer`s Garden.   Look at the pretty blues!


May 23, 2017

Fruits of Our Labours

I was away for the Victoria Day weekend again this year.   I go to FOOL or Fruits of Our Labours, an SCA event dedicated to teaching arts and sciences.    It's always lots of fun.  I always drag along a spinning wheel, but hardly ever have time to actually spin.  This year I got about an hour of spinning in but really nothing to bother even showing.

On Saturday though, we did some natural dyeing.  We mordanted with alum, iron and copper.   We dyed with ferns, cochineal, dandelion and bedstraw.   The bedstraw was disappointing in that it didn't give us any colour at all.   It wasn't quite flowering yet and the dye vat water was literally colourless after almost an hour of cooking.    It was quite cool and windy, and we were outside, so it's possible the bedstraw just didn't get enough time in the pot.   The cochineal vat though, was awesome.   We got beautiful pinks and purples.  There was much dye left in the pot and I sent it home with one of the people in the class.
The results from the fern dye pot were also disappointing.   I think that is my fault for allowing only 4 hours from start to finish and with the weather being cool and breezy, we just didn't have time to do it all in the outdoor class.   My previous results with ferns were soft but bright gorgeous greens.

We had results - some good and some not so good but still, we had results and those pinks and purples are really luscious.

Orla, one of the gals in our group is mundanely, a jewellery maker.  Her work is gorgeous.   Several years now, she's run an enameling class.   A couple of years ago, I made a little cloisonne pin.  This year I did an etched pin, based on an Anglo-Saxon original.  It's the one on the left which looks awful because it had just been heated to cherry red with the blow torch, to melt the glass onto the copper and it's just cooling down in this photo.   I ran out of time to get it finished, so it went home with the instructor and I'll fetch it at a later date.

There were a couple of other classes that I wanted to take, but with teaching on Saturday and the weather streaming down rain all day Sunday, I ended up not doing all I'd hoped.  Still, it was a great weekend and we've already started planning next year's event.


June 14, 2014

Spinning and more spinning

 My friend Kai went visit her family in Japan.  She brought me back this lovely gift of fermented Japanese Indigo leaves and the chemicals with which to process the dye vat!  I'm so excited about this.  I'm researching the how's right now because I don't read Japanese and the terminology in the translation of the instructions is different that what I normally use, so there is a bit of a disconnect with procedure.  It will happen though and it will be lots of fun.  Plus of course there is the research part, which is fun in itself.
 Merino in a colour called Beansprout.  It's very pretty and was easy to spin.  There was supposed to be 4 oz of it, but I'm wondering if there really is.  While Kromski bobbins are supposed to hold 4 oz, I've always found it to be completely full or even sometimes just a tad over full to get the full amount on.  This is just not quite there in my mind.  I'll weigh it after it is plied.  Yes, I'm going to ply it from a centre pull ball, and no I won't get any pig tails happening, because I've found keeping the tension even is all you need to keep pigtails at bay from any plying method.


More spinning, this time a Merino/silk blend.   Apparently it's supposed to be super slippery and hard to spin.  I've found that it drafts nicely and spins easily.   It's so pretty too, with a lovely mix of brown colours and the white silk.... and soft... lusciously soft.

Demonstrating spinning at the local Renn Faire on the school day.   My kirtle is too large by several inches around.  If I'd assembled it with opera seams as I'd intended, it would be an easy adjustment.  I like to write a little list of assembly steps when I make a garment.  However, I missed ready that particular item on my list of instructions and sewed the bodice together by rote, so instead, I'll have to rip the bodice half apart to make the adjustment.   It's way too much work for right now.  

April 04, 2013

Early Spring Blues

 I was outside today and noticed these true signs of spring.  Even though yesterday was blustery and snowy, today the world has transformed.    These are daffodils and possibly some hyacinths.  Nearby there should be crocuses growing but nothing this year.  I'm guessing that I'll have to replant this year.  I love crocuses in the spring.  One day I'd like to plants them all over the lawn for a wonderful spread of colour.  I've to hope that they'd grow before the lawn does though.
 Shibori samples!  There are more but they are paler in colour.  These ones I popped into the indigo pot this morning and started on chores.  I only remembered them after lunch, so they had a good long time to develop colour! 


The socks are done!  It's always a good thing to have a new pair of wool socks in the drawer.  I've been knitting and dyeing an awful lot of blue lately.  I definitely need a shot of some other colour right now.  Not that I'm complaining about the blue, because look at today's blue sky.  But I've been dyeing with indigo, weaving with indigo, knitting with indigo, the shibori is indigo and the socks may not be indigo, but they've indigo stripes.  I'm even rather fond of indigo blues, but  it's time for a project in another colour.  Maybe pink?    One can never have too many pairs of pink socks!

January 27, 2013

All dressed and no place to go....

I finally had enough yardage for the warp spun.  It was time to dress the loom.   I rechecked my WPI and decided to re-sley the reed at a slightly closer sett.  It really is a fairly quick process and only too half an hour or so.  Then I started winding the warp.  I needed 360 ends and over the afternoon I wound off a bout here and there, chained them up and stuck them on the loom.  I got 4 bouts wound off and realized I would be short enough yardage  to cause a problem.  So back to the wheel I went and spun, spun, spun  for several days until I got not only a charlie horse in my left calf but enough yardage to finish the warp and allow for broken threads.  I'm not expecting any threads to break unless I do something stupid, since I've needed scissors to cut most of them.

Kitten protection for the warp chains.
In between spinning sessions, I started tying on the warp threads.  It was here that I realized that I had a huge problem.  Those warp chains hanging from the front beam were giving the kitten a lot of excitement and me a lot of worry, as I had visions of chewed yarn.    I ended up tucking each warp chain in a plastic bag and tying it on the beam, tightly I might add to protect the warp.  Thankfully the kitten ignored the bags.    I will mention that tying on to the existing warp is somewhat tedious, but at least it's fairly quick tedium.
Sadly, a dressed loom but no weft dry enough to weave with!

I finished winding the last warp chain yesterday, tied it on and beamed the warp.  Despite my complaints about the tedious bit of tying on the new warp, the whole buisiness of dressing the loom seemed to pretty much sail along.  Once I got the knots through the reed, the rest of the process was pretty effortless.  I untied the cord which had been turned into a kitten toy - that was a good 10 minutes of fun - so that I could lash on the warp, thus saving a bit more of my handspun yarn.  

Then I started test weaving - fixing two crossed threads.  I test wove a couple of inches and was horrified.  It looked awful!   The grey of the warp and the beige colour of the weft were lifeless.  I even asked hubby to check it out, hoping he'd just say something about the light and make me feel better but his comment was "Gak, can you dye it"...  something I hadn't really wanted to do.  I'd spun up a pretty borderline amount of weft, not wanting to have yards of it left over.  Dyeing it means either spinning more or dyeing extra fibre.

Awesome, awesome, awesome, dark blue from an Indigo vat.
Today, I made up an Indigo vat and dyed away, knowing that I'd have to dye up a bunch of  sliver to have on hand for when I run out with 4 inches left to weave!   I got a perfect soft, denim blue on the skeins and the sliver.  I put in 100 grams of white merino mill ends to play with later.  When I fished them out, I also found a small skein of spun weft, which had sunk to the bottom and had been missed.  It was dark blue!  Luckily, I'd put only half the stock solution in to start with, so revamped the vat and redyed all my skeins and sliver.  I had enough dye left to do another batch of Merino.  I was trying to decide whether to worry about totally exhausting the dye vat, when I noticed the kitten playing with something... a skein of my weft, which had mysteriously "fallen" off the shelf.   I rescued it, quickly soaked it and dumped it into the Indigo, hoping that there was enough dye left to get it even close to the dark blue of the rest.   I was lucky.  Very, very lucky, especially since it was one of the larger skeins I'd spun.   So the blue is darker than I'd really wanted when I started with, but it's an awesome blue.  I'll have more than enough contrast and depth for the pattern and 200 grams of Merino in that awesome blue as a bonus!

Now I'm drying the yarn in front of the fire, in hopes of getting a little bit of weaving done. 


October 19, 2012

The Blues

I was in the garden, pulling out the tomato plants and putting the stakes away for the winter when I noticed my paltry little patch of Woad had finally started growing.  With the summer drought, it didn't grow much at all and I really didn't want to risk our well by watering the garden too much.   When I planted it, there was a row of regular Woad and a row of Chinese Woad, hoping to do experiments to see what the differences were between the two Woad varieties.  However, this year, there wasn't enough of either to do two decent dye vats, especially this late in the season, when sometimes the pigment isn't as strong as in the heat of the summer. 

 I grabbed a pot and combined the two types of Woad, picking almost every leaf I could find, in hopes of having enough blue to make this dye vat worth while.  I even picked the few Dyer's Knotweed leaves there were, knowing that it needs a slightly different processing to get the full value of the pigment it contains.  I was hopeful that it would add at least a little indigotin to the vat.  There were about 700 grams of Woad leaves to work with.


I use a fairly standard method for processing Woad leaves, similar to what is found in many dyeing manuals available today.  I soak the leaves in water which is very hot - I boil the kettle, turn it off and when it stops bubbling, I pour it over the leaves.  It took 2 kettles full of water to cover the leaves.  Then I let the leaves sit for about an hour.  I used to be precise about waiting 40 minutes but have found that approximately an hour is as good and much less worry.     After squeezing out all the liquid from the soaked leaves, I use baking soda (sodium bicarbonate) to make the solution alkaline.  The liquid then needs to be aerated, which I used to do by pouring back and forth between two buckets.  These days though, I use my craft stick blender, which is fast and easy.   The liquid is supposed to be a sherry colour, but mine was a dark icky brown.  The aeration causes foam.  Usually I've had a white foam and when the pigment starts to develop, you see it as blue specks on the foam.  However this foam was light brown and I never did get any flecks, although finally in a weird shadow, I saw a faint blue cast to the foam.  I picked up the stick blender to stretch for a minute and noticed that it was stained a much darker blue than before.  I decided that the pigment was there but the brown froth was masking it.   Two spoons of Thiox to start reducing the vat, and poof, I knew I didn't have too much too worry about.  The only question would be how much blue was in the pot?

I soaked 50 grams of Mohair locks.   When the vat had turned yellowish, I added about 3/4 of them.   I pulled them out a few minutes later and once again, I am always thrilled by the process of the air hitting the fibre and turning the yellowish colour a lovely blue.

After dyeing the rest of the Mohair, I dyed a bit of roving, another handful of Mohair and 2 silk hankies.  I'm quite happy with the results of this dye vat.  There was lots of blue in there and I completely exhausted the blue pigment.  It was a good day to dye!

April 18, 2012

Just a little update..

 The little quilt top is done.  It's a pretty enough pattern.  I'd thought that I'd have enough of the border fabric to use as backing, but I'm slightly short.  It will only take a metre of fabric, but I've nothing that looks totally right at the moment.  Horrors of horrors, but I don't feel like fabric shopping right now.    When I do get it backed and ready to quilt, it will be the perfect size to practice fancier machine quilting techniques.
The plum tree is blooming.   We had quite the frost last night, so no idea whether it will still be in flower this afternoon, but it is pretty for the time it lasts.   The tree is fairly wild, shadowed by Cedar and Maple trees, so doesn't get enough  light or nutrients to produce more than a few small plums, which are sour.   Still, it's a glorious sign of the beauty of spring.  I'm just happy that the pear trees haven't blossomed out yet.  The pears are edible and abundant.   I've been debating trying to make perry with them this year as we've had several large harvests of small pears.  However, the past couple of springs, I've done some pretty major pruning to the younger tree and maybe this year will be the year that we get not quite so many, but larger and easier to harvest fruits.  The old tree is very old and hollow.  I fear that pruning would stress it more than necessarily.  It will have to come down soon, but until then, the pears are a delcious, old and sweet Bartlett  type and too yummy to lose if not necessary.
Scottish Traditional Dye samples by Margaret Stalker
Two nights in a row I've been to guild meetings which were energizing and inspiring.   The first was a new guild that I joined.  I've been debating this for a while as it's a bit of a long drive to get there but they are such an exciting and active group of people, that I finally broke down and joined.  The program was mechanical sock knitting machines, which was well presented but not quite an area of my interest, but the people and the projects presented were awesome.    Last night at my home guild, we had Margaret Stalker in, speaking on Traditional Tartan dyes.  It was more than fascinating.  It makes me want to veer off into deeper dye studies , play with tweeds and tartans, spin, dye and weave.

December 08, 2011

Bits and Pieces

It's been an odd week, but a busy one.  We've had a lot of rain -thankfully rain and not nearly as much snow - but so much rain that it's just been puddling, with standing water all over the place. It's been quite funny watching the chooks decide whether they thought the puddles or the snow was the lesser evil.  Most decided wading was better than the snow - funny birds.

I finally rinsed out the solar dyed fibre experiment .  Well, mainly rinsed out.  The excess dye just kept coming and I was starting to be concerned about fibre felting.   The colours in the photo are just a tad more saturated than in real life.   I'll have to do more research into Lac recipes and how to get red instead of purple.  I can get those purples with Logwood and Cochineal as well.  Good reds are much more difficult to find.  The Madder though, yielded a nice red colour with the solar dyeing.

I've started quilting my daughter's quilt.  The centre log cabin blocks are stitched in the ditch.  The bulk bamboo batting only had washing instructions, (wash after quilting) and no quilting instructions.  From doing a bit of web research, it seems that a number of the bamboo battings need to be quilting no further than 2-4 inches apart.   I decided to go with the 2 inches, just to be safe.   It was easy with the blue quilt as all the stitch lines were 2 inches apart.   The wonky log cabin blocks are fine as they are narrower than 2 inches, but the wonky stars in the corners needed a little more fussing with as the odd shapes have somewhat less equal dimensions.   It's going to take a little longer to quilt this one up, but it's still a lot faster than hand quilting.


The cat is undicerning about what quilt he sleeps on.  He did however choose the quilted blue quilt over the plain log cabin top.  Once the layers were together, it no longer mattered to him, which quilt he occupied.    He seems to like sleeping on the treadle sewing machine when it's open.  He can survey the room easily and still gets the heat from the woodstove!

I wound off a new warp for some tea towels with 2/8 cotton.   I'd been dithering over 3 different projects.  I printed out the specs for 2 of them and decided on project number 3.  I proceeded to wind the warp for project number 1.   It's not so bad, but of course my excitement to quickly dress the loom has slightly faded.  Mainly though, I realize that getting the quilt finished has to take priority.  Once it's done, I have several little project bags to make as presents and then I can dress the loom.at my leisure.

The dark blue fibre which I've been spinning on the Mazurka is almost finished and the bobbin is just about full.  I thought I had another lot of the dark blue, but all the other blues I can find are substantially lighter in colour.  I may  ply this with a lighter blue of a similar weight.    We'll have to see what I can come up with.  It's a little to fine to ply back on itself.  I find that with the singles are very fine, self plying tends to end up with tangles unless one is very careful.

In other news, I may never get a chance to keep my new white mittens clean.  I've put them in a safe spot and cannot find them anywhere!  I'm quite sad about that.

September 29, 2011

So Far This Week

I've finished spinning up the superwash Merino, Sari Silk, Icicle blend.  I'm quite happy with it.  The large skein has 220 yds, while the small one has another 60 yds.  That's the yardage based on the niddy noddy count.  I've no idea what to do with this pretty yarn though.

I cut and sewed up 2 tote bags.   They are a little fussy because they are fully lined and have pockets.  I will say though, that these are the 3rd and 4th bags I've made, and they have gotten a fair bit faster to make than the first one.  It's nice that they are completely machine sewn.  I make them out of sturdy material, although the one with hearts is just a plain quilting cotton, interlined with Pellon interfacing to give it the needed umph to make a good tote bag.  It's a nice size bag, so having an extra one around is useful.  One is for me and the second is for a gift.


The first dye vat for the embroidery wools was Coreopsis Tinctoria.  With only an alum mordant, in the pot at that, not pre-mordanting like I would normally do, yielded this lovely soft orange.  How pretty is that?  I'm thrilled with the colour and will definitely plant this variety of Coreopsis again.

July 27, 2011

Coreopsis

Coreopsis Tinctoria plants
Some years ago, in the spring, I travelled around to both main stream and more specialized garden centres looking to establish a dye garden.  I had in my hand a list of suitable plants with both their common and Latin names, so as to be able to easily find exactly what I was looking for.  It was a somewhat difficult task.  Many mainstream garden centres had front of store staff with little knowledge.  The more specialized garden centres  just didn't carry many of the plants  I was looking for, although they had a few of them. Several referred me to Richter's Seeds, as the best place for me to find what I was looking for.  They were right.

Coreopsis Tinctoria
I've had great luck with many dye plants over the years, but the one that has eluded me is Coreopsis Tinctoria.  I've found a great number of varieties of Coreopsis out there but never actual Coreopsis Tinctoria.  Tinctoria usually means that the plant will have very good dye properties.  I'm thinking that the current trend to low maintenance, highly hardy perennial gardens may discourage plants like Coreopsis Tinctoria, since it's an annual.   The only place I'd been able to find them was Richter's, which indeed does have a more than amazing selection of wild flowers, herbs etc.  I would highly recommend them as I've had spectacular service from them over the years.  I've had problems in the past with getting Coreopsis Tinctoria seeds to actually germinate and if they do, staying alive long enough to get them in the ground.

Coreopsis Tinctoria all red mutant flowers
This year, my Coreopsis seeds germinated beautifully.  Not so in the past, but research suggests that they actually germinate in the fall and overwinter as rosettes, before flowering in the summer.   I'll plant next year's crop this fall to see if it works.   However, I got seedings this spring. They survived and I stuck them in the ground.  They loved our nasty, cold, wet spring and they flourished.    They are a bit leggy, with delicate leaves and pretty bi-coloured flowers.  Each morning, I pop out and pick all the flowers which are fully opened, tossing them in the freezer for future use.  I will leave a few flowers to go to seed, for next year.  Several Two of the flowers have virtually no yellow on them.  The petals are the deep red/burgandy colour of the centres.   I'm also letting these go to seed and planting them separately.   If they carry on the burgandy colour to their offspring, it would be interesting to see if there is a colour difference in the dye.

Some variety of perennial Coreopsis
I've some perennial Coreopsis in the garden as well, both a double and a single flowered type.  I'm also collecting these flowers to use as a comparison with the Coreopsis Tinctoria to see if it is worth the extra effort.     Regular Coreopsis give yellows with alum and oranges with iron mordants.   Coreopsis Tinctoria is supposed to give deep, rich oranges with only alum.   I guess we shall see later this summer when the plants stop flowering and I have enough stored flowers with which to dye.

I treat my dye plants as I would any other crop plant I grow.  When the fruit or in this case the flowers are are ripe, I harvest them for the purpose.  I won't wait until the flowers dye back  in case it lessens the pigment. Instead, I have flowerless dye plants.  I was once told, that this was a little odd.  However that is the purpose that I grew the flowers for, so I use them that way.  Anything else would feel odd to me :)

July 24, 2011

Solar Dyeing Addendum

I was thinking about Helen's comment about how she uses glass jars and sometimes leaves them as long as a year.   I realized that perhaps climate has something to do with the methods we choose when using similar techniques such as solar dyeing.    Our winters are on the harsh side.   They are cold and can be long.   Our first frosts come in September.  We can have snow, which stays as early as November.   I have a high/low thermometer in the greenhouse and during the winter, there is little advantage even there.  If it is -15C outside, it is -15C in the greenhouse. I've only vaguely thought about using glass jars.  Large ones are hard to find these days and I would have to bring them inside during the winter.  If I were to leave a full glass jar outside, it would likely crack from the frozen liquid expanding, unless I was certain to leave enough space in the jar.  Even then I'd worry about it just from the freezing and thawing that might take place at various times, from temperature fluctuations.

   Even our summer weather can be erratic.  We're having extreme and unusually hot weather, but often we get very warm days and cool nights.  I was doing some Indigo fermentation one year, starting early in June to take advantage of a few really early, warm days.  I had 2 white buckets and one which was blue and white.   After the 2 warm days, I noticed that the water in the buckets had cooled down noticeably.  The outside of the buckets were almost cool.     In thinking about this, I sat down on some plastic bags of top soil and compost and found that it was hot, very hot in places, which were the black writing.   I immediately spray painted my buckets black and a few hours later, the water was steamy warm.   I'll have to do some checking on water temps.  

Bettina -  my regular old water is well water.  Our water is fairly heavy in iron, so we filter it somewhat.  Not sure about the hardness factor.  I don't think it's super hard, but at least is free from chlorine.

July 21, 2011

Solar Dyeing Experiments

A couple of weeks ago, I had this urge to do some dyeing.   It's been so hot though, that there is no way I want to do it inside and sitting by a fire, in the blazing sun, when it's this hot out,  just didn't seem like a lot of fun.  I checked the cupboard and sure enough, my tin of black spray paint was there.   I grabbed a couple of empty, kitty litter pails and spray painted them black.  I added water from the garden hose.   The hose is long and the sun heated the water in the hose to about 130F., which filled the first bucket completely with a bit left for the second bucket.   After they were filled, I checked the temperatures.  The second bucket was at about 90F, after cooler water started running in the hose.


I decided to use extracts because I had some which I don't really use and they were probably at that needing to get used stage.  I added some Madder extract and Alum to the one bucket and some Cochineal extract and Alum to the second bucket.   I left the buckets sit in the sun for a bit while the extracts dissolved.  A bit later, I tossed in some pre-wetted Shetland fleece.  I've gently stirred it twice a day.  It certainly isn't instant gratification, but it's been an interesting experiment.  My previous solar dyeing experiments have all been Indigo fermentation vats.  

I'm not fond of Cochineal extracts because I've only ever gotten purples and pinks with them.   I'd have added some cream of tarter in hopes of pushing the colour to the red spectrum, if I had any.  I didn't feel like taking a trip to town just for cream of tarter.   The Madder started of a dull orangy brown but the reds are starting to show through.  So far in my experience, Madder goes toward the orange end with slightly acidic conditions.  I wonder if it is too late to toss in something to push it a bit alkaline?

I'll keep stirring and checking the colour twice a day until I get something I am happy with and then rinse, rinse, rinse.

June 06, 2011

Dyeing with Cutch

On Sunday, I dyed yarn for the warp which had me stymied.  I found  some yellow which had previously been dyed with Yellow Bedstraw.   It was for a sampling project and is leftover.  It's pretty close in size to the Harrisville Shetland I'd wound off and I had enough of it to finish the warp and probably do the weft of at least one of the projects.  I didn't want it yellow though.  In my stash of supplies there isn't a lot which will produce brown.   I have a few Oak galls, but not enough for this quantity and they'd require crushing and soaking.  Walnuts I normally just harvest in the autumn.  There were two little bags of Cutch though and I'd never tried it before.    It was interesting researching this dye because depending on where you check, it is suggested you use a 20% - 400% dye to fibre ratio.  That is a huge range!   I ended up using 50% Cutch by weight to the yarn and then added a second skein in for an exhaust dip.  Interestingly, they are both very close in colour.  The exhaust vat dyed yarn will be weft.

First, I weighed out the yarn and had 2 skeins, weighing 100 grams each.  I then weighed out 50 grams of Cutch resin.  It was actually 53 grams but I wasn't worried about precision with this experiment.   It seemed better to err on the side of a bit more dye than less I filled a dye pot with water.  I used the outdoor hose and it was well water.  


 Both skeins of Yellow Bedstraw went into the pot to soak while the fire was started.

I decided to dye outside for several reasons.  Cutch is supposed to time to dissolve and then the colours are reputed to be be stronger, with more undertones with long soaks.   It was hot outside and I didn't want to have the stove on all day.  We have lots of scrap firewood kicking around so keeping a fire going all day, wasn't going to be an issue.

The soaked skeins came out of the pot, the water was topped up and the Cutch added.  The pot was set over the fire and cooked until the crystals dissolved.   Then the first skein - wound warp was popped in and cooked for a few hours.   Then I added the second skein and cooked the two together.   The water did get warm, but never boiled.  It simmered over the fire from just after breakfast until supper time, when the pot was removed from the fire and set to cool.

I left the pot outside all night.  After much rinsing, this is what the final colour is.  I'm quite pleased as it will look very nice with the other two colours of the warp.